CV Intelligence
CV Intelligence (CVI) is a set of AI-assisted features built directly into ClearVantage. Each feature reads data that already exists in the ClearVantage database, sends a focused summary of that data to a secure AI service, and returns something staff can act on immediately: a member profile, an account overview, an event briefing, a search query, or an email draft.
CV Intelligence features are recognizable throughout the application by their gradient buttons.
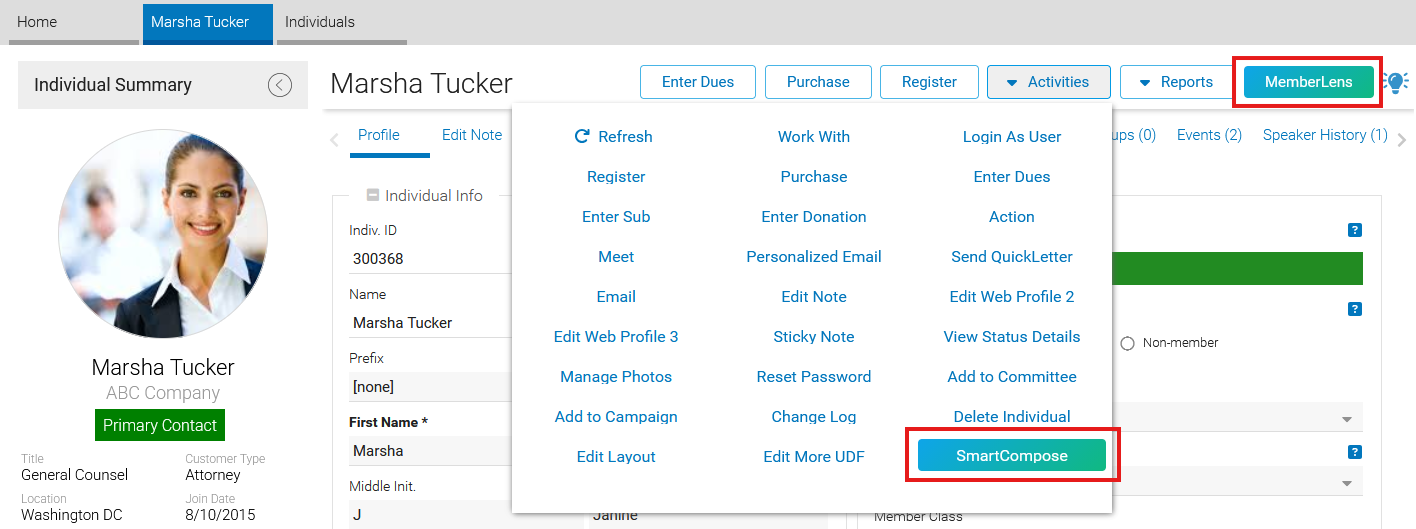
The following features are available:
-
MemberLens: An engagement overview for an individual, generated from the member's membership, event, committee, transaction, and donation history. Available from the Individual Notebook.
-
OrgLens: An account overview for a member organization, including contact counts, subsidiary activity, and speaker history. Available from the Organization Notebook.
-
EventLens: A pre-event briefing or a post-event analysis for a single event, depending on whether the event has started. Available from the Event Notebook.
-
ClearQuery: A plain-language search builder. Staff describe the list they want and ClearQuery assembles the equivalent Power Query criteria. Available from the Individual, Organization, and Master Certification lists.
-
SmartCompose: Two personalized email drafts for an individual, written for a selected purpose such as a renewal reminder or an event invitation. Available from the Individual Notebook and directly from a MemberLens recommendation.
Warning
CV Intelligence must be provisioned before any related features become available. For more information, please contact your Euclid Support Analyst.
Getting Started Checklist
Use this checklist to prepare for CV Intelligence. The remainder of this guide provides more information about each step.
Provisioning
-
Contact the Euclid Support Analyst to enable CV Intelligence for the organization.
-
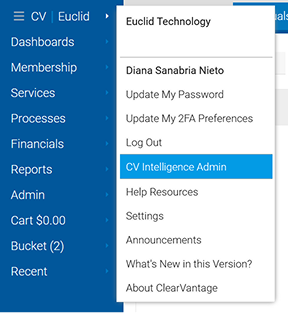
Confirm that CV Intelligence appears in the "CV | Euclid" main menu for at least one administrator.
Access
-
Decide which users need to have administration permissions for CV Intelligence.
-
Decide which users need to use CV Intelligence features.
-
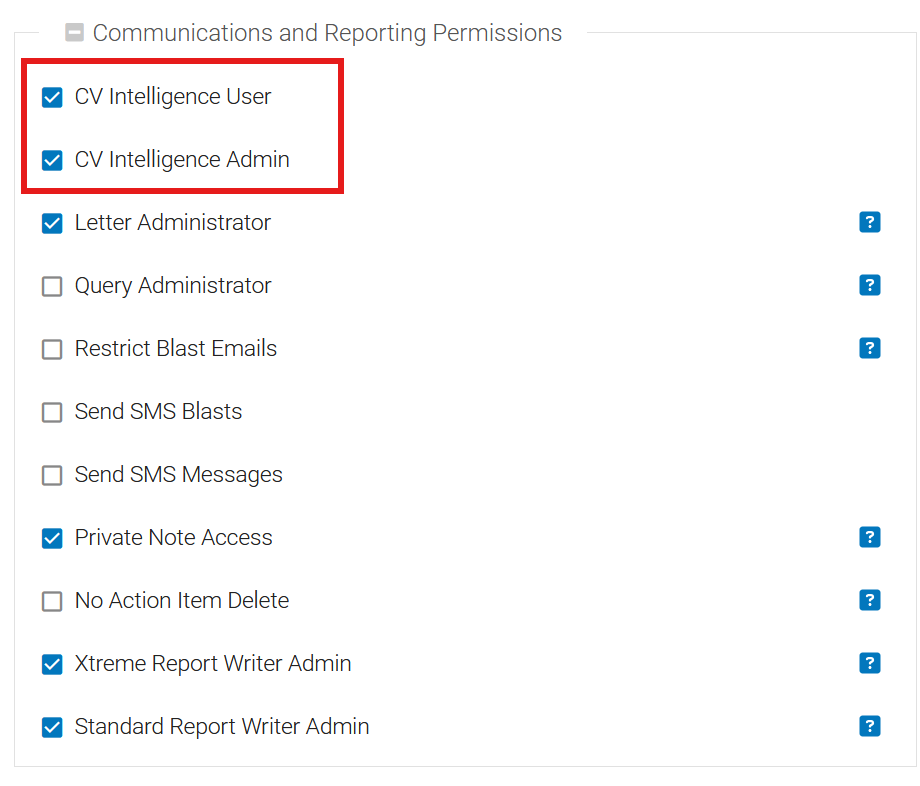
Assign the "CV Intelligence User" and "CV Intelligence Admin" permissions accordingly.
Feature Configuration and Activation
-
Review the feature list in the "CV Intelligence Admin" screen and switch off any features the organization doesn't intend to use.
-
Enter custom instructions for each feature so summaries reflect the organization's terminology and priorities.
-
Review the data included in each packet and disable any sections that are not relevant.
-
Brief staff on reviewing AI output before acting on it or sending it.
How CV Intelligence Works
Understanding the request flow makes the configuration options and the occasional error message much easier to interpret.
-
A staff member clicks a CV Intelligence button.
-
ClearVantage creates a data packet for the request. Depending on the action being performed, the packet may include information about the member, organization, event, or search structure. The packet is built from the data in ClearVantage and is controlled by the packet options described in the Configuration Tab section.
-
The packet and a set of instructions are sent to the AI service. The instructions include any custom instructions saved for that feature.
-
The response is stored in ClearVantage and displayed. For MemberLens, OrgLens, and EventLens, the response is also saved as history.
Requests typically complete in a few seconds. Longer requests display a progress indicator while the response is generated.
Data Sent to the AI Service
CV Intelligence deliberately limits the personal information included in each data packet:
-
MemberLens: Identifies the member by first name only. Last name, email address, phone number, mailing address, and date of birth are never included.
-
OrgLens and EventLens: May identify individuals by full name when they have a direct relationship to the subject of the packet, such as event registrants, attendees, committee or board members, or speakers. Contact information remains excluded.
-
All other packet content is non-identifying. For example, amounts, dates, counts, status codes, event names, and product names.
Custom instructions and packet options should not be used to add personal information beyond this policy.
Note
CV Intelligence is not available in training or test databases. CV Intelligence buttons are hidden and requests from a test environment will be refused.
Reviewing AI Output
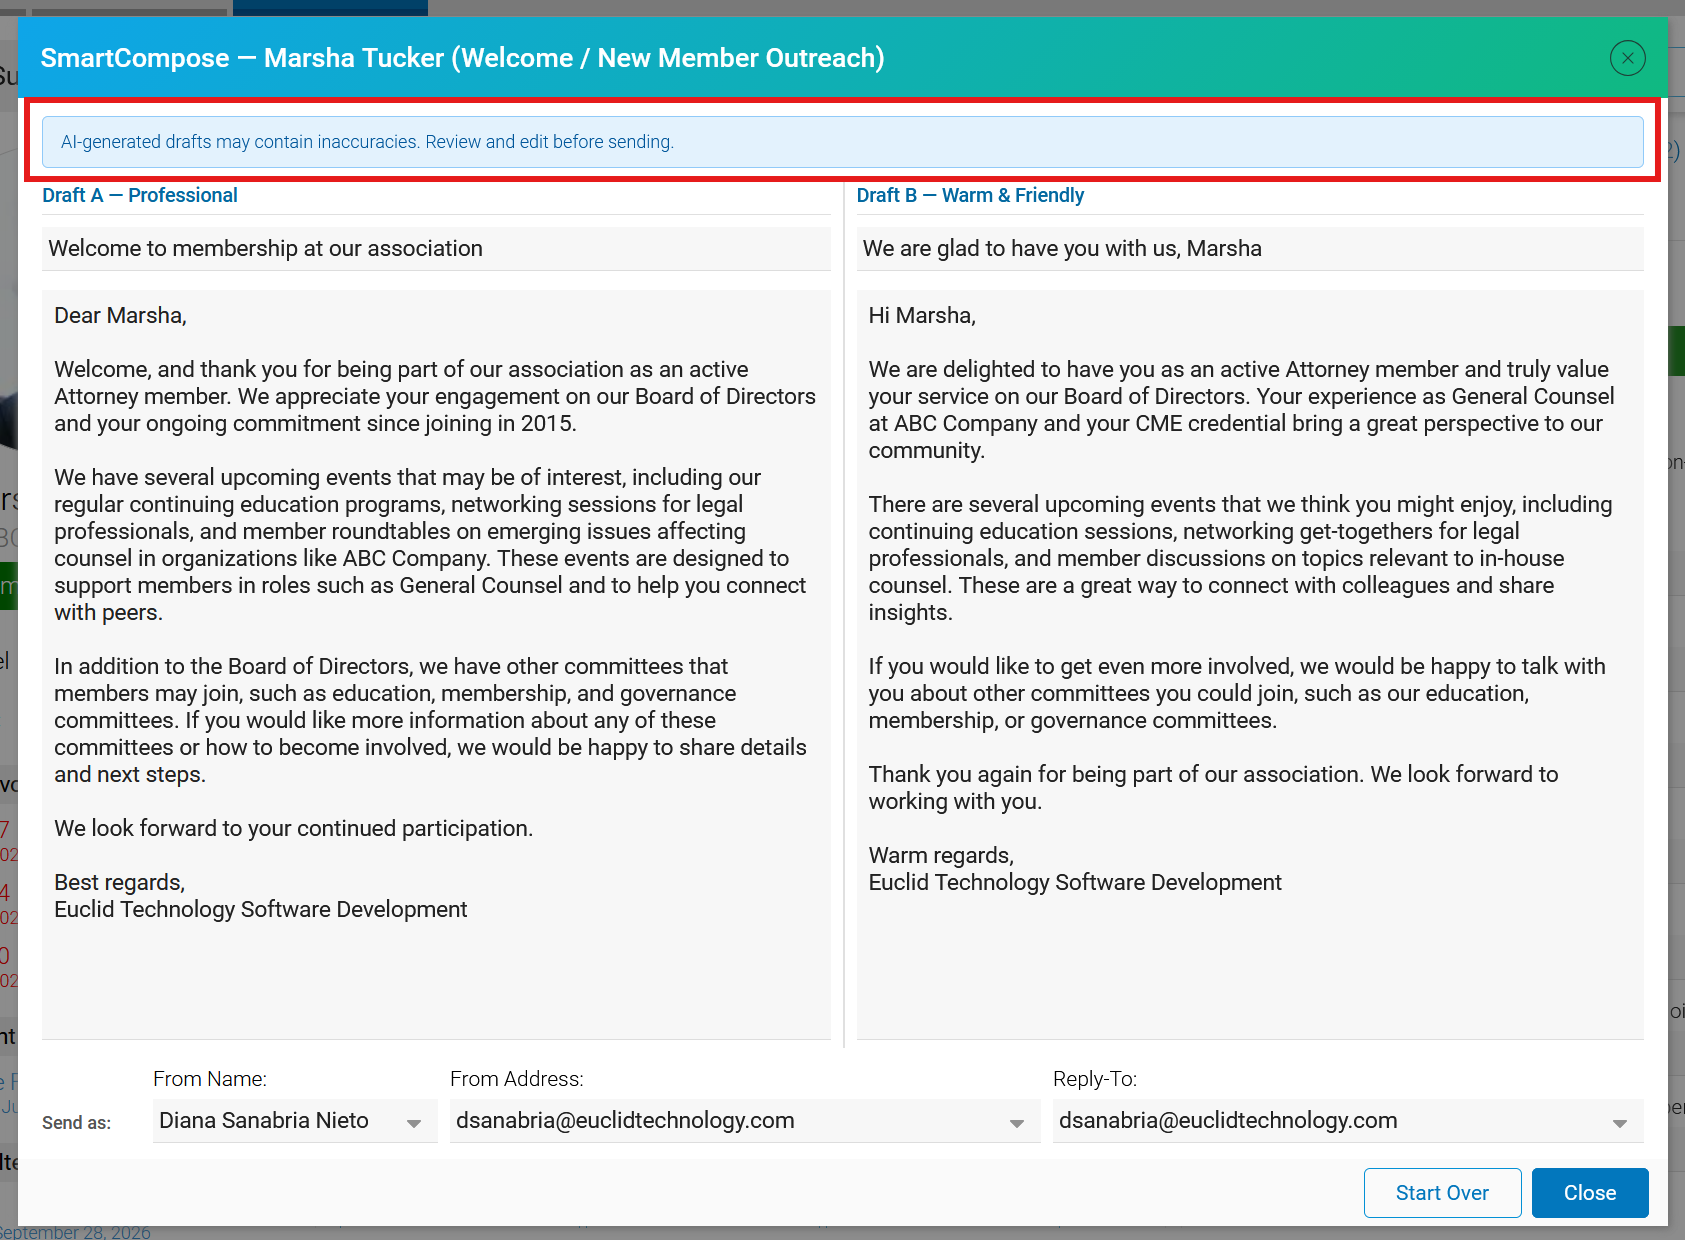
Every CV Intelligence result carries a notice reminding staff that AI-generated content may contain inaccuracies. Treat every result as a starting point:
-
Verify figures, dates, and balances against the member, organization, or event record before acting on them.
-
Read email drafts in full and edit them before sending.
-
Review the criteria ClearQuery produces before relying on the resulting list.
Metered Usage
CV Intelligence activity is metered. Each request consumes a share of the organization's monthly allowance, which refreshes at the start of each cycle. Administrators can monitor consumption at any time from the Usage Tab.
Two behaviors follow from this and are worth knowing before enabling the features for staff:
-
Saved results are free to view: Opening MemberLens, OrgLens, or EventLens displays the most recent saved result without generating anything new. Only "Generate" and "Regenerate" create a new request.
-
Replayed ClearQuery searches are free: Running a recent search again from a suggestion card reuses the criteria that were already produced.
When the monthly allowance is exhausted, CV Intelligence features report that insufficient tokens remain for the cycle and no request is made. Contact the organization's CV Intelligence administrator, who can review consumption in the CV Intelligence Admin screen. For more information, see the Usage Tab section.
Availability and Permissions
Access to a CV Intelligence feature is governed by three layers of access control. All three conditions must be met before the feature is visible to a staff member.
| Layer | Scope | Controlled by |
|---|---|---|
| CV Intelligence is provisioned | Whole system | Euclid Support |
| The individual feature is switched on | Whole system, per feature | CV Intelligence administrator, in the Features Tab |
| The staff member holds the CV Intelligence permission | Per user | User or role administrator |
User Permissions
Two dedicated permissions determine what each staff member can do. They are located in the "Communications and Reporting Permissions" section of the user record. A user may be assigned one, both, or neither.
| Permission | What it allows |
|---|---|
| CV Intelligence User | Use the AI features: generate MemberLens, OrgLens, and EventLens summaries, build ClearQuery searches, and generate SmartCompose drafts. |
| CV Intelligence Admin | Open the CV Intelligence Admin screen to monitor usage, switch features on or off, and configure each feature. |
For more information on assigning permissions, see the Users and Permissions guide.
Note
The "CV Intelligence Admin" permission does not grant the ability to generate AI results. A staff member who administers CV Intelligence and also uses it needs both permissions enabled.
Feature Availability
An administrator can switch each feature on or off independently. When a feature is switched off, it is hidden for every user. Its buttons, notebook fields, and panels are removed everywhere they appear. For more information, see the Features Tab section.
MemberLens
MemberLens produces an engagement overview for a single individual: a short narrative summary, a set of recommended next steps, and a list of upcoming dates or risks. It is intended to answer "what should staff know about this member before contacting them?" without requiring a review of every tab in the notebook.
Accessing MemberLens
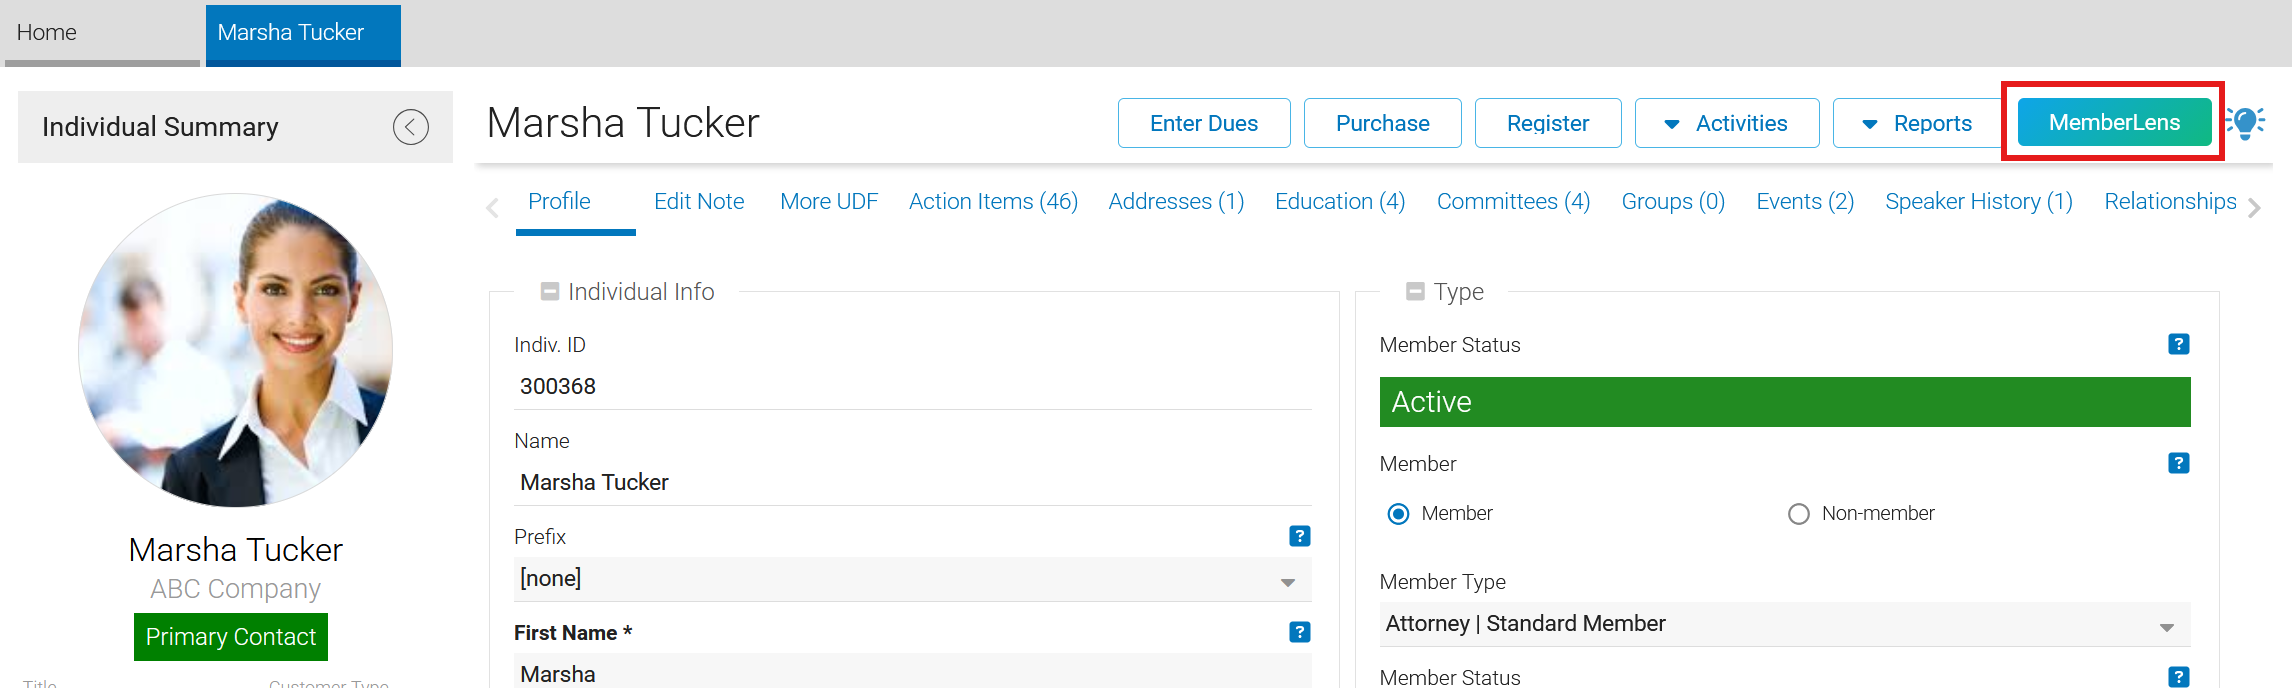
Open an individual notebook and click the "MemberLens" button in the notebook toolbar.
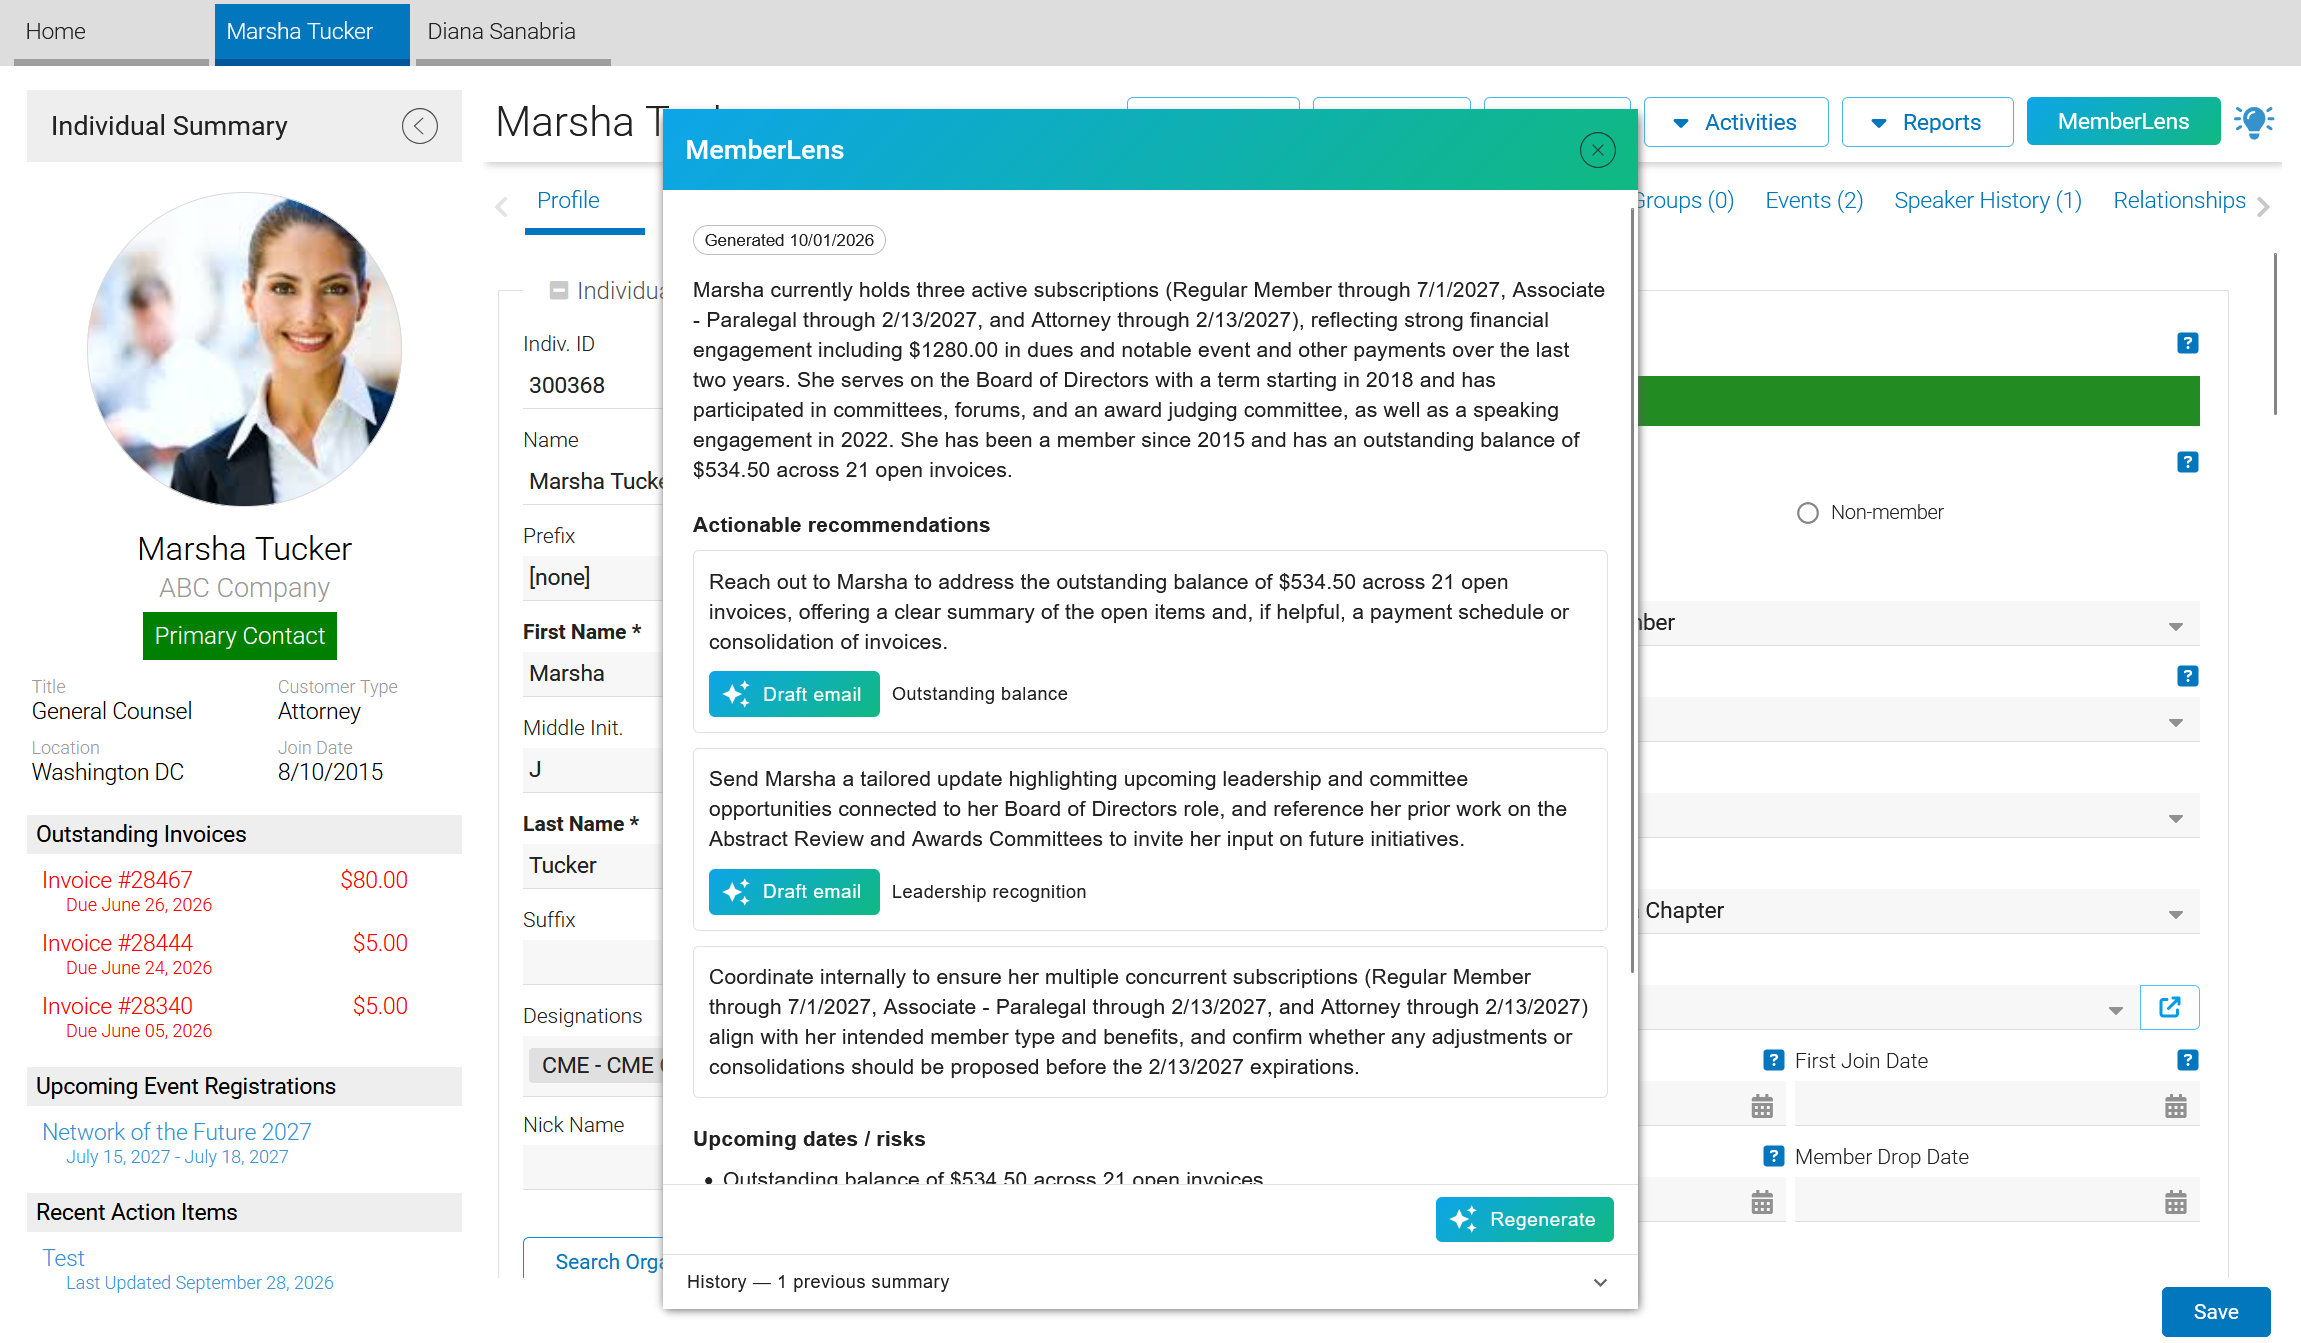
MemberLens opens as a floating panel attached to that notebook. The panel can be left open while working elsewhere in the application.
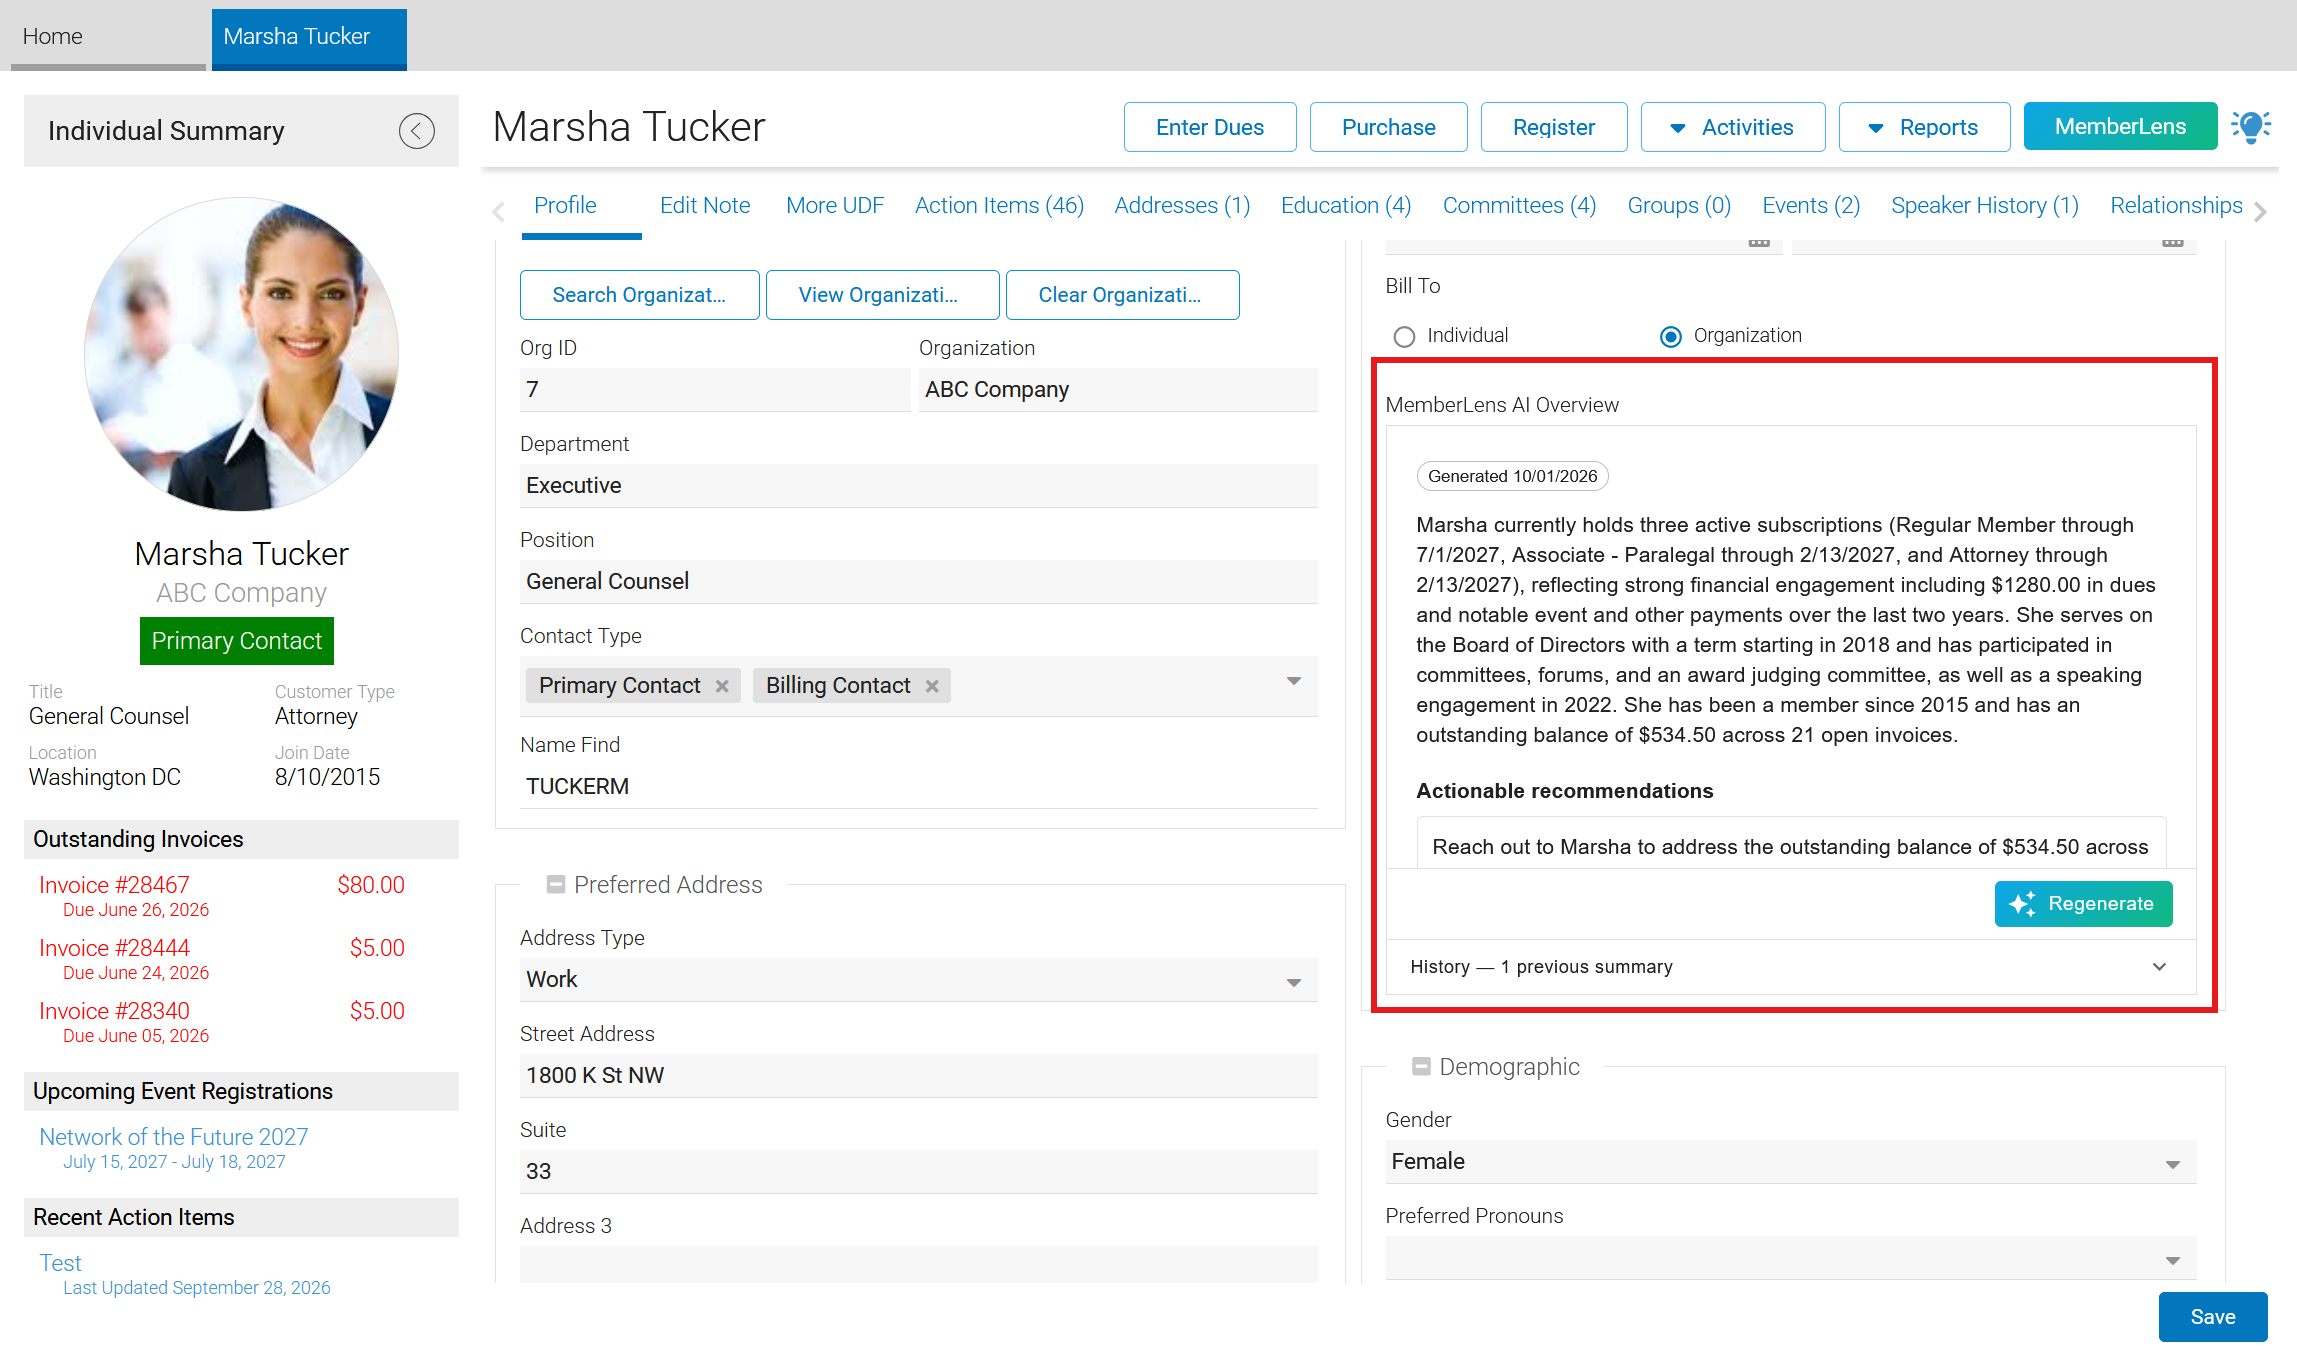
A MemberLens panel can also be embedded directly in the notebook layout, so the current summary is visible without opening a separate panel.
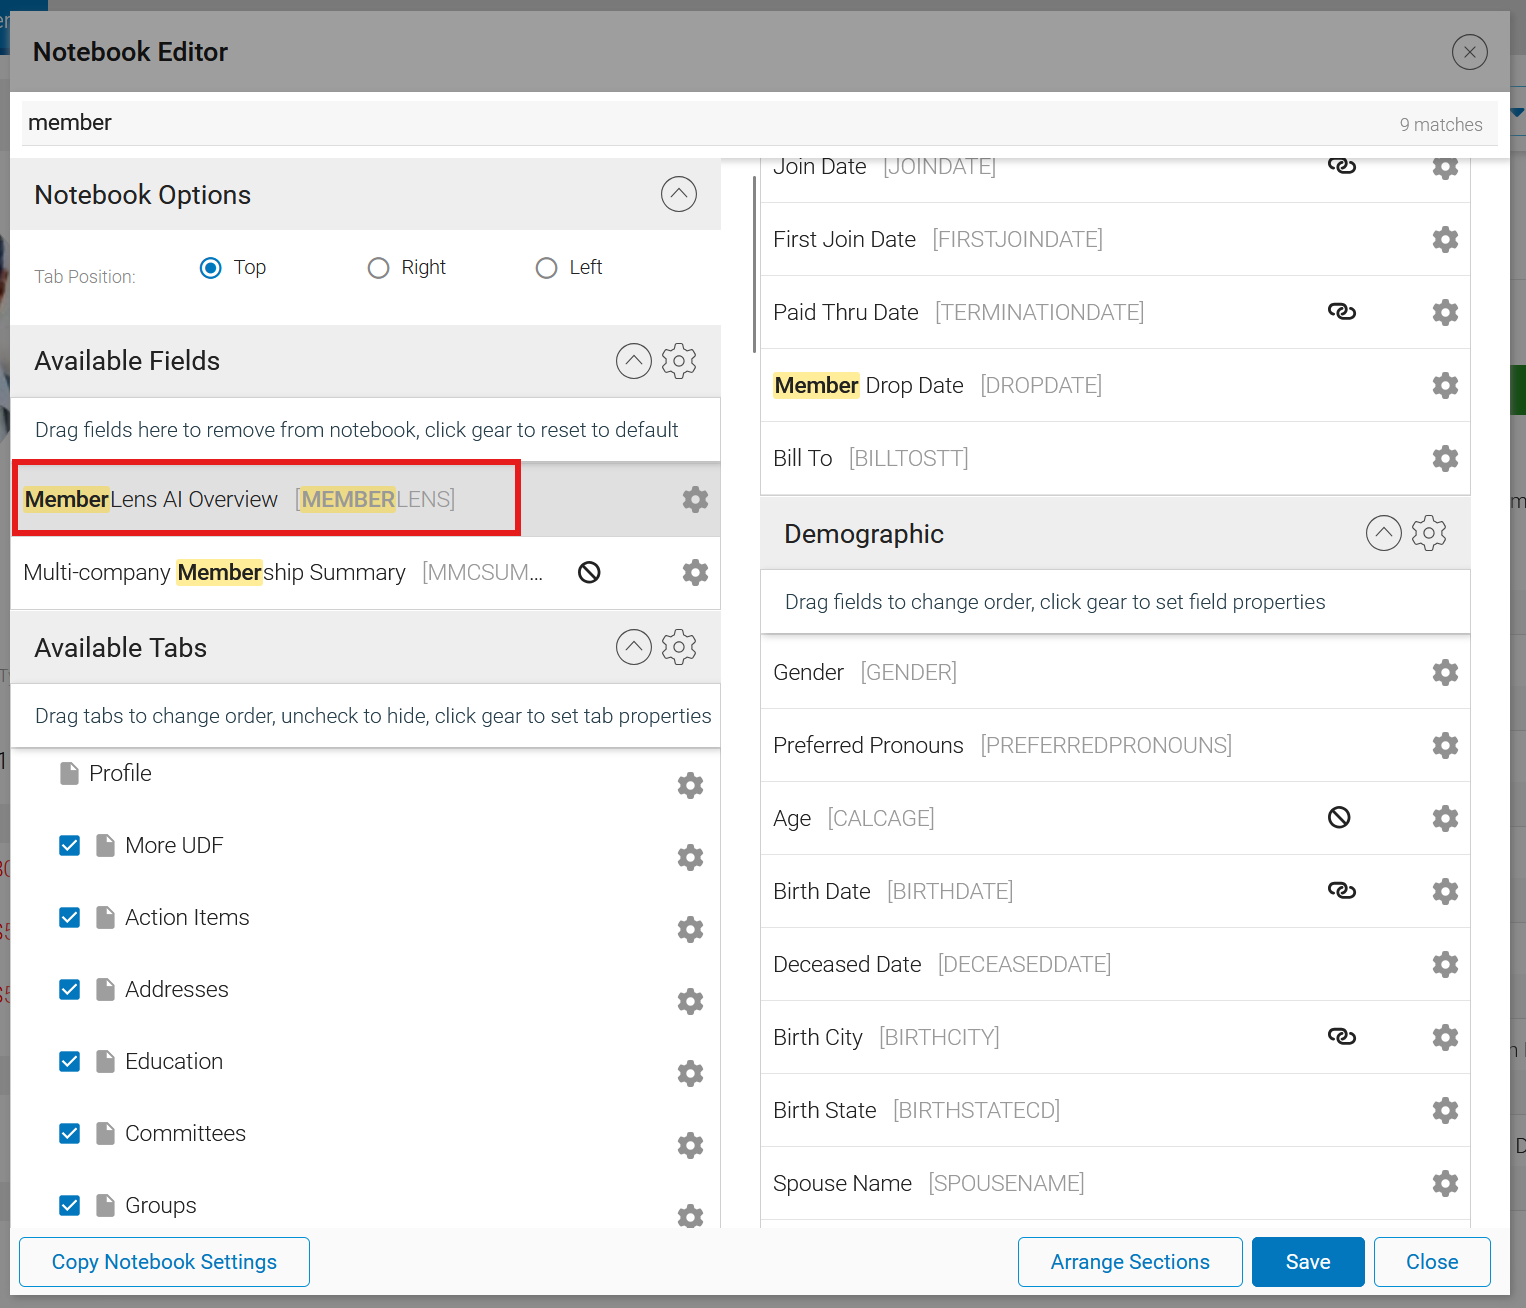
To add the "MemberLens AI Overview" field to the notebook layout:
-
Click the "Activities" button and select "Edit Layout" to open the Notebook Editor.
-
Find the "MemberLens AI Overview" field from the "Available Fields" section.
-
Drag and drop the field in the desired location to the right of the Notebook Editor. For more on how to edit notebooks and add fields, see the Notebook Editor guide.
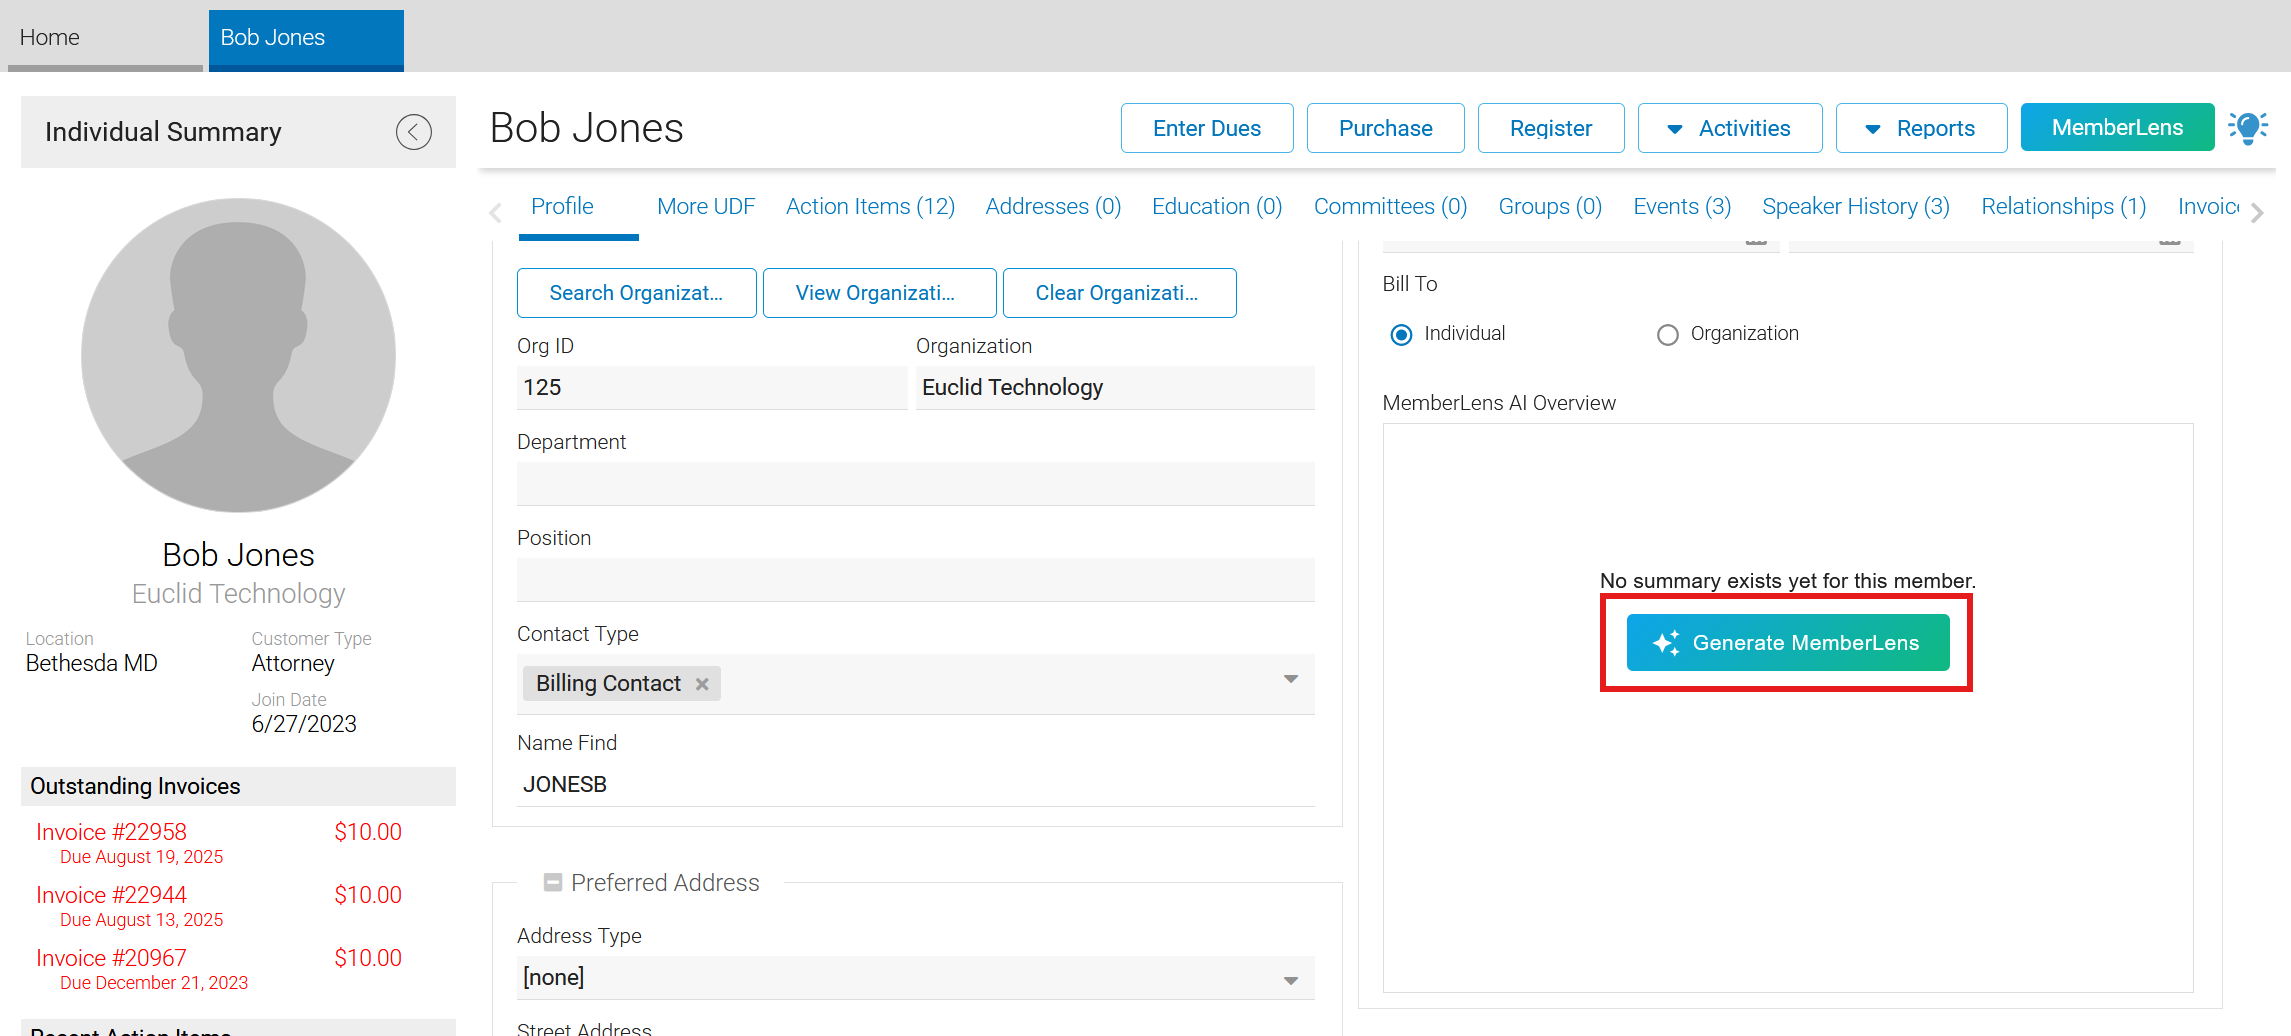
When no summary has been generated for a member, the panel shows "No summary exists yet for this member" along with a "Generate MemberLens" button. Click the button to generate the first summary.
Generating and Reading a Summary
A completed summary contains three parts:
-
Summary: A short narrative paragraph covering the member's engagement level, financial value, and length of membership.
-
Actionable recommendations: Two to three specific next steps for staff. Each recommendation is displayed in its own box.
-
Upcoming dates / risks: Notable dates and risks drawn from the data, such as an approaching renewal, a lapsed subscription, an outstanding balance, or a drop in giving.
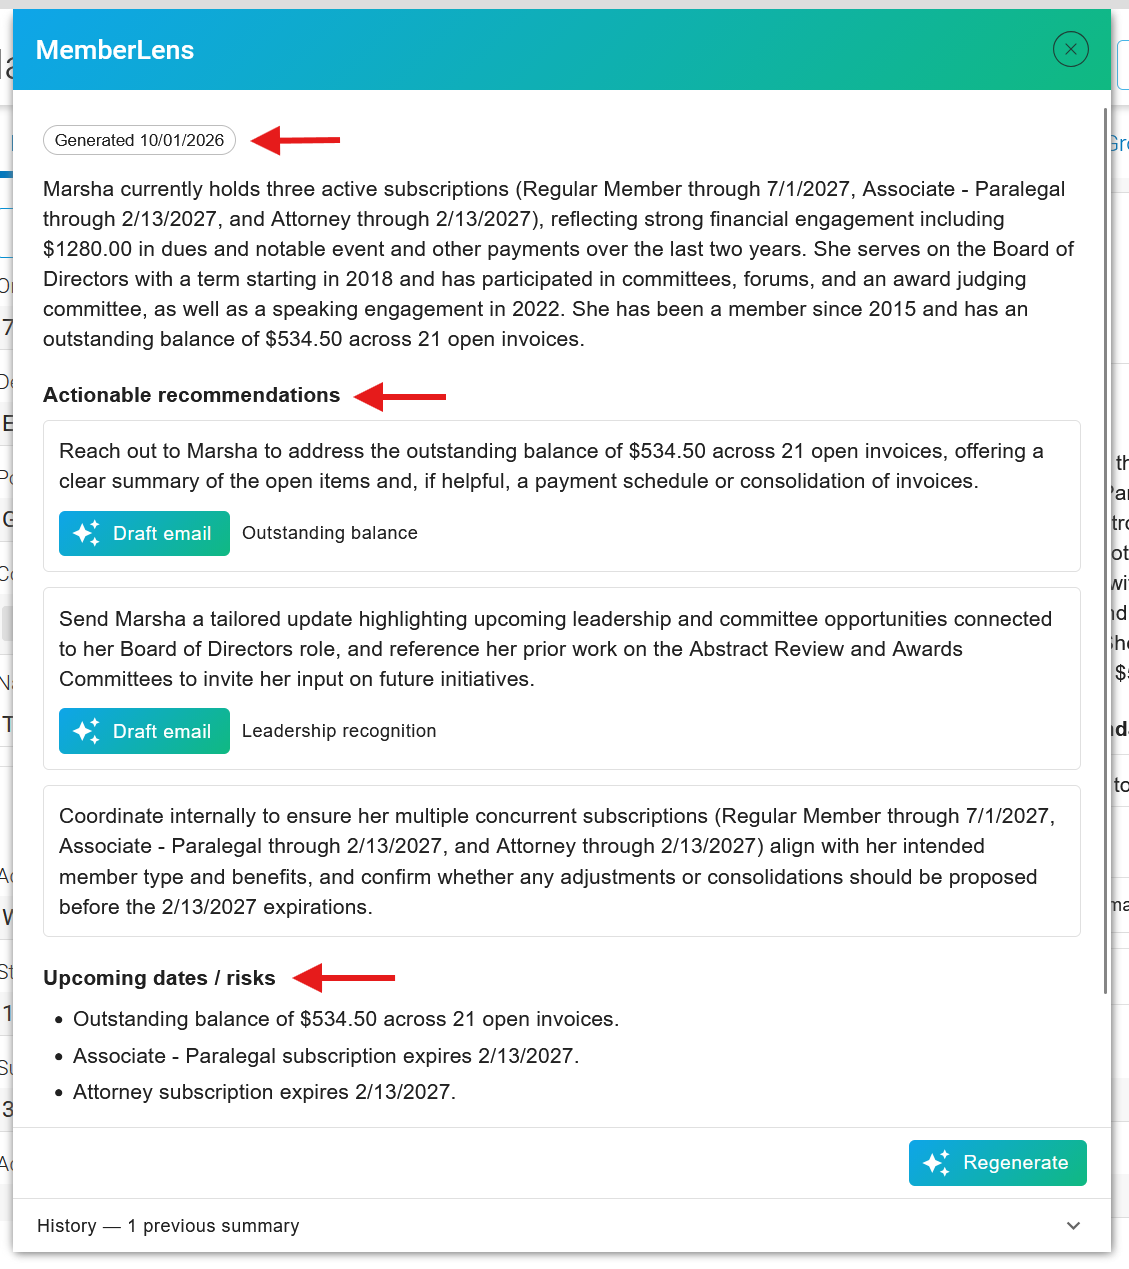
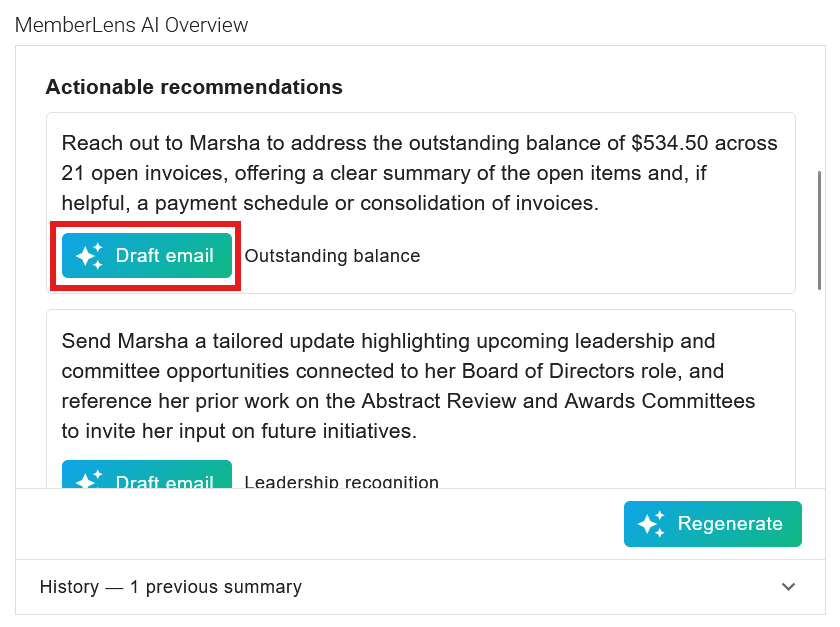
Each recommendation that calls for outreach displays a "Draft email" button and the kind of email it will start from, such as "Renewal reminder" or "Event invitation". Clicking it opens SmartCompose with that purpose already selected and the recommendation text carried over as context.
Note
The "Draft email" buttons appear only when SmartCompose is also switched on. With MemberLens on and SmartCompose off, the outreach recommendations will display without the "Draft email" button.
Regenerating and History
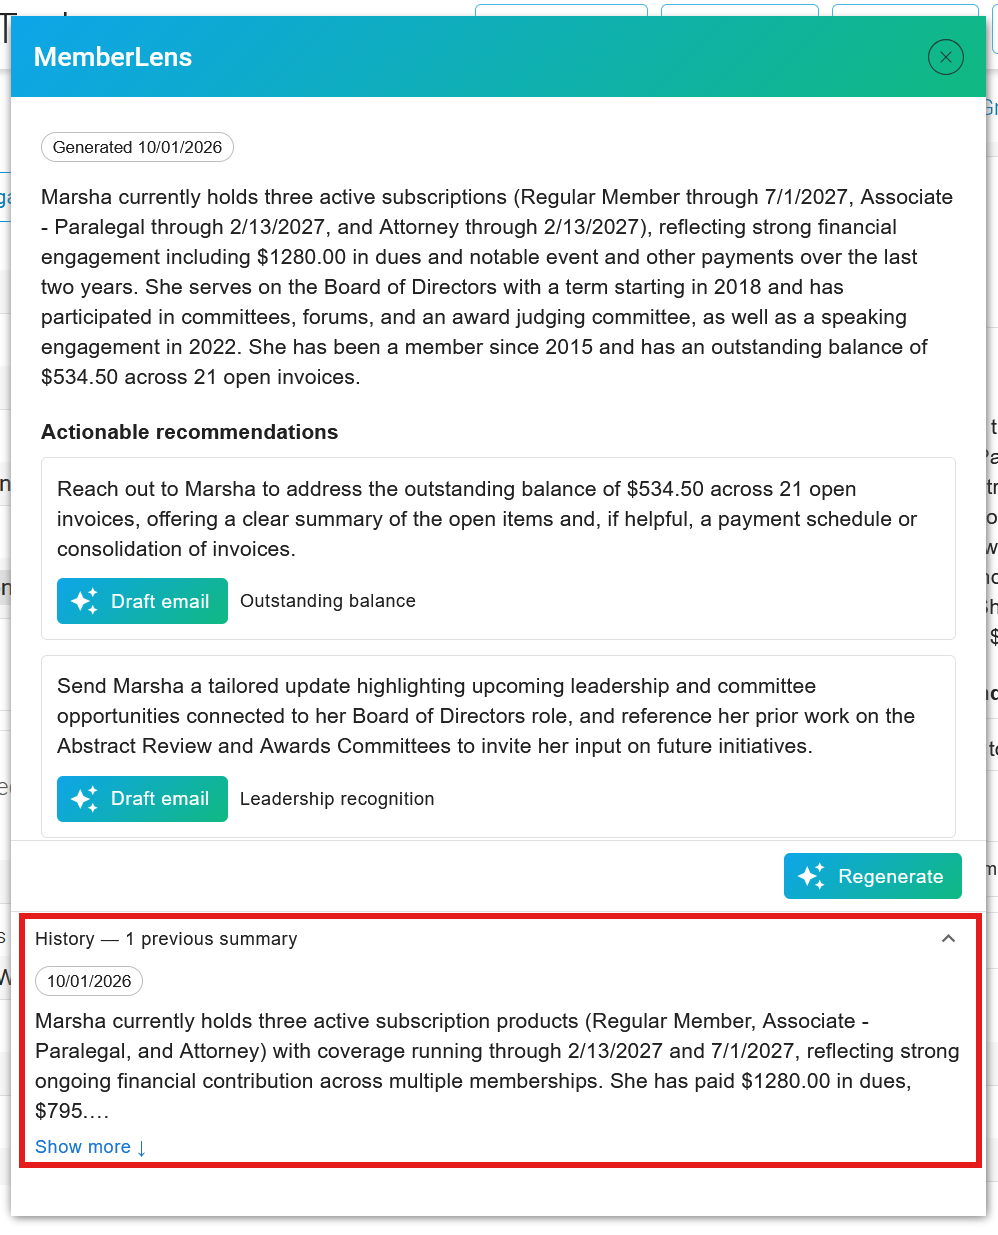
The summary shown when the panel opens is the most recently saved result, with the date it was generated. To produce a fresh summary that reflects recent activity, click "Regenerate".
Previous summaries are retained. When earlier summaries exist, a "History" section at the bottom of the panel reports how many are available. Expand it to review them, and use "Show more" on an individual entry to read it in full. The ten most recent summaries are available.
Configuring MemberLens
MemberLens is configured in the "Configuration" tab of the CV Intelligence Admin screen. Two settings are available.
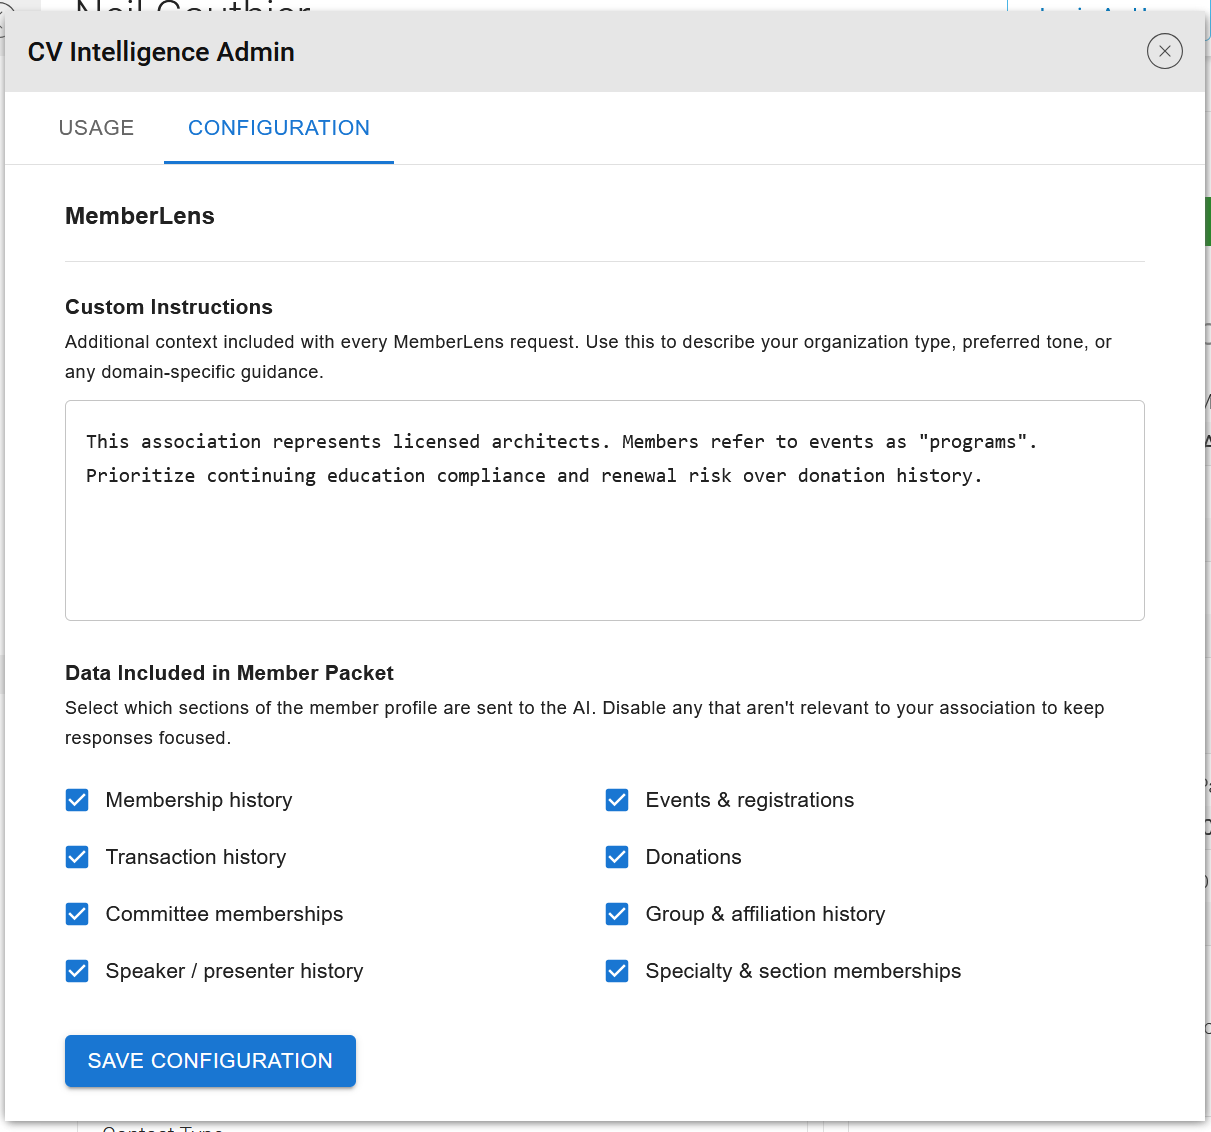
Custom Instructions: Free text that is added to every MemberLens request. Use it to describe the organization type, preferred tone, terminology, or standing priorities. For example:
This association represents licensed architects. Members refer to events as "programs". Prioritize continuing education compliance and renewal risk over donation history.
Data Included in Member Packet: Checkboxes controlling which sections of the member profile are sent with the request. Clear any section that is not relevant to the organization so summaries stay focused:
-
Membership history: Subscription and dues records.
-
Events & registrations: Past and upcoming event registrations.
-
Transaction history: Payment and invoice activity, summarized by category.
-
Donations: Giving history.
-
Committee memberships: Current and former committee service.
-
Group & affiliation history: Group and affiliation records.
-
Speaker / presenter history: Speaking engagements and recorded ratings.
-
Section memberships: Specialty and section membership records.
Example Use Cases
Preparing for a renewal call: A membership coordinator working a lapsed-renewal list opens each member's notebook and generates a MemberLens. The summary reports which subscriptions have lapsed and when, flags an outstanding balance, and recommends a renewal reminder. The coordinator clicks "Draft email" on that recommendation and sends a personalized message in the same visit to the record.
Briefing before a conference conversation: Before meeting a member at the annual conference, the staff generates a MemberLens and learns that the member has served on the education committee since 2021, has registered for three programs this year, and is due to renew their dues the following month, enough to have an informed conversation without opening multiple tabs.
OrgLens
OrgLens produces an account overview for a member organization. It follows the same pattern as MemberLens but reads the organization's account: membership products, contact counts, event participation by its people, committee representation, speaker history, and financial activity.
Accessing OrgLens
Open an organization notebook, click the "Activities" button, and select "OrgLens".
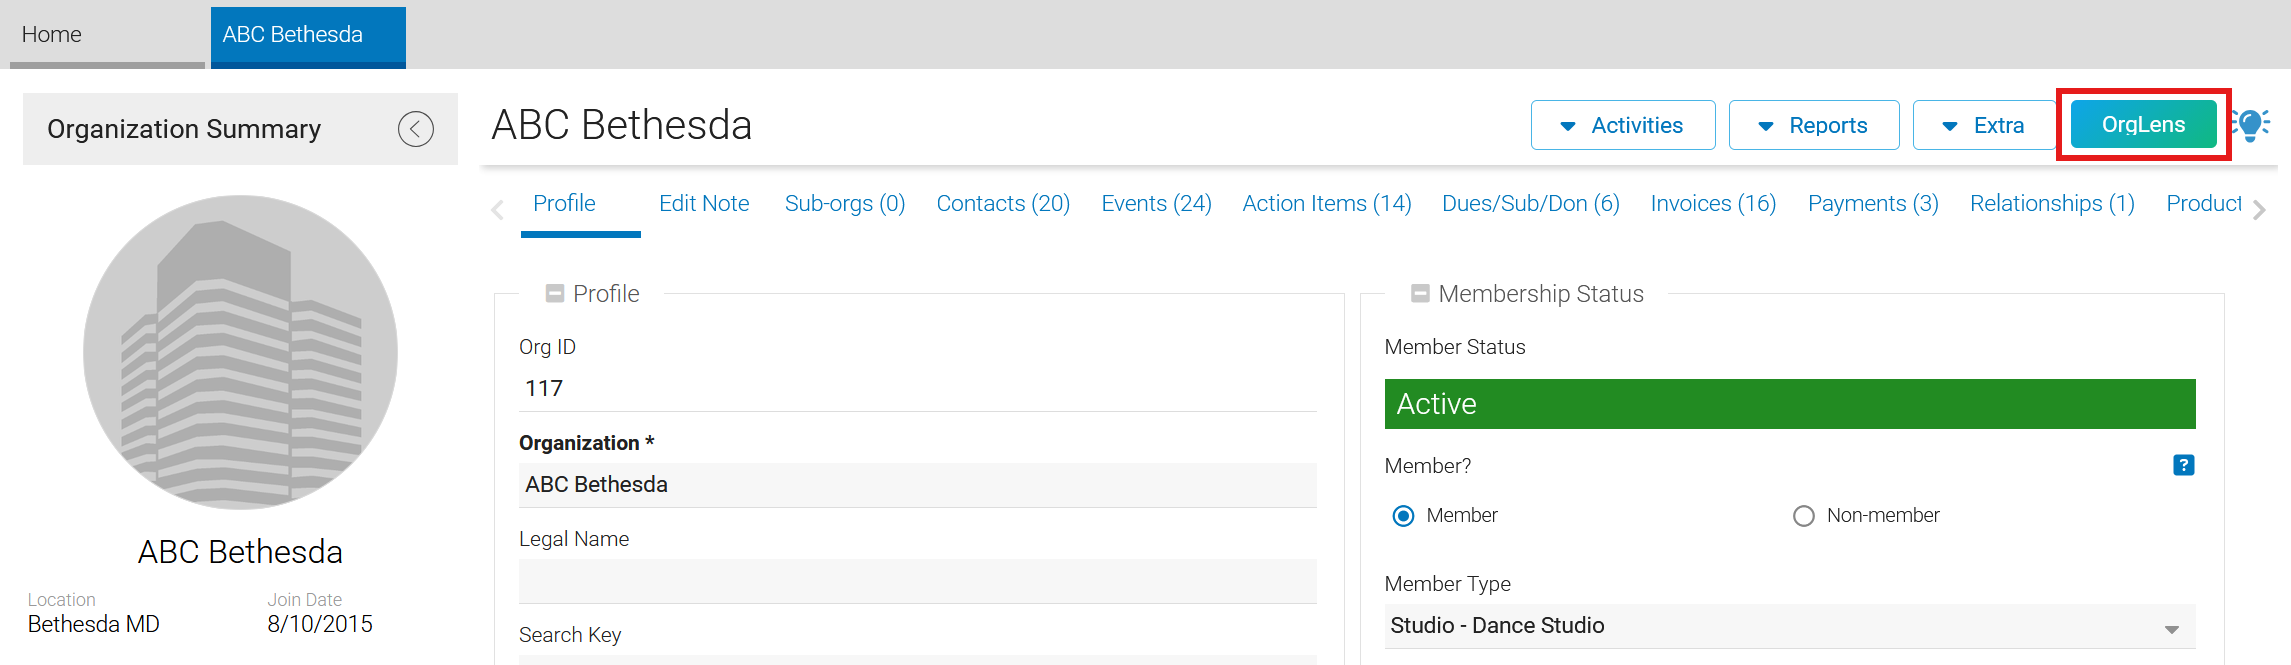
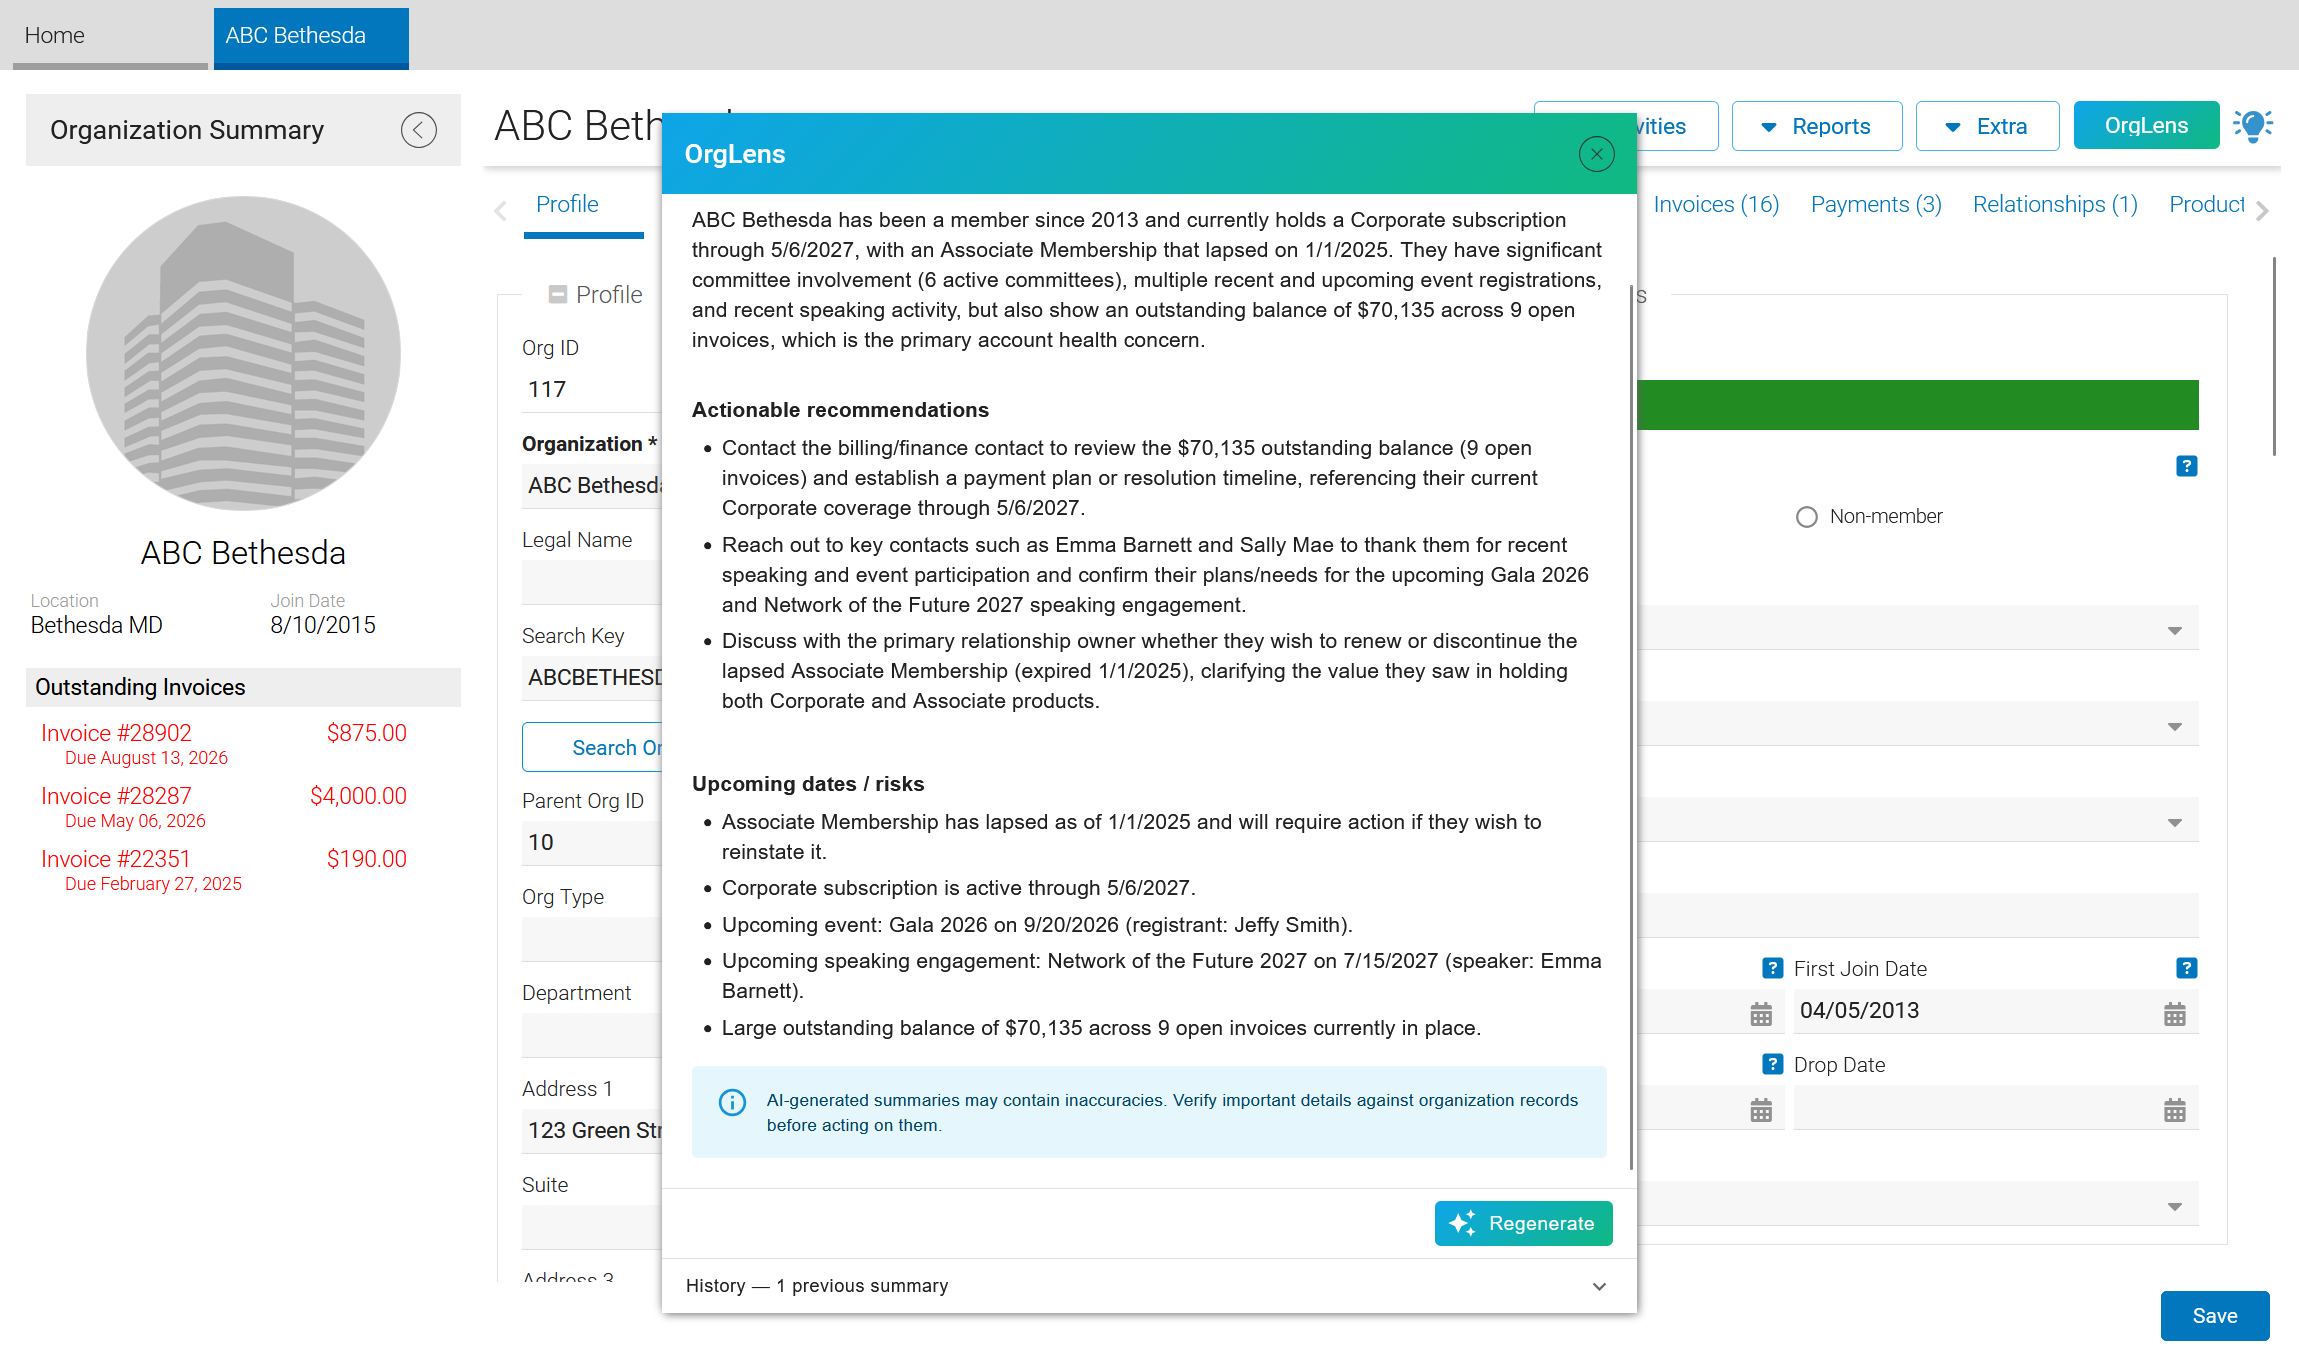
Like MemberLens, OrgLens opens as a panel attached to the notebook.
An OrgLens panel can also be embedded directly in the notebook layout, so the current summary is visible without opening a separate panel.
To add the "OrgLens AI Overview" field to the notebook layout:
-
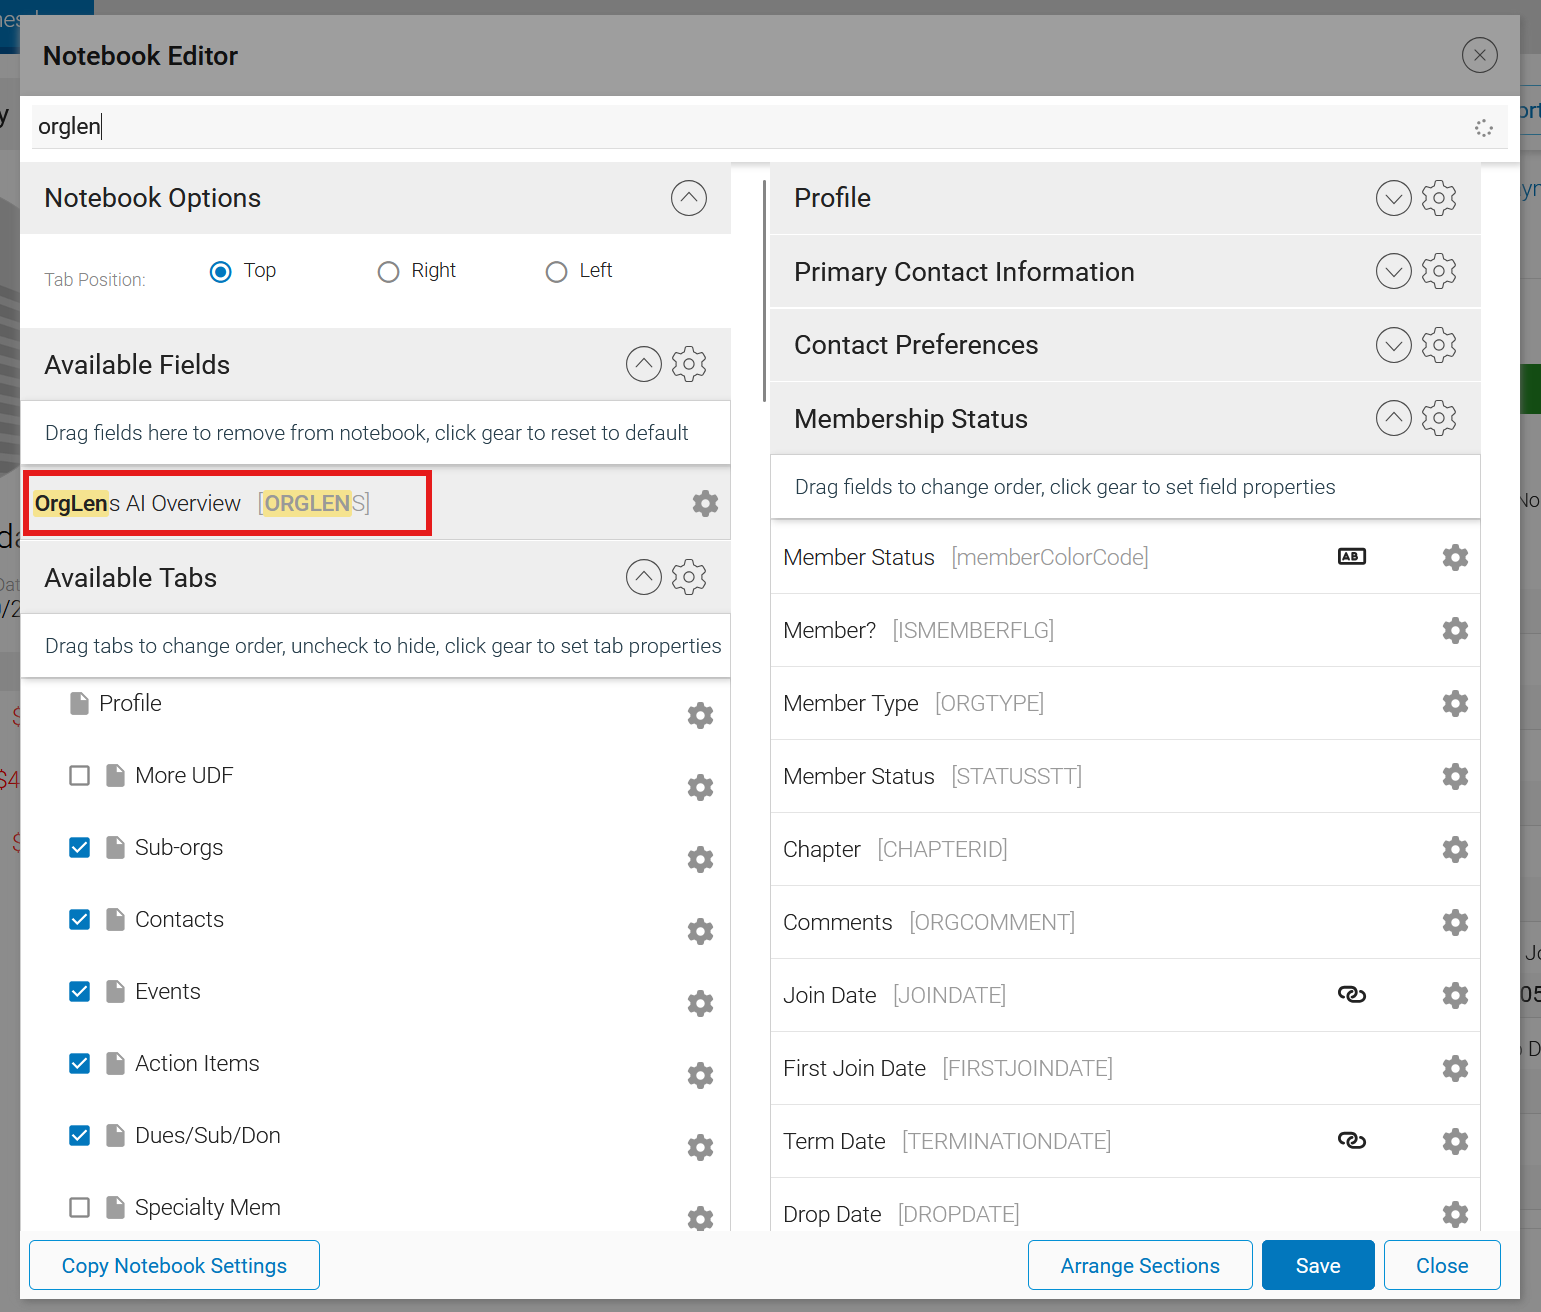
Click the "Activities" button and select "Edit Layout" to open the Notebook Editor.
-
Find the "OrgLens AI Overview" field from the "Available Fields" section.
-
Drag and drop the field in the desired location to the right of the Notebook Editor. For more on how to edit notebooks and add fields, see the Notebook Editor guide.
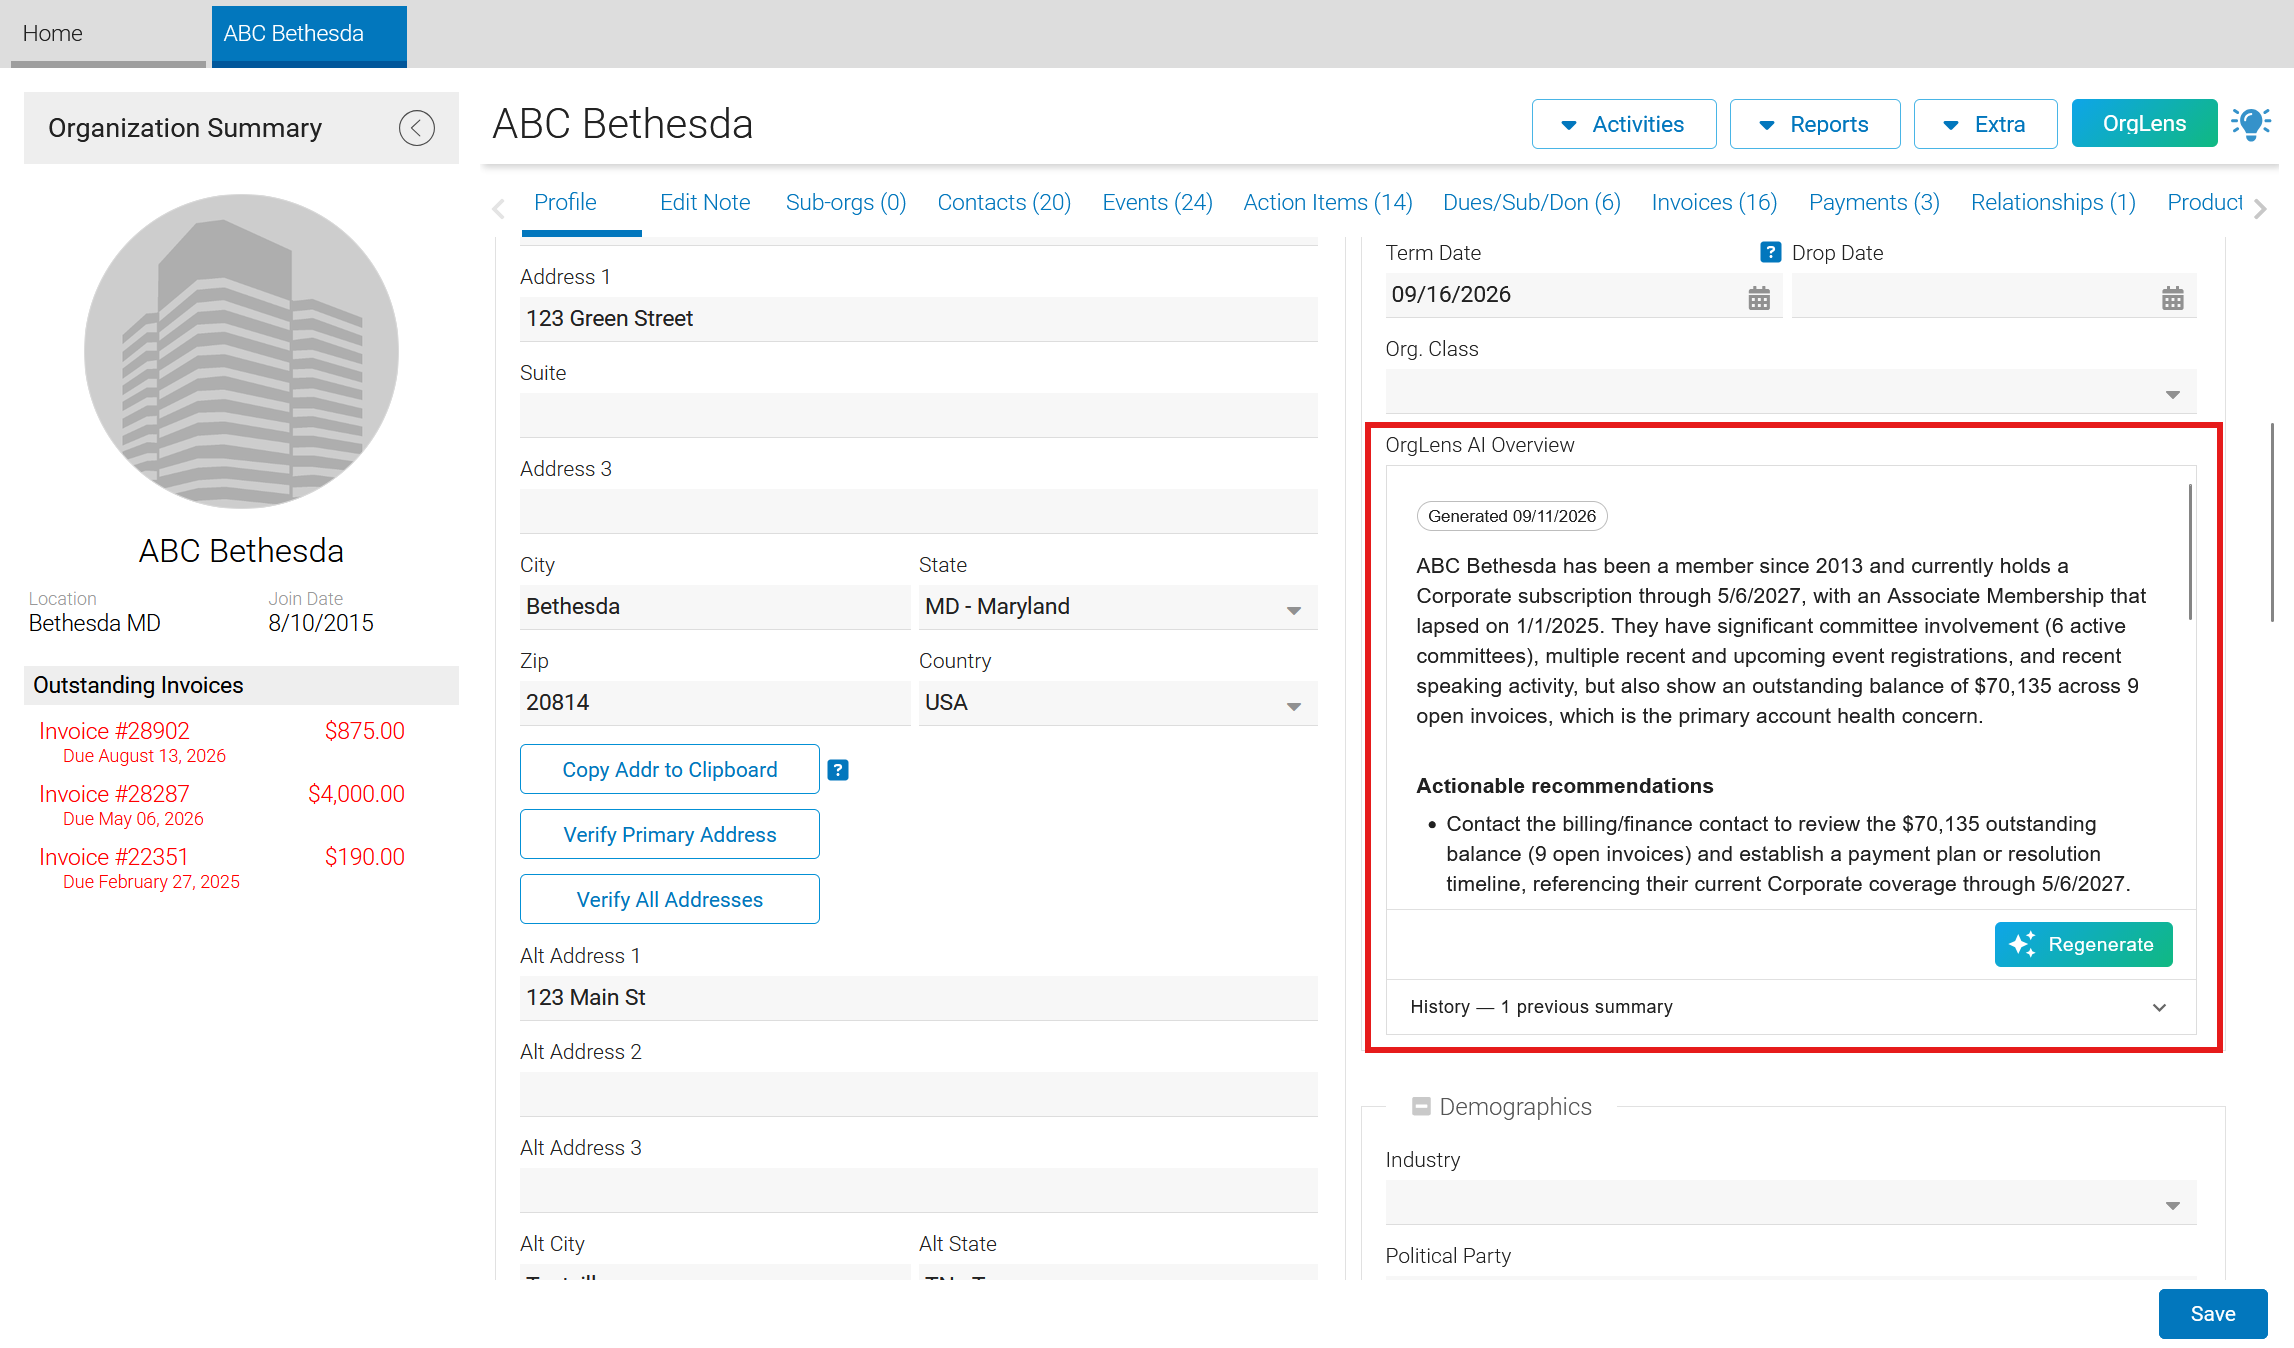
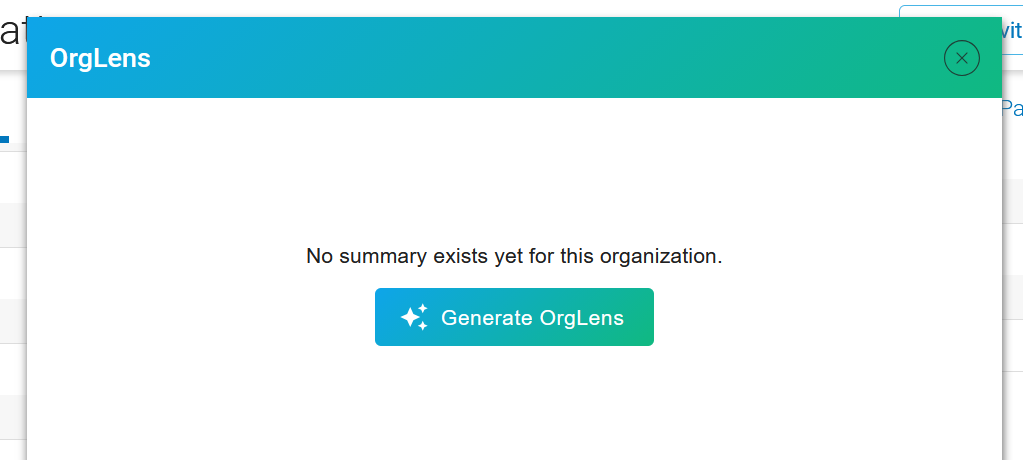
When no summary exists, the panel shows "No summary exists yet for this organization." with a "Generate OrgLens" button.
Generating and Reading a Summary
A completed summary contains three parts:
-
Summary: A short narrative paragraph covering the organization's engagement level, financial value, and length of membership.
-
Actionable recommendations: Two to three specific next steps for account management.
-
Upcoming dates / risks: Renewal dates, lapsed products, outstanding balances, and notable changes in contact counts.
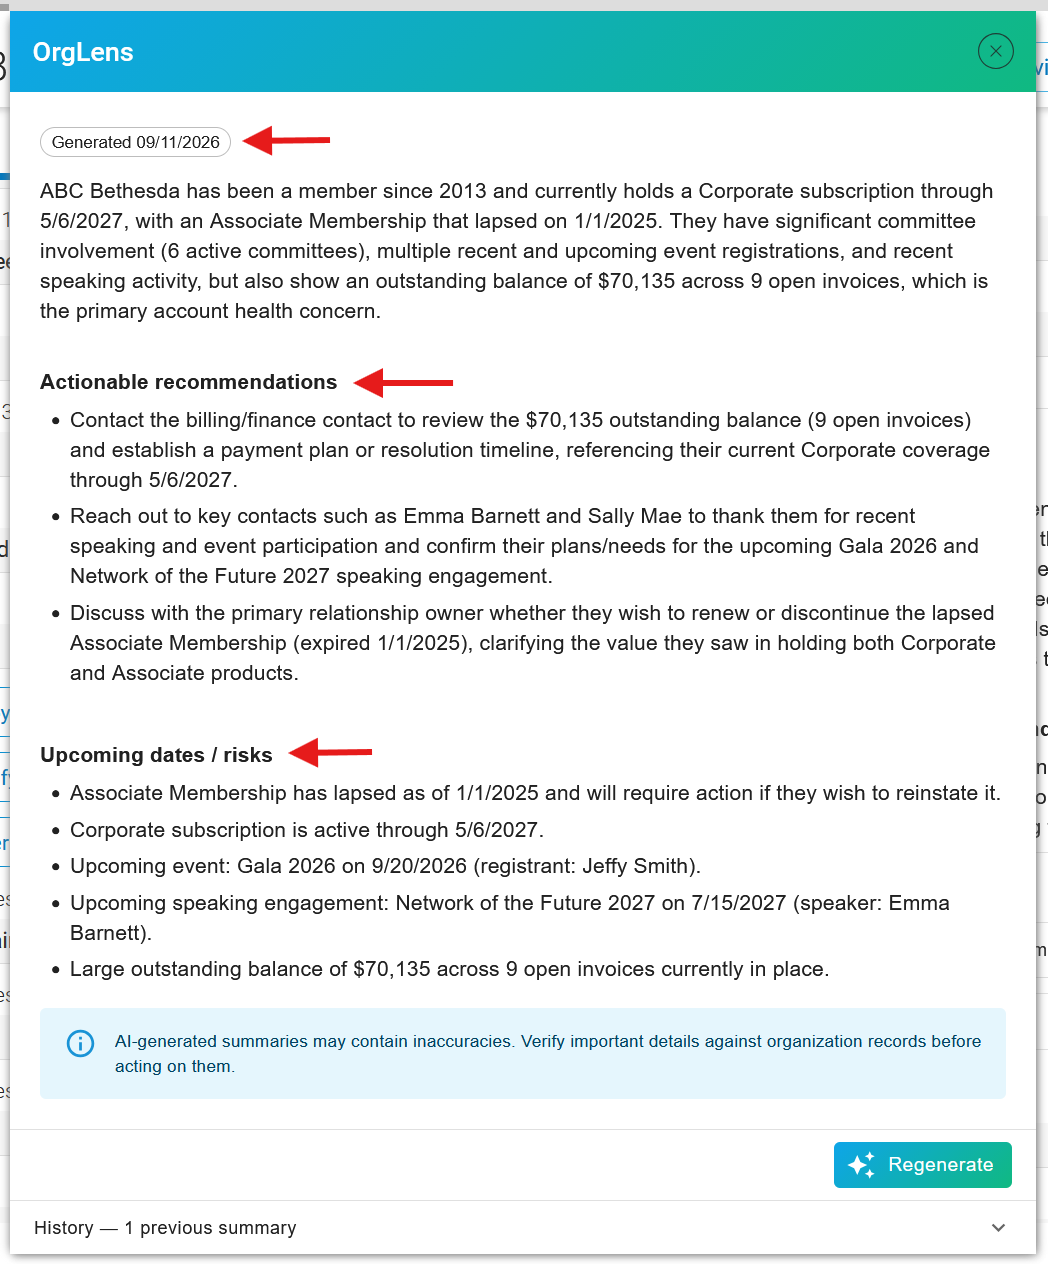
Use "Regenerate" for a fresh overview, and the "History" section to review earlier ones.
Configuring OrgLens
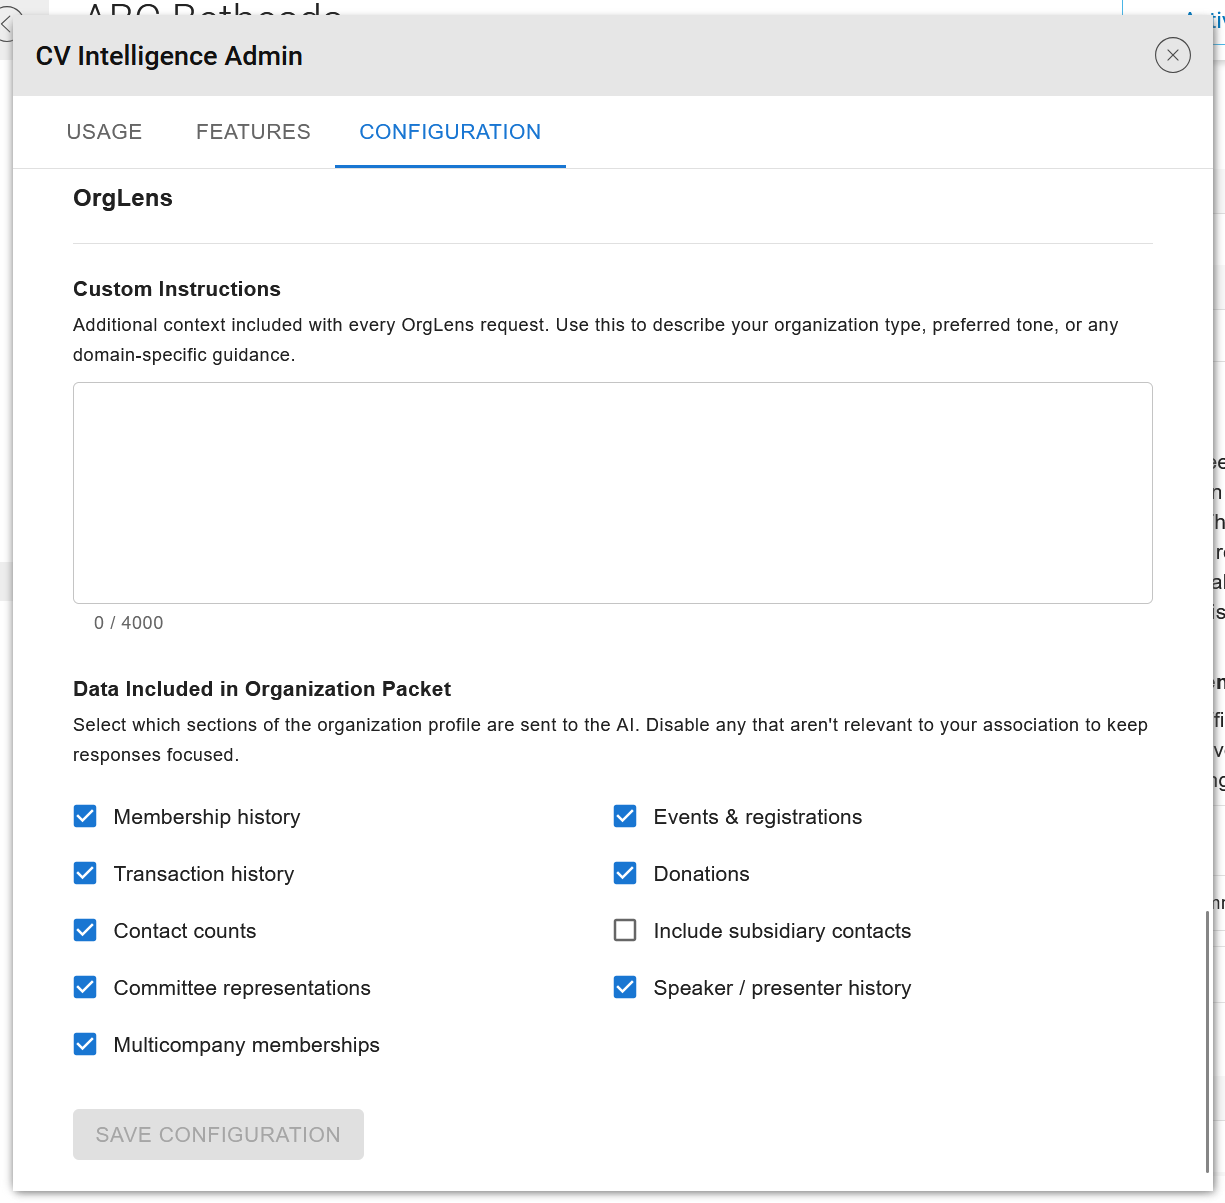
OrgLens is configured in the "Configuration" tab of the CV Intelligence Admin screen, with custom instructions and its own set of packet options:
-
Membership history: Subscription and dues records held by the organization.
-
Events & registrations: Event activity by the organization's contacts.
-
Transaction history: Payment and invoice activity, summarized by category.
-
Donations: Giving history.
-
Contact counts: Counts of linked contact records by member flag.
-
Include subsidiary contacts: Extends contact counts to subsidiary organizations. Cleared by default.
-
Committee representations: Committee service by the organization's contacts.
-
Speaker / presenter history: Speaking engagements by the organization's contacts.
-
Multicompany memberships: Specialty and multicompany membership records.
Example Use Cases
Preparing for a corporate account review: An account manager preparing for a quarterly review generates an OrgLens to quickly gather key information about the organization. The report may include organizational tenure, current and lapsed products, the number of contacts who registered for events during the year, and committee participation by organizational contacts. This information provides much of the content needed for the review in a single step.
Renewal pipeline triage: When a group of corporate memberships comes up for renewal, staff generates an OrgLens for each account and uses the "Upcoming dates / risks" section to sort accounts into routine renewals and accounts that need a conversation.
Recruiting sponsors and speakers: A conference planner reviewing potential sponsors uses the speaker history and event participation information in the summary to identify organizations whose staff already present at events and are likely to respond to an invitation.
EventLens
EventLens produces a briefing for a single event. Which briefing it produces depends on the event's start date. For more information, see the Generation and Reading a Briefing section.
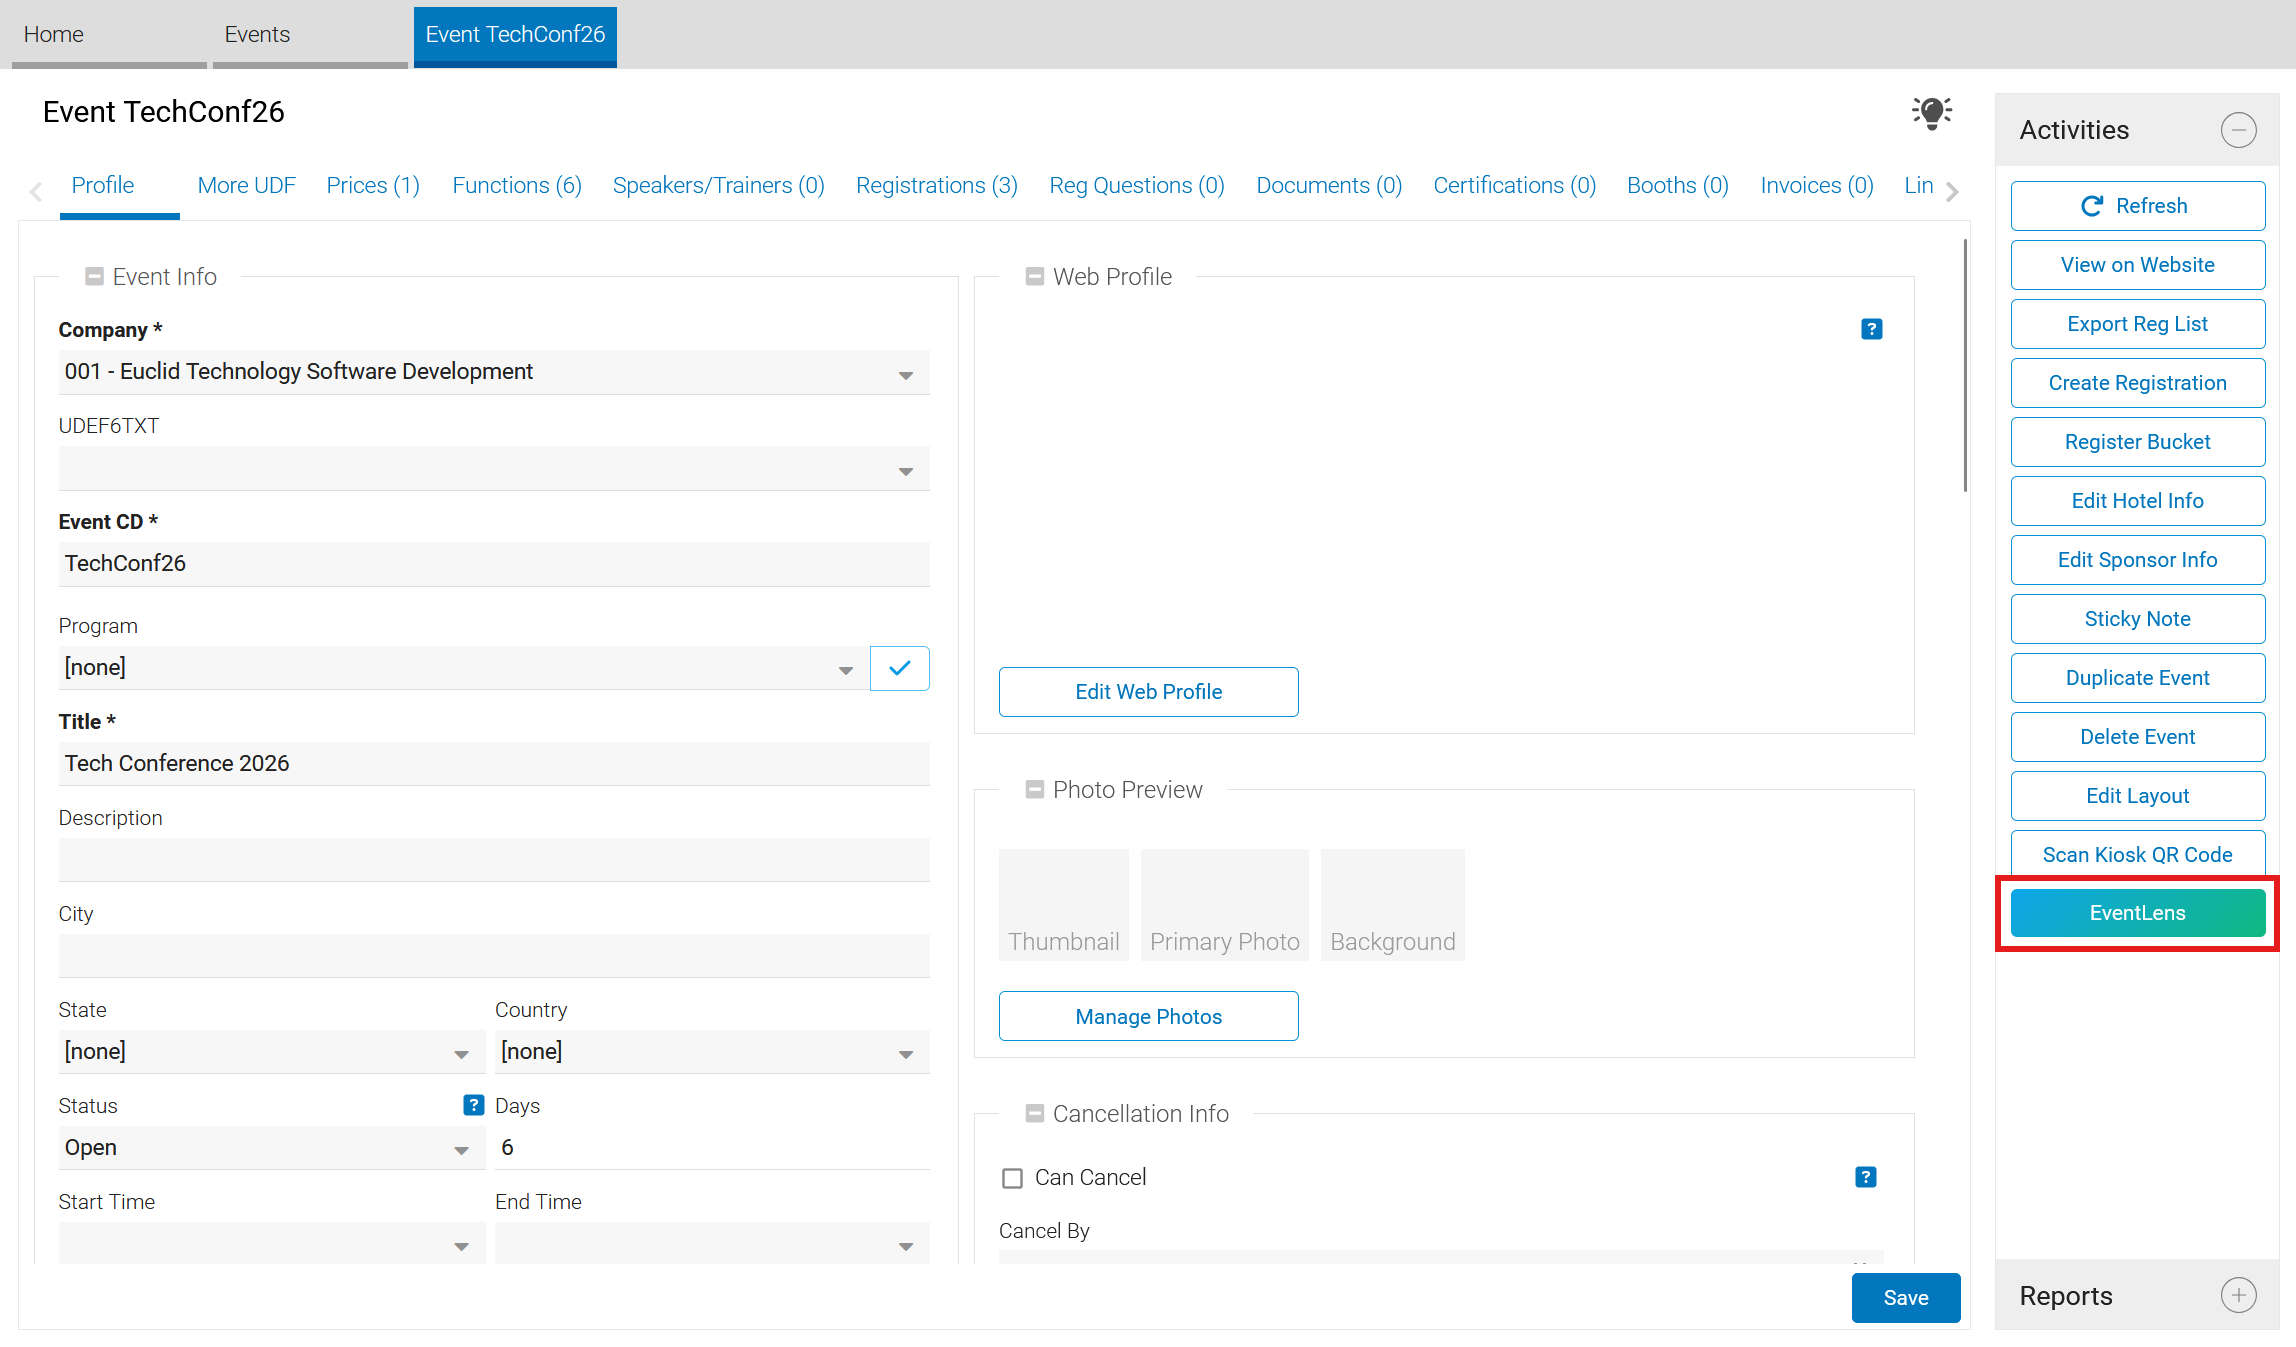
To generate an EventLens briefing, open an event notebook and click the "EventLens" button in the "Activities" panel.
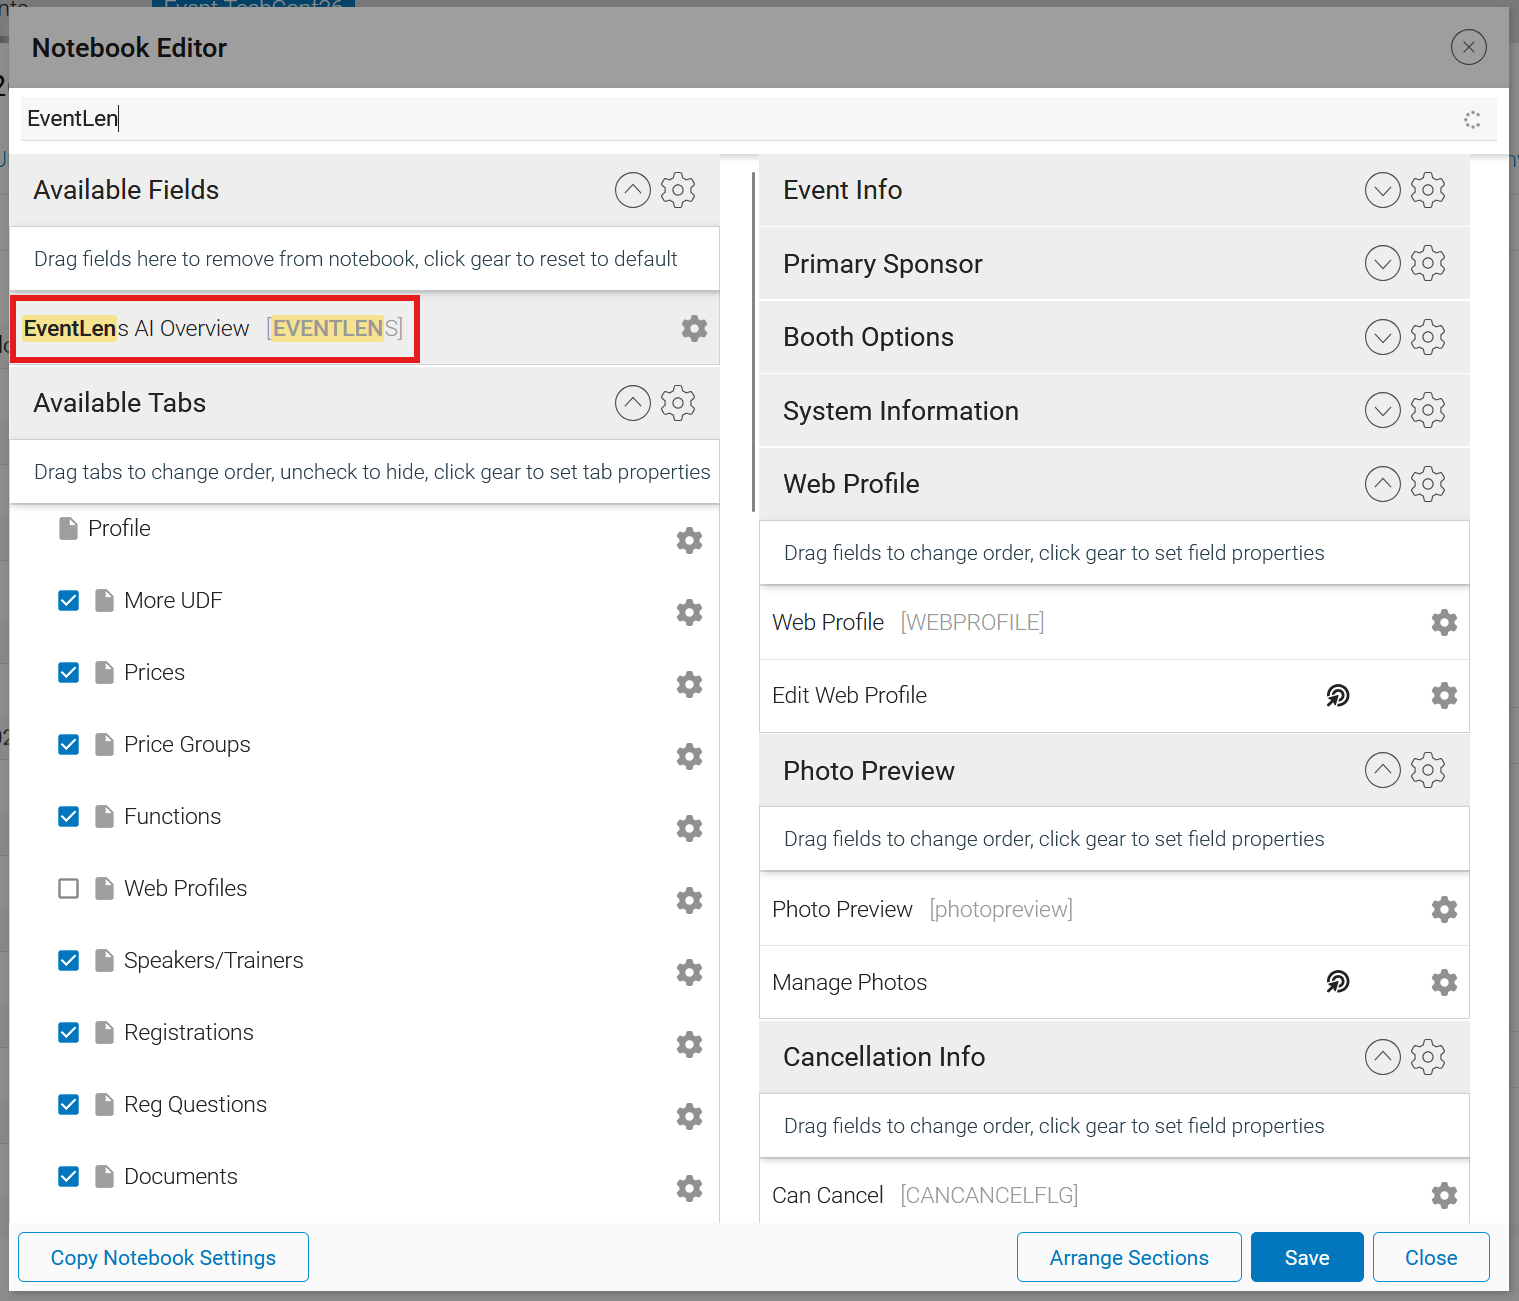
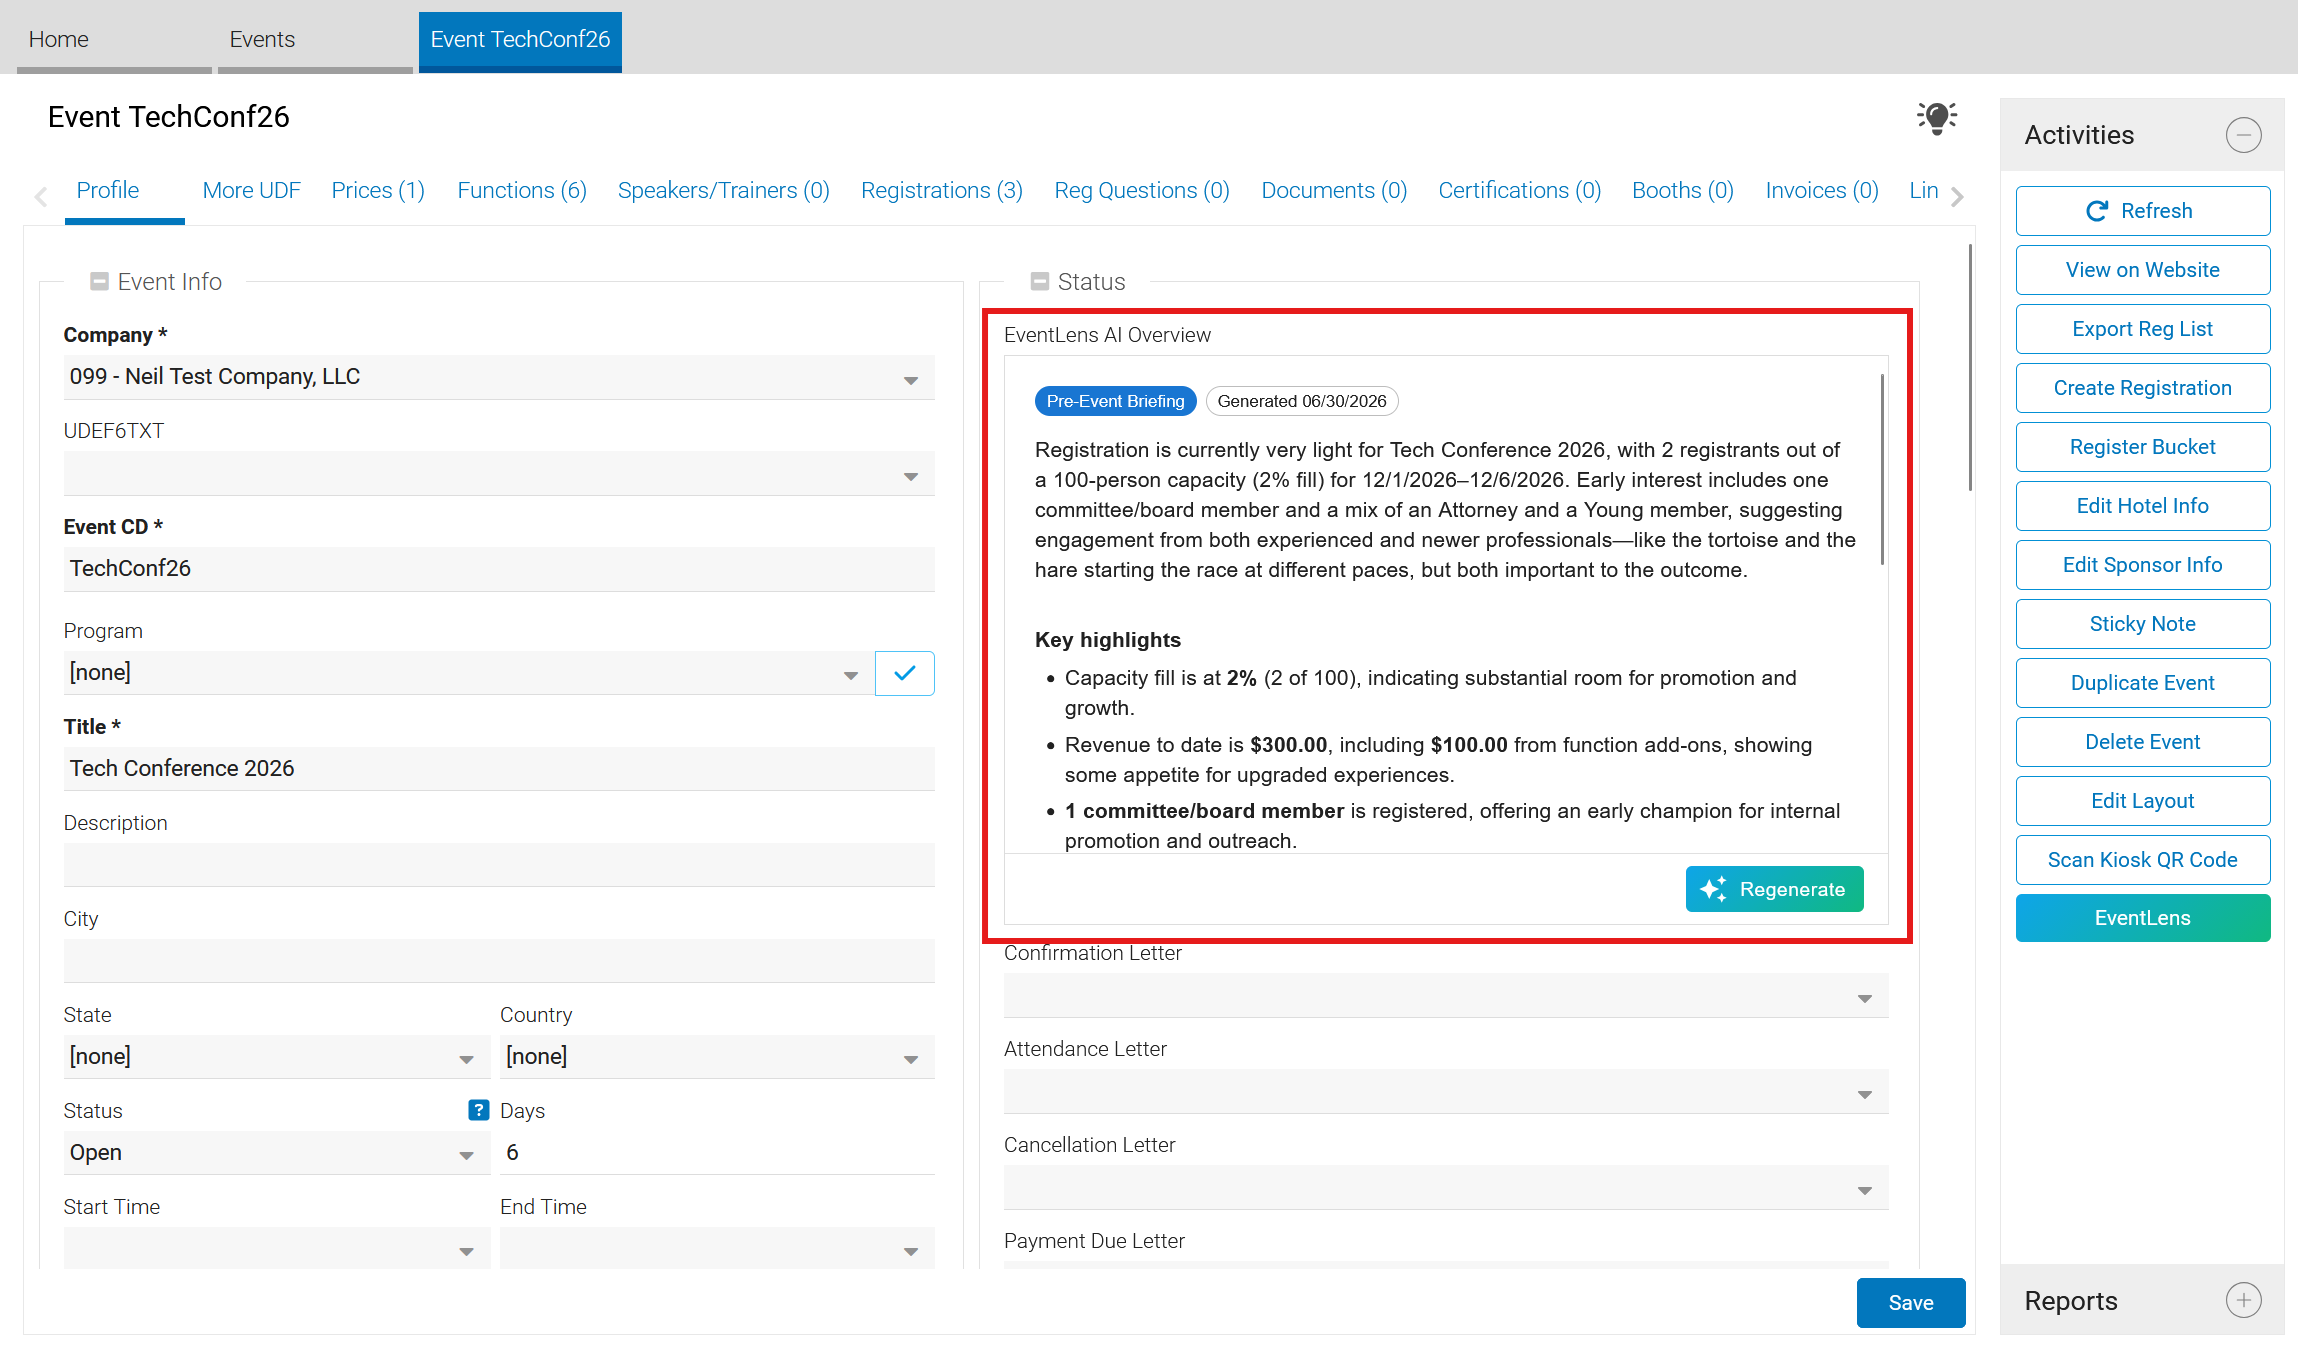
EventLens can also be embedded in the event notebook layout:
-
From the Activities Panel, select "Edit Layout" to open the Notebook Editor.
-
Find the "EventLens AI Overview" field from the "Available Fields" section.
-
Drag and drop the field in the desired location to the right of the Notebook Editor. For more on how to edit notebooks and add fields, see the Notebook Editor guide.
Generating and Reading a Briefing
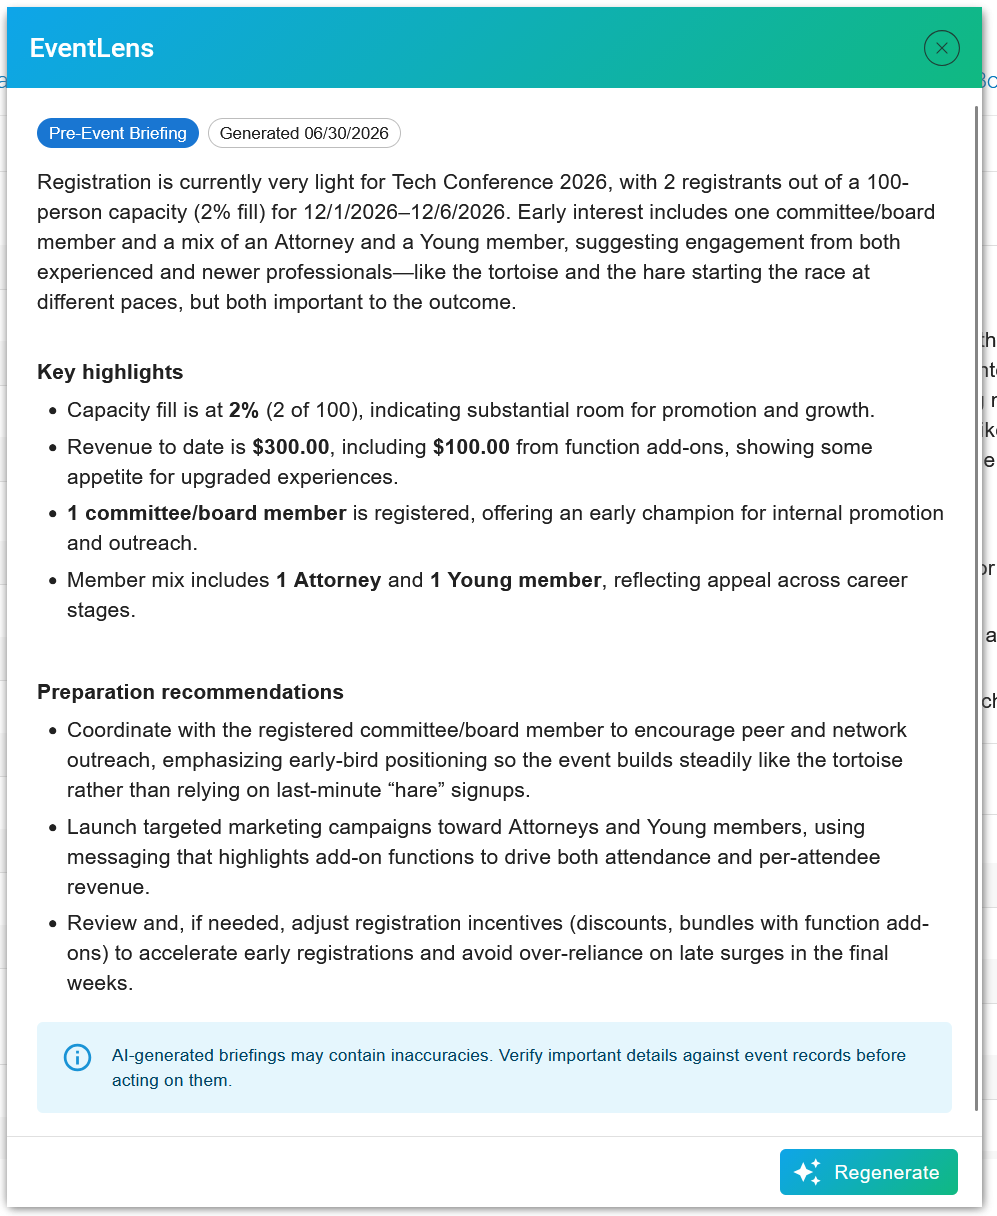
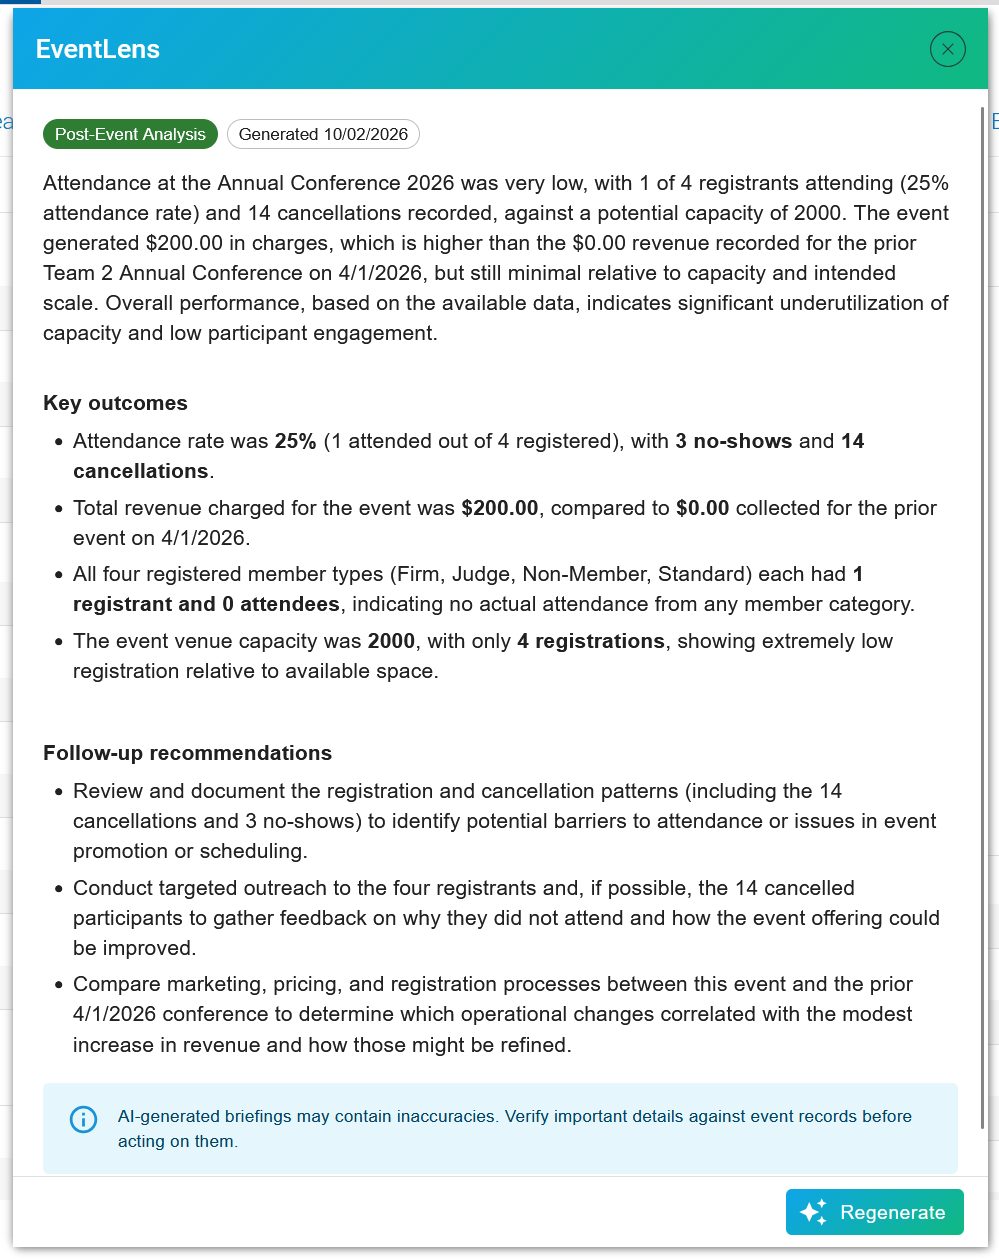
The panel displays a chip identifying the briefing type, "Pre-Event Briefing" or "Post-Event Analysis", and the button is labeled to match, for example "Generate Pre-Event Briefing".
-
Pre-Event Briefing: For an event whose start date is in the future, includes registration status, capacity fill, notable registrants, the speaker lineup, and preparation recommendations.
-
Post-Event Analysis: For an event that has started or finished, includes attendance, revenue, first-time attendees, notable attendees, and follow-up recommendations.
The switch is automatic. An event can therefore hold both a pre-event briefing and, after it begins, a separate post-event analysis. Each is saved independently.
A pre-event briefing contains a narrative paragraph on registration status and capacity, followed by:
-
Key highlights: Data-driven highlights such as capacity fill rate, first-time registrants, committee or board member registrations, and the speaker lineup.
-
Preparation recommendations: Two to three steps for staff ahead of the event.
A post-event analysis contains a narrative paragraph on attendance and revenue, followed by:
-
Key outcomes: Attendance rate, revenue collected, first-timer count, and notable attendees.
-
Follow-up recommendations: Two to three follow-up steps.
Use "Regenerate" to refresh the briefing as registrations change, and the "History" section to compare earlier briefings.
Note
Registration and attendance are recorded separately in ClearVantage, and attendance is frequently never marked. EventLens reports attendance only where it was explicitly confirmed, and does not treat an unmarked registration as a no-show.
Configuring EventLens
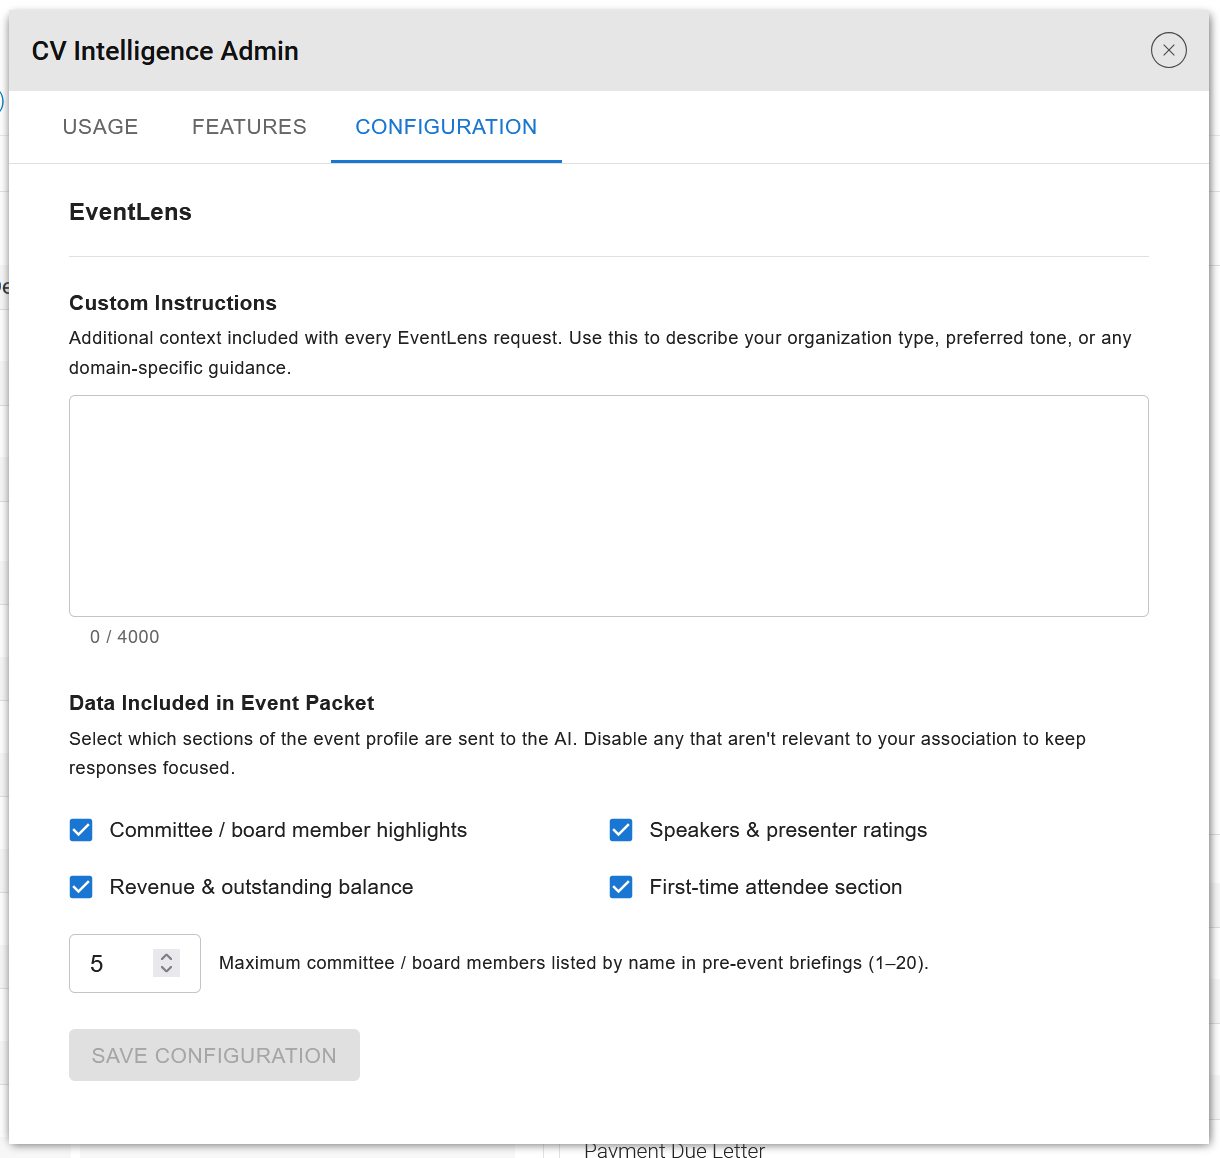
EventLens is configured in the "Configuration" tab of the CV Intelligence Admin screen. In addition to custom instructions, the following options control the event packet:
-
Committee / board member highlights: Identifies registrants and attendees who serve on a committee or the board.
-
Speakers & presenter ratings: Includes the speaker lineup, and recorded ratings for events that have already taken place.
-
Revenue & outstanding balance: Includes event revenue and amounts still owed.
-
First-time attendee section: Identifies registrants attending an event for the first time.
-
Notable registrant limit: The maximum number of committee or board members listed by name in a briefing. Accepts a value from 1 to 20. The default is 5.
Example Use Cases
Final week before a conference: An event manager generates a pre-event briefing seven days out. The briefing reports the capacity fill rate, counts the first-time registrants, names the board members who have registered, and recommends confirming a session that remains under-subscribed.
Board and VIP preparation: Before a regional program, staff generate a pre-event briefing to produce a short list of committee and board registrants, so the chapter president can be briefed on who will be in the room.
Post-event wrap-up: After the annual meeting, staff generate a post-event analysis for the wrap-up report: attendance against registration, revenue collected against outstanding balances, the first-timer count, and follow-up recommendations for converting first-time attendees into members.
ClearQuery
ClearQuery builds a Power Query from a plain-language description. Instead of selecting fields, match types, and values by hand, staff describe the list they need and ClearQuery assembles the criteria, runs the search, and shows exactly what it applied.

ClearQuery is available on the Individual List, the Organization List, and the Master Certification List.
Building a Query
-
Open the Individual, Organization, or Master Certification list.
-
Click the "ClearQuery" button, next to "Power Search" in the search panel.
-
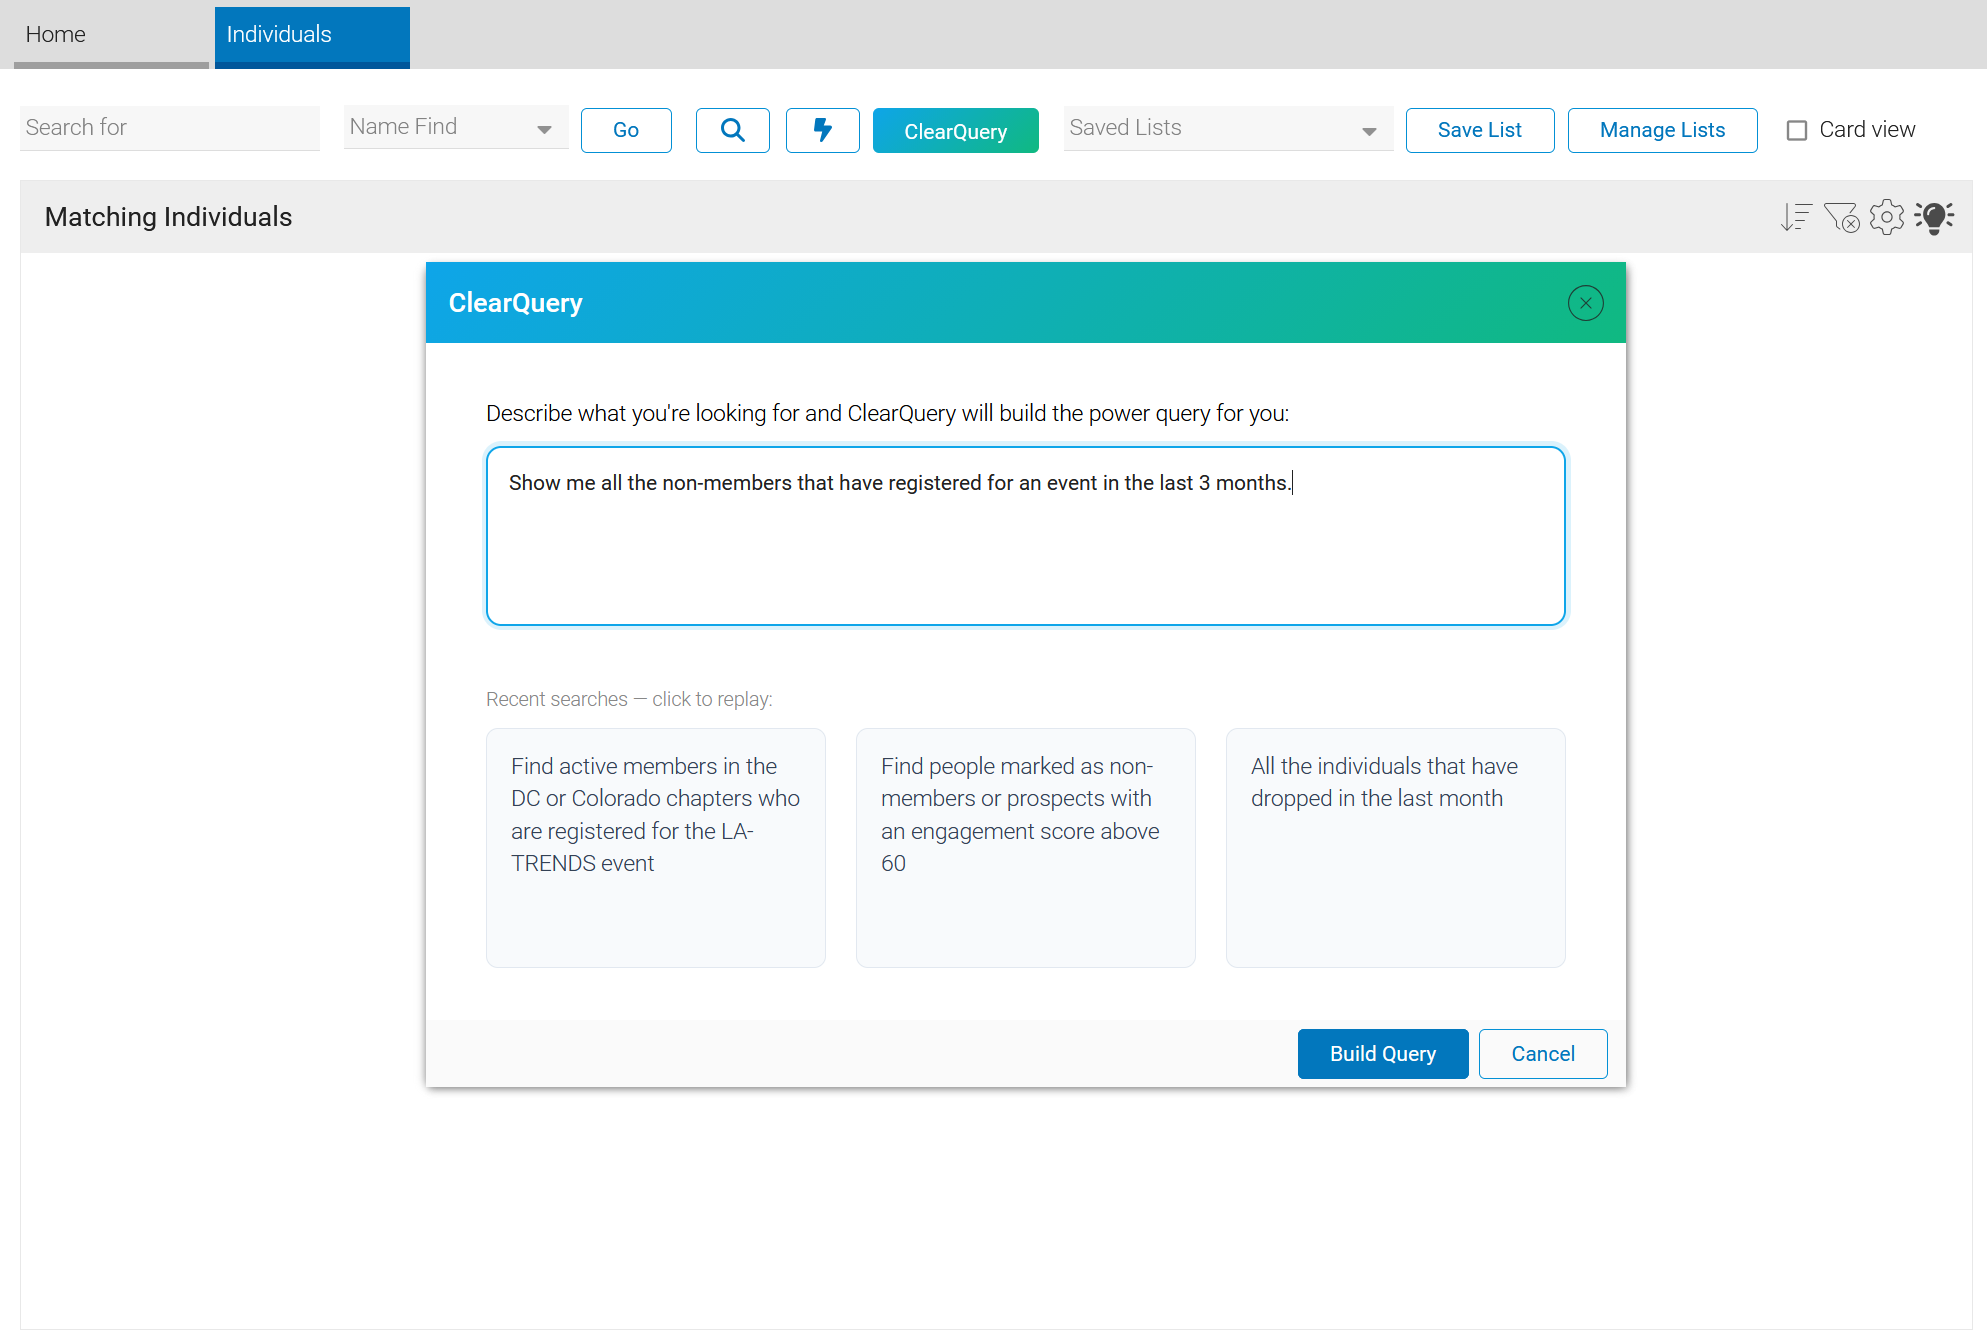
Describe the list in the prompt box. Be specific about fields, values, and time frames.
-
Click "Build Query", or press Ctrl + Enter.
-
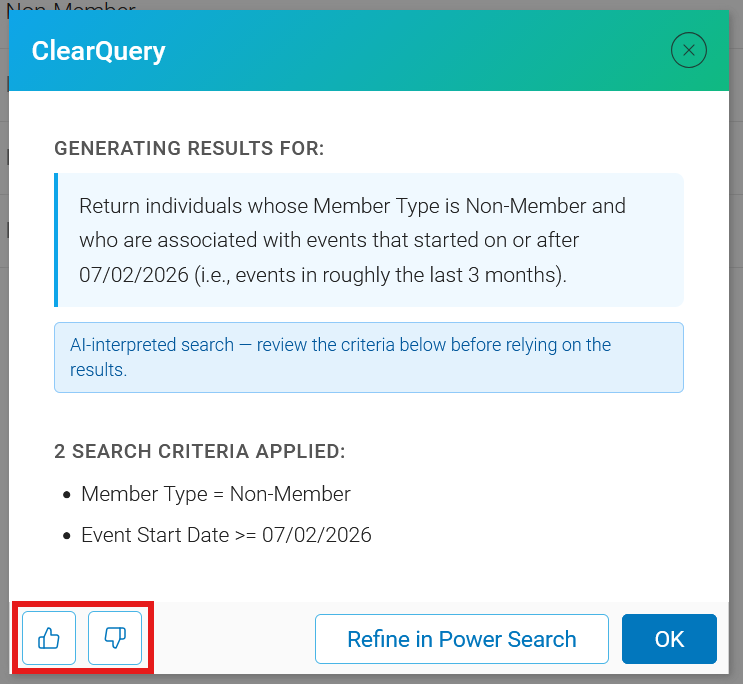
Review the confirmation window. It restates the request, lists every criterion that was applied, and reminds staff that the search was AI-interpreted.
-
Click "OK" to keep the results, or "Refine in Power Search" to open the criteria in the Power Search window and adjust them by hand.
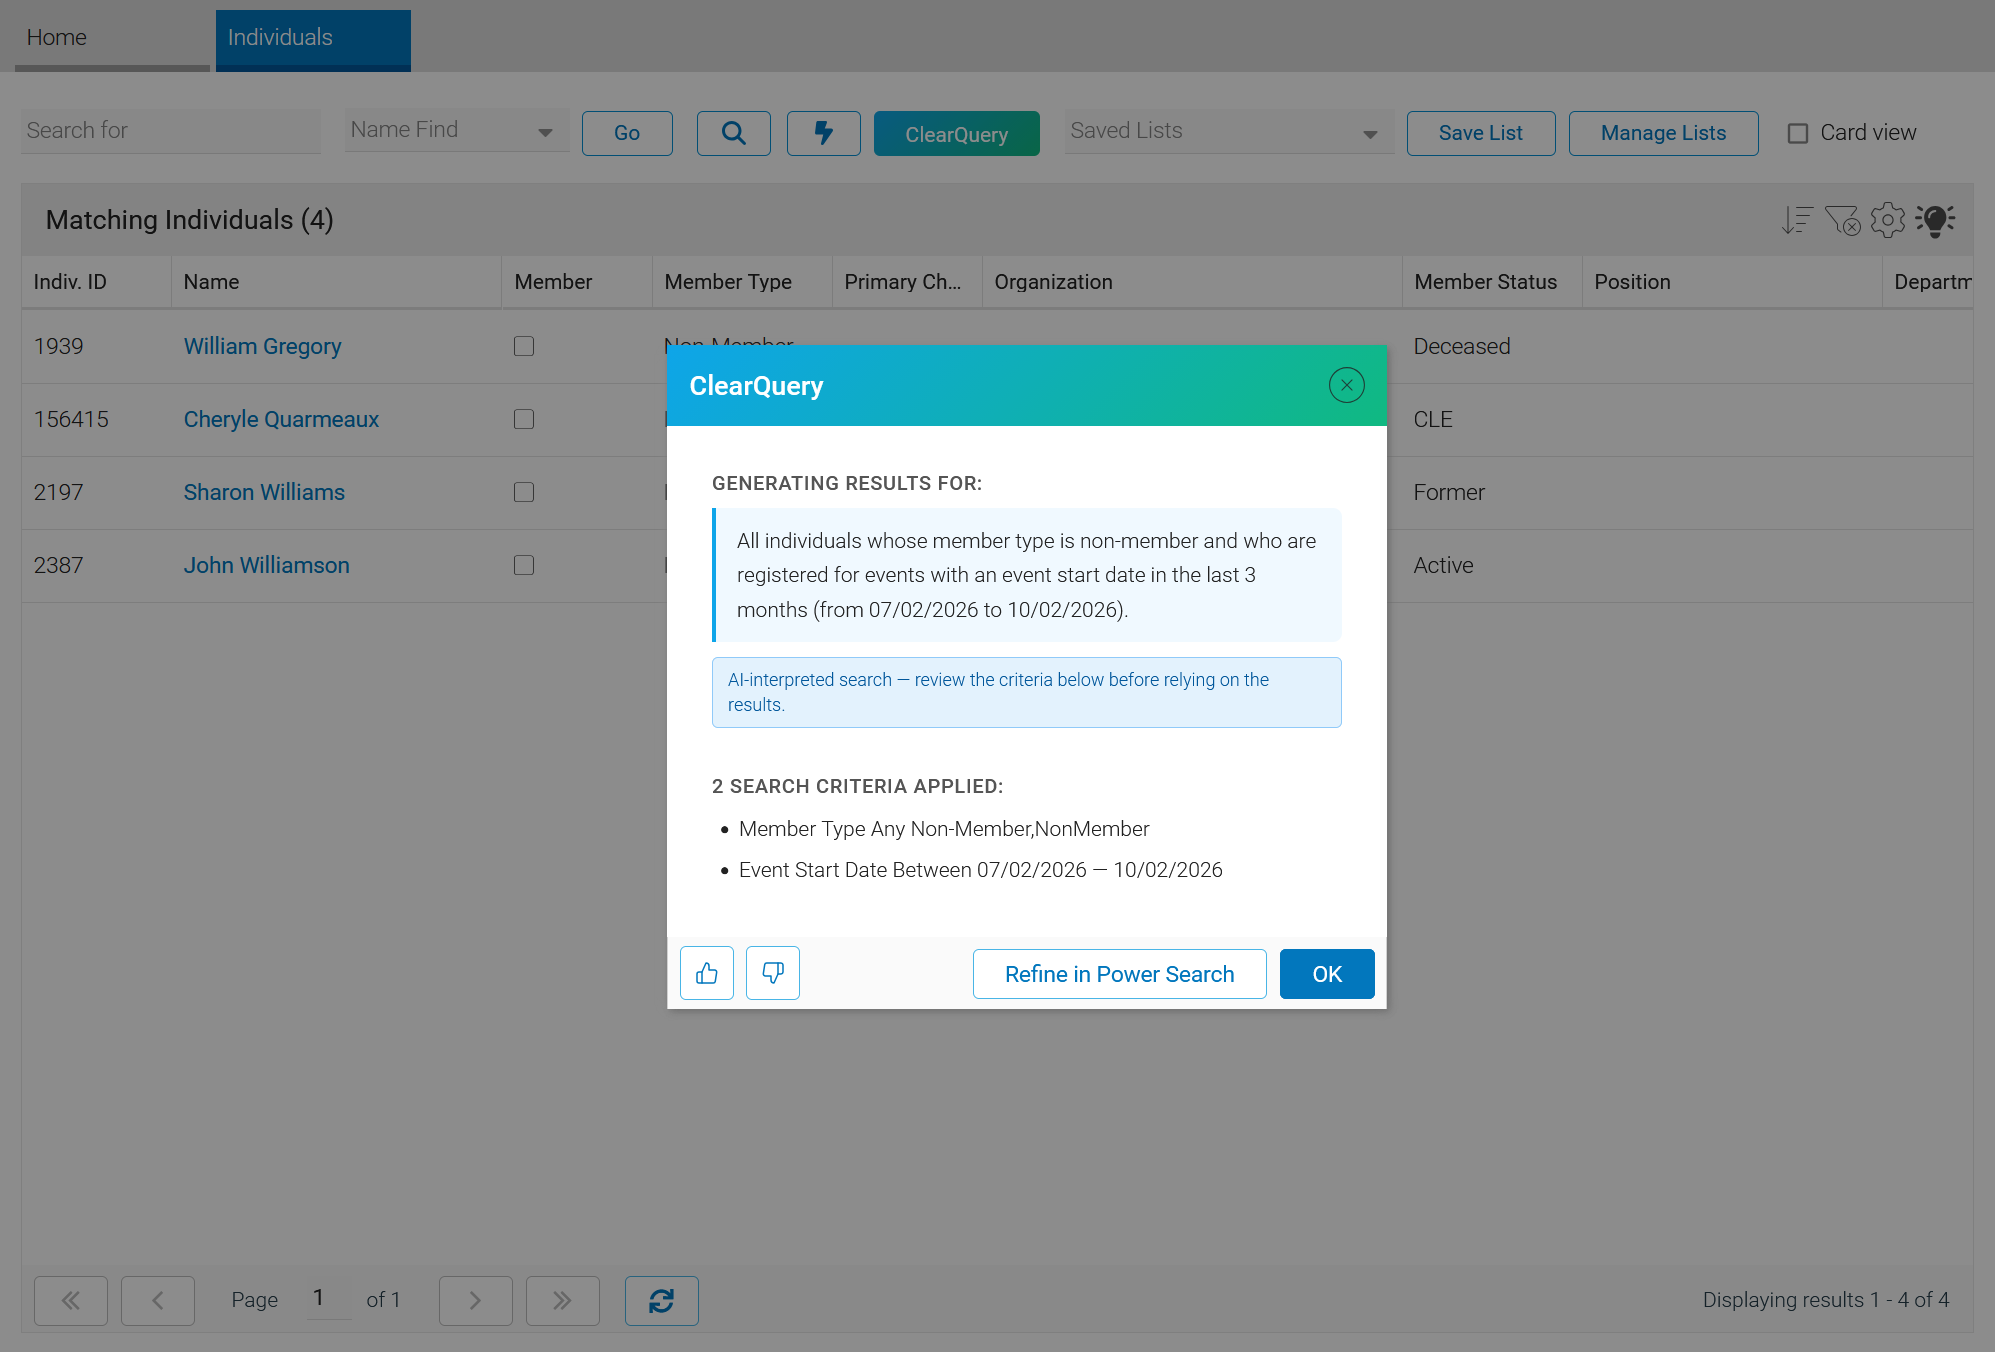
The list behind the confirmation window has already been filtered to the results. For more on working with the results, see the Working with Lists guide.
ClearQuery can also apply exclusions. A request such as members who have not registered for any event this year produces a query with NOT criteria, which are listed in the confirmation window alongside the standard criteria. As with a manually created Power Query, only one NOT criterion may be applied to a search request.
Replaying Recent Searches
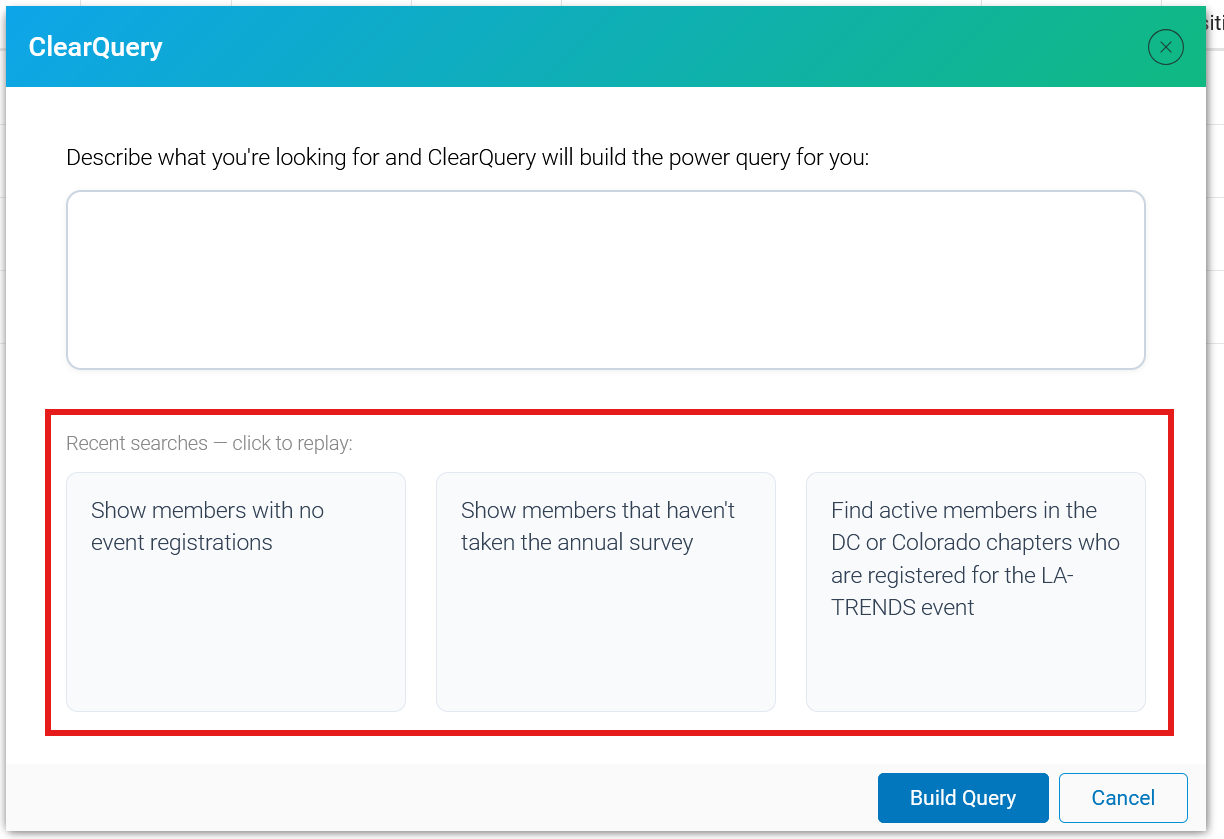
The ClearQuery window displays up to three recent searches under "Recent searches — click to replay". Clicking a card runs that search again immediately, reusing the criteria that were already built. Replaying a search does not create a new AI request.
Info
CVI_CLEARQUERY_REPLAYS controls which recent searches are offered. ALL shows recent searches from across the organization and is the default. USER shows only the signed-in user's own searches. DISABLED hides the suggestion cards entirely.
Rating a Result
The confirmation window includes a thumbs up and a thumbs down button. Rating results improves the suggestions offered to the whole organization: a search marked "This search was helpful" is favored in the recent searches list, and a search marked "This search was not helpful" is excluded from it.
Configuring ClearQuery
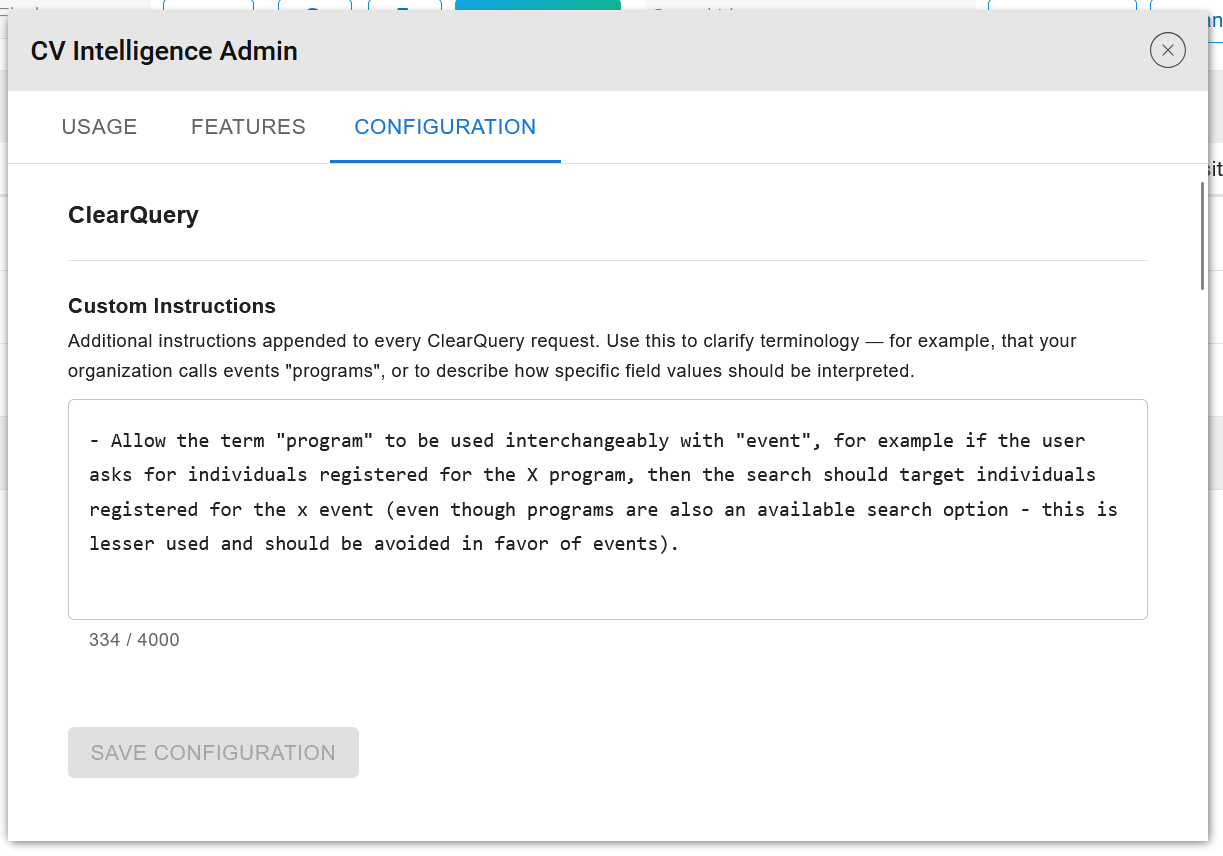
ClearQuery has no packet options, because the data it works from is the list's own search structure. It does accept custom instructions, which are added to every ClearQuery request. Use them to clarify terminology and how field values should be interpreted. For example:
Our organization calls events "programs" and refers to member organizations as "firms". The member type code "AFF" means affiliate, not affiliated chapter.
Example Use Cases
Simplifying list creation: A marketing coordinator needs individual members in Ohio and Michigan whose membership expires in the next 90 days and who have opted in to email. Typing that sentence into ClearQuery produces the query without hunting through the Power Query field list.
Exclusion lists: For a re-engagement campaign, staff can ask for active members who have not registered for an event in the last two years. ClearQuery applies the exclusion as NOT criteria, which staff can confirm in the criteria list before using the results.
Training new staff: New staff can use ClearQuery to build a query, then click "Refine in Power Search" to see how the same request is expressed in Power Query criteria, a practical way to learn the search tool. For more on Power Query, see the Quick Find & Power Query guide.
SmartCompose
SmartCompose generates two personalized email drafts for an individual, written for a purpose the staff member selects. Both drafts are fully editable, and either can be sent directly from the results window.
Generating Drafts
-
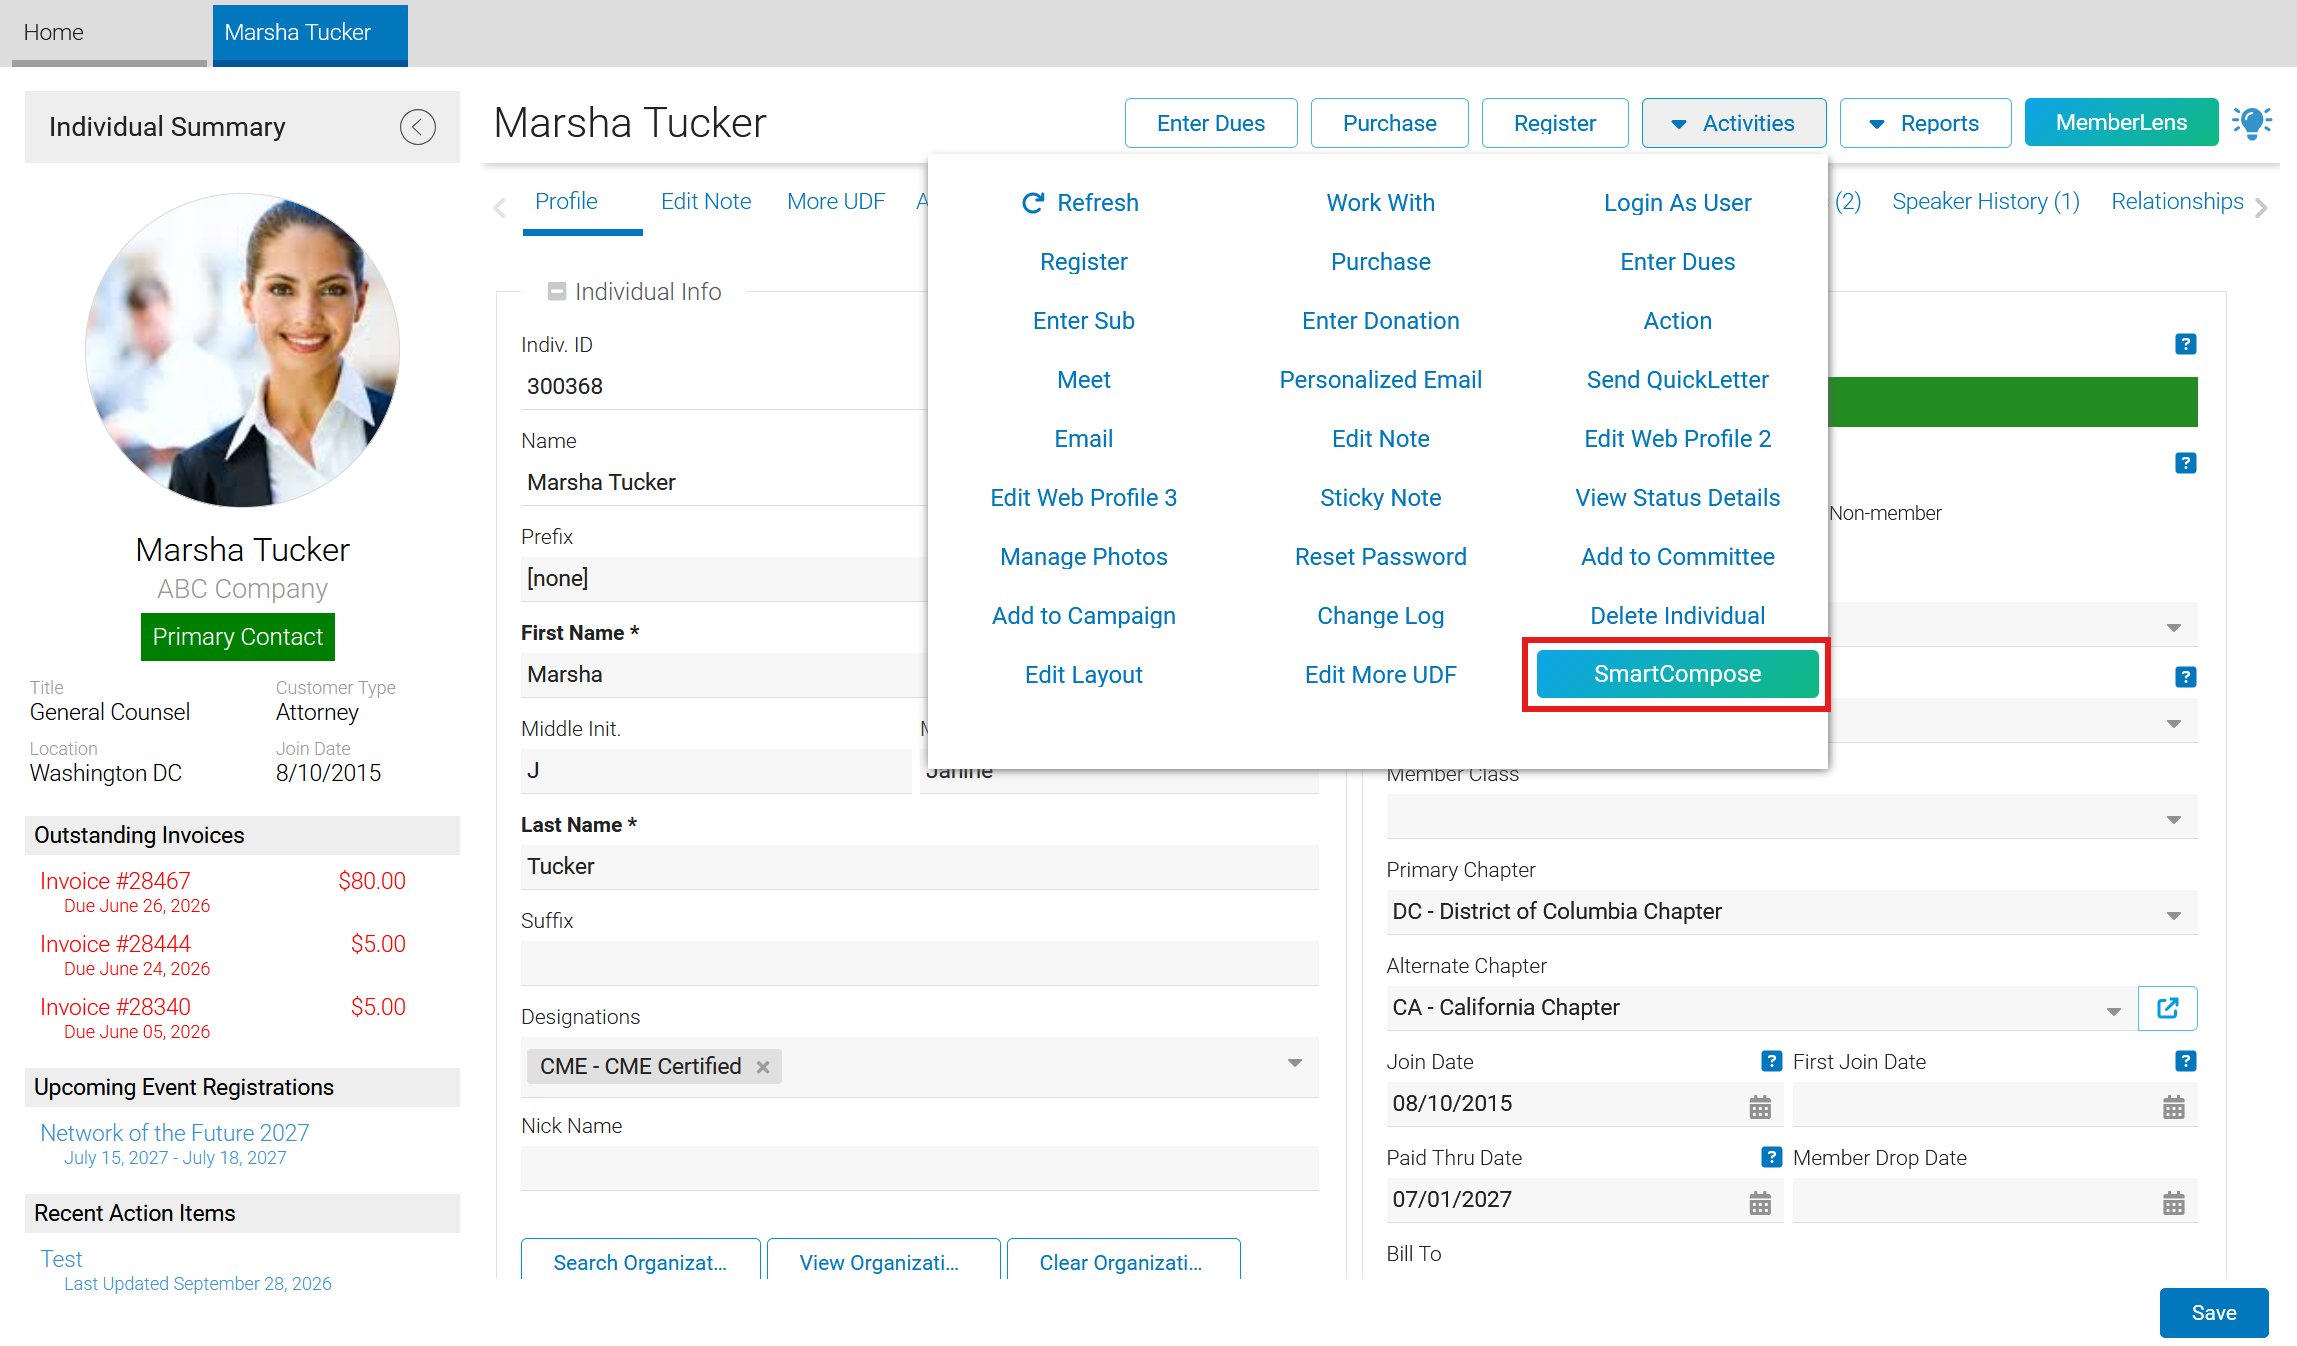
Open an Individual Notebook, click the "Activities" button, and select "SmartCompose".
Note
SmartCompose can also be launched from a MemberLens recommendation using its "Draft email" button, which pre-selects the matching purpose and carries the recommendation across as context.
-
Select the purpose of the message.
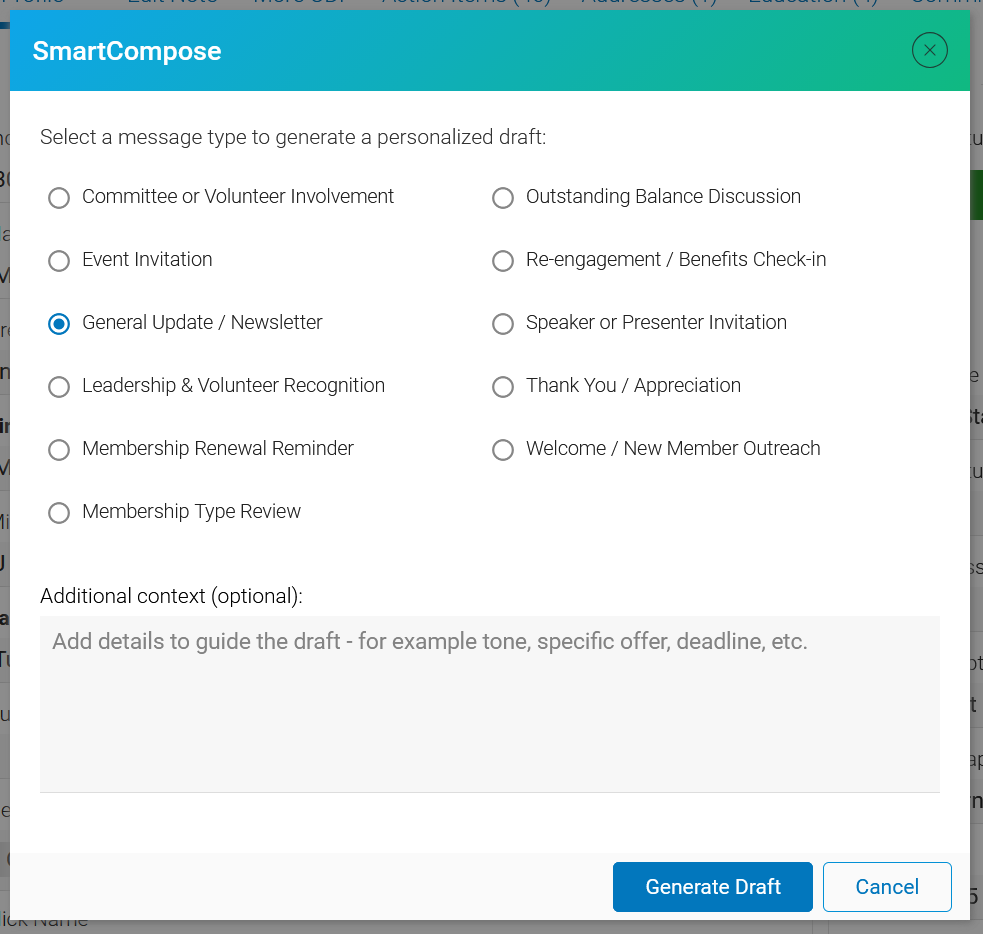
When "Event Invitation" is selected, an "Event" dropdown appears. Select the event the message should invite the member to.
-
Optionally, enter additional context to guide the draft, such as the desired tone, a specific offer, a deadline, or other relevant details.
-
Click "Generate Draft".
Working with the Drafts
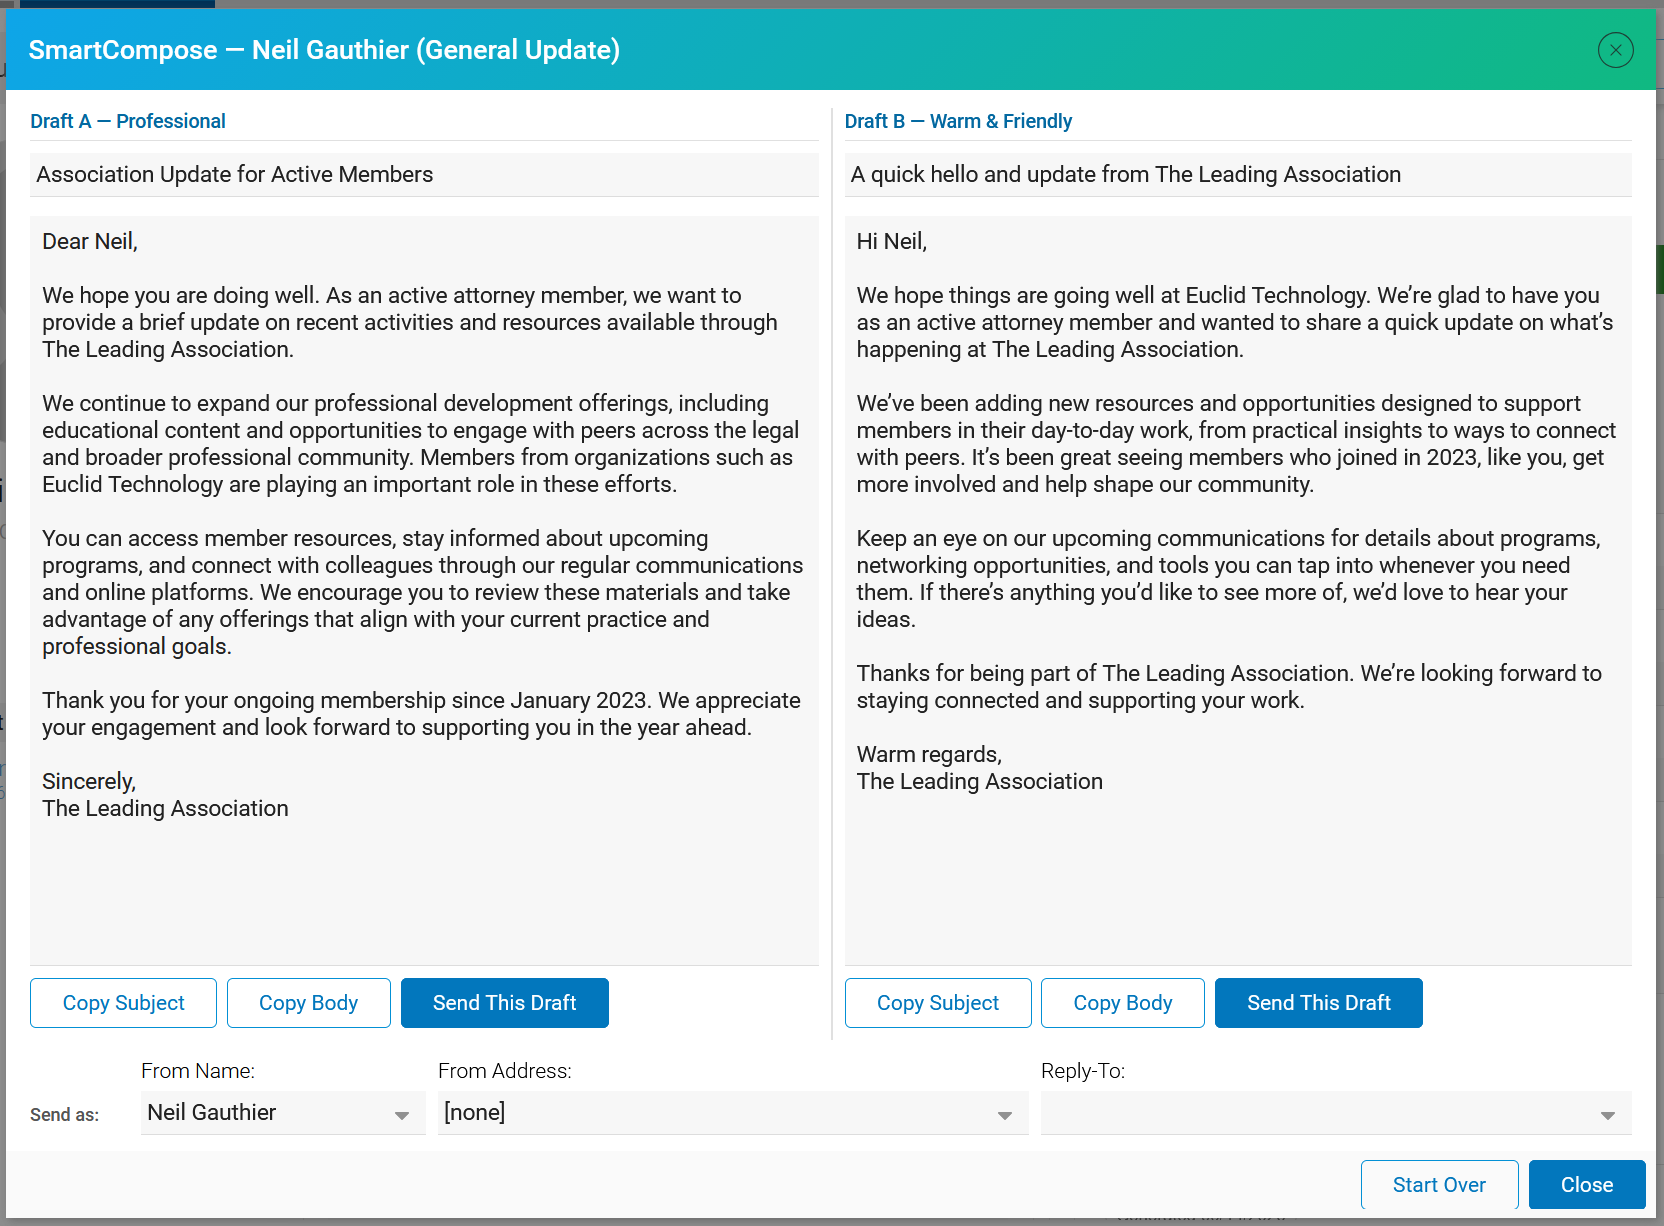
The results window displays two drafts side by side:
-
Draft A — Professional
-
Draft B — Warm & Friendly
Each draft has an editable subject line and body. Edit either draft directly in the window before copying or sending it.
Three actions are available per draft:
-
Copy Subject: Copies the subject line to the clipboard.
-
Copy Body: Copies the message body to the clipboard, for use in the Email Editor or another tool.
-
Send This Draft: Sends the draft to the individual through ClearVantage.
Before sending, complete the "Send as" fields at the bottom of the window:
-
From Name: The display name the message is sent from.
-
From Address: The address the message is sent from.
-
Reply-To: Optional. The address replies should be directed to.
Click "Start Over" to return to the purpose selection window and generate a different kind of message, or "Close" to dismiss the window.
Configuring SmartCompose
SmartCompose has no configuration block. Its drafts are shaped by the selected purpose, the additional context entered by staff, and the individual's own record.
The "SmartCompose" activity button can be relabeled or removed per role, in the same way as other individual notebook activities. For more information, see the Customizing Layouts guide.
Example Use Cases
Renewal outreach that does not read like a form letter: A membership coordinator working through a lapsed list selects "Membership Renewal Reminder", adds the context, offer the two-month grace period, and sends a personalized note referencing the member's committee service, in less time than what editing a template would take.
Thanking a volunteer: After a committee term ends, staff select "Thank You / Appreciation" and generate a note that names the member's actual contributions, then send it directly from the results window.
Speaker recruitment: A conference planner reviewing prior presenters selects the option "Speaker or Presenter Invitation", adds the session topic as context, and starts from a draft that already references the member's previous presentations.
CV Intelligence Admin
The CV Intelligence Admin screen is where administrators monitor usage, switch features on and off, and configure each feature.
From the main menu, click "CV | Euclid" and select "CV Intelligence Admin". The screen opens in a window with three tabs: "Usage", "Features", and "Configuration".
Usage Tab
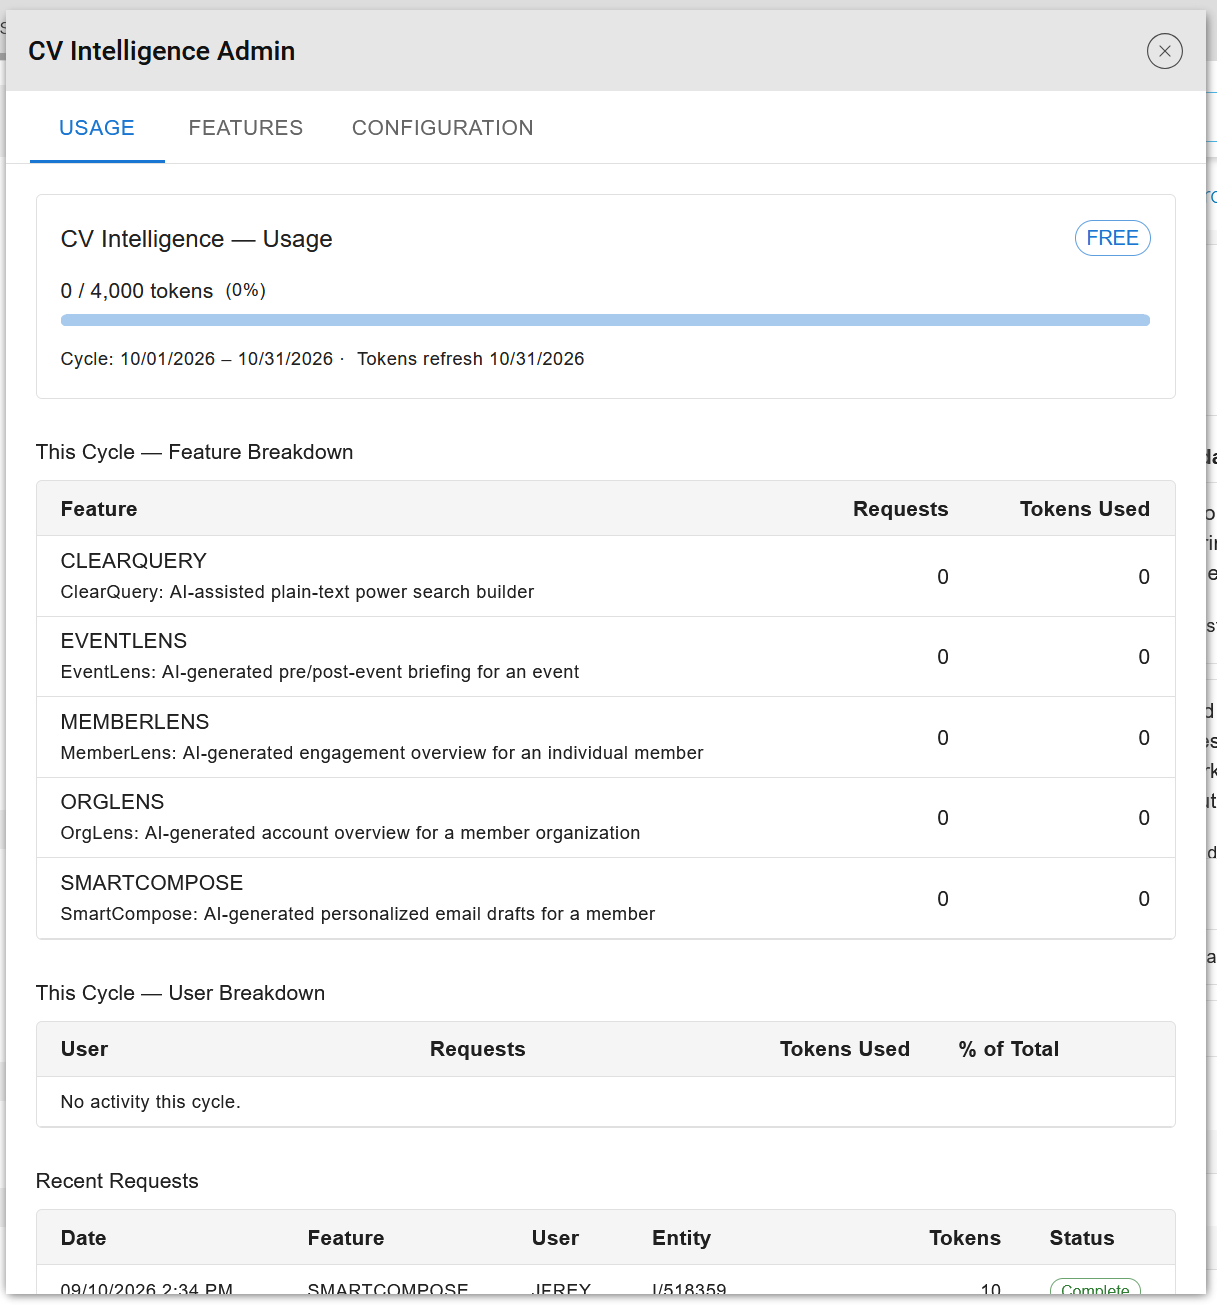
The "Usage" tab reports CV Intelligence consumption for the current cycle.
-
Usage summary: A progress bar showing consumption against the monthly allowance, with the cycle dates and the date the allowance refreshes. The bar changes color as the allowance is approached, and an overage banner appears if it is exceeded.
-
Feature Breakdown: Requests and consumption for each feature this cycle. Every available feature is listed, so switching a feature off does not remove its history.
-
User Breakdown: Requests and consumption per staff user, with each user's share of the cycle total.
-
Recent Requests: The most recent requests, with the date, feature, user, subject of the request, and status. Status values are Complete, Failed, and Pending.
Note
Requests made by Euclid staff, for example while investigating a support case, are excluded from every figure on this tab and do not count as consumption against the monthly allowance.
Features Tab
The "Features" tab is the organization's on/off control for each CV Intelligence feature. It answers, at a glance, what is currently active.
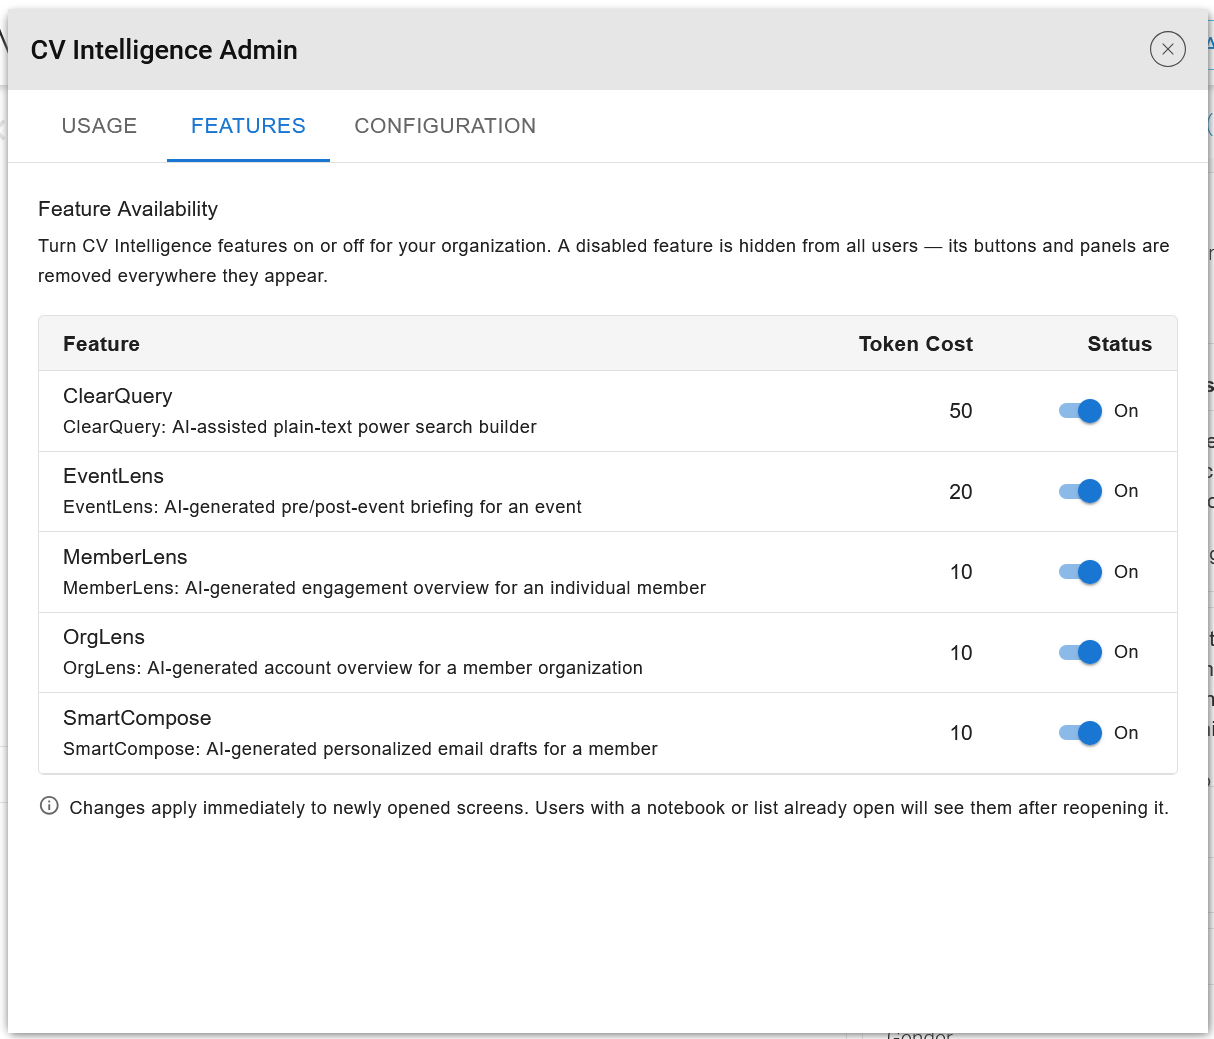
Each row displays a feature, its description, and a toggle. Disable a feature to hide it from all users. Its buttons, notebook fields, and panels are removed wherever they appear. Changes are saved immediately; no separate save step is required.
Note
Changes apply immediately to newly opened screens. Staff with a notebook or list already open will see the change after reopening it.
Switching a feature off does not affect its current configuration or usage history. A feature can be switched off and back on without losing its setup.
Configuration Tab
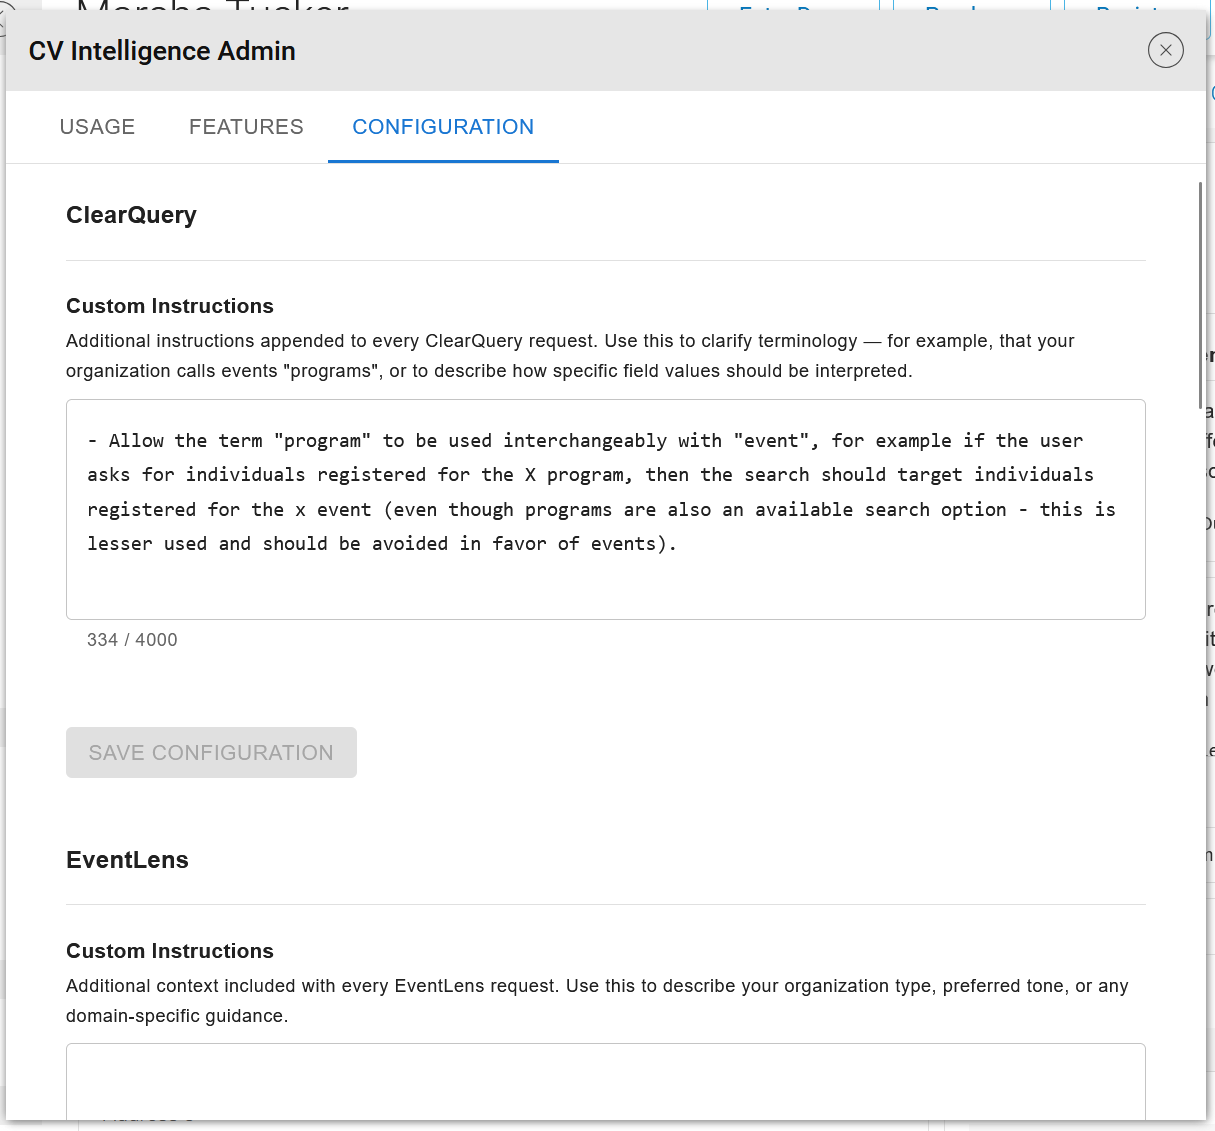
The "Configuration" tab contains a panel for each configurable feature: MemberLens, OrgLens, EventLens, and ClearQuery.
Note
SmartCompose does not support configuration and therefore does not appear on this tab.
Each panel provides:
-
Custom Instructions: Free text added to every request for that feature, up to 4,000 characters. A character count is displayed below the field.
-
Data Included in Packet: Checkboxes, and for EventLens one numeric field, controlling which sections of the subject's profile are sent with the request. The available options are listed under each feature earlier in this guide.
Click "Save Configuration" to apply changes. The button will be active when the configuration is updated.
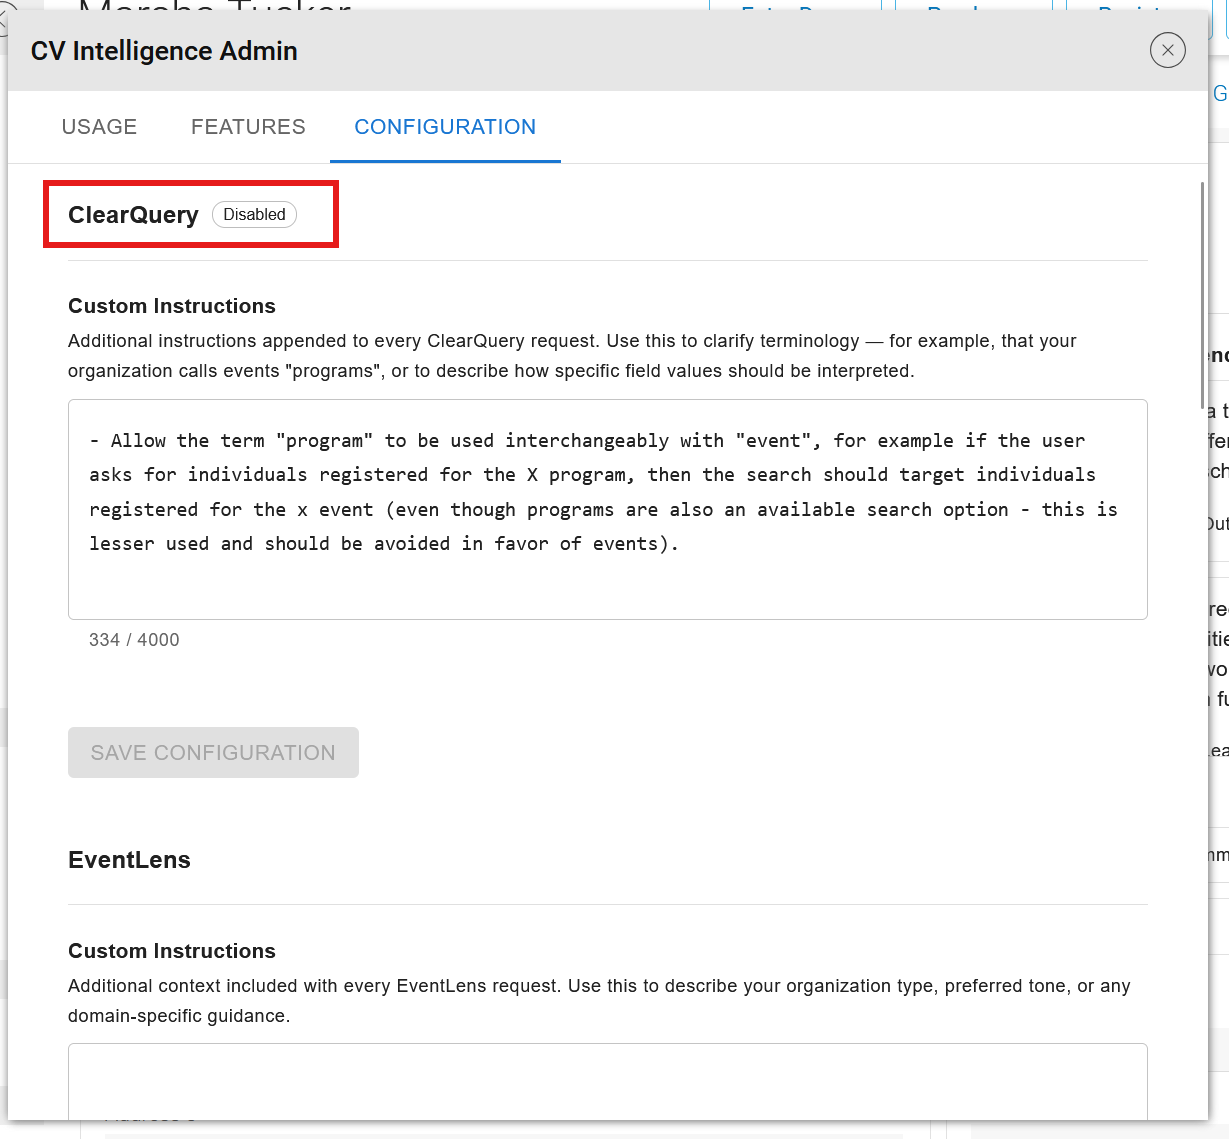
A panel for a feature currently switched off in the "Features" tab displays a "Disabled" chip beside its name. Configuration remains editable, so a feature can be set up before it is switched on.
Writing Effective Custom Instructions
Custom instructions are the primary way to tailor CV Intelligence to an organization without a code change. The most useful instructions do one of three things:
-
Establish context: State the kind of organization, its membership model, and who the members are.
This is a state medical society. Members are physicians and residents. Residents pay reduced dues and convert to full membership after training.
-
Correct terminology: Name the organization's own vocabulary and explain local codes.
Events are called "programs". Chapters are called "districts". The status code "LOA" means leave of absence, not lapsed.
-
Set priorities: Say what matters most, so that the recommendations generated lead with it.
Prioritize continuing education compliance and committee succession. Donation history is secondary for this organization.
Keep the following in mind:
-
Instructions apply to every request for that feature, for every staff member. Specifics about one member belong in the request itself, not here.
-
Instructions cannot add personal information to a data packet, and cannot override the data minimization policy described in Data Sent to the AI Service.
-
Text entered in a custom instructions field, or in any CV Intelligence prompt, is validated before it is used. HTML code and links are removed, and text resembling an attempt to override the system's instructions is rejected with a message asking for it to be rephrased.
Advanced Configuration
Warning
The capabilities in this section are customized per client. For more information, please contact your Euclid Support Analyst.
The data packet for MemberLens, OrgLens, and EventLens is assembled by configurable logic, which allows a Euclid Support Analyst to tailor a packet for an organization beyond what the packet options expose. Two levels of customization are available:
-
Append an additional section: Add information to the packet without modifying the standard sections. Examples include chapter memberships, certification status, and client-specific data sets.
-
Replace the packet entirely: Use a custom packet structure instead of the standard packet when the organization's data model differs substantially from the standard structure.
A customized packet can also contribute additional instructions to the AI request, so a new section arrives with guidance on how to interpret it.
The history windows used by the standard packets (membership history, event history, and transaction history) are also adjustable per organization through the same mechanism.
Troubleshooting
A CV Intelligence button is not visible: Confirm all three visibility layers described in Availability and Permissions: CV Intelligence is provisioned for the system, the specific feature is switched on in the "Features" tab, and the staff member holds the "CV Intelligence User" permission. Also confirm the work is being done in the production database, since CV Intelligence is hidden in training and test databases.
A feature was just switched on but staff cannot see it: Changes apply to newly opened screens. Ask staff to close and reopen the notebook or list.
A request reports that insufficient tokens remain: The organization's monthly allowance is exhausted. Review the "Usage" tab to see which features and users consumed it, and contact the Euclid Support Analyst to discuss options. The allowance refreshes at the start of the next cycle.
A request shows a status of Failed in the Usage tab: The AI service did not return a usable response. The consumption for a failed request is returned to the allowance. Generate the result again; if failures persist, contact the Euclid Support Analyst.
A request has been Pending for a long time: Close and reopen the panel to resume checking the result. If a request remains pending well beyond a minute, generate it again.
ClearQuery could not match the request to any criteria: The description did not correspond to fields available in that list's search structure. No usage is charged in this case. Rephrase with more specific field names, values, or time frames, and consider adding terminology guidance to the ClearQuery custom instructions.
A summary looks wrong or contradicts the record: Regenerate the summary to ensure it reflects the latest record data. If similar errors occur repeatedly, document the pattern, contact the Euclid Support Analyst, and review any applicable custom instructions or packet options.